How To Crochet: Broomstick Lace
By Robin Beers – 43 Comments| The broomstick lace stitch is a very pretty stitch that is made using both a crochet hook and a knitting needle. The concept is to loop your crocheted stitches onto a larger knitting needle, and then to gather them up in groups for a lacy effect. | 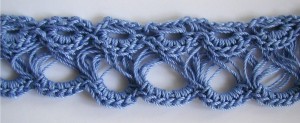 |
You can use a very large knitting needle for bigger loops and you can create different rows with different size stitches. The only stitch that you need to know is single crochet, can you believe it? For this tutorial, I used my favorite crochet thread in size 3 with a size C crochet hook and a size 17 knitting needle. The usual grouping of stitches is 4 to 6. Your initial chain will vary in length depending on how many groups of stitches you want to make. In this example, I am going to make 4 groups of 5 stitches so I will chain 20.Â
Note: If you are left handed, just put your mouse over the photo for a left-handed view. Not all the photos require a left-handed version.
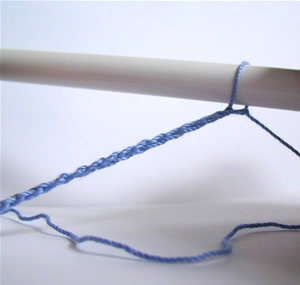
Chain 20. Then make a loop over your knitting needle.
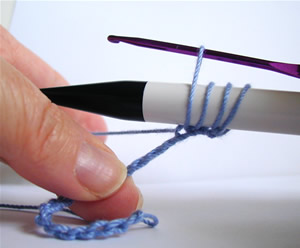
Insert crochet hook into each chain, yarn over and bring the loop up onto the knitting needle.
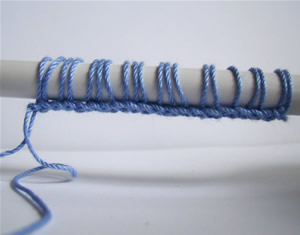
You should now have 20 loops on your knitting needle.
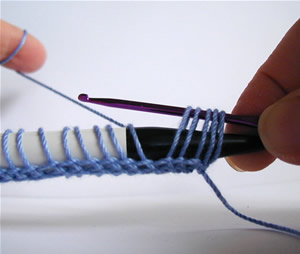
In groups of 5, gather the stitches off the knitting needle.
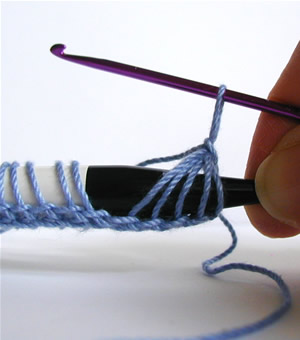
 Now begin to draw up your working yarn and chain 1 to close the group.
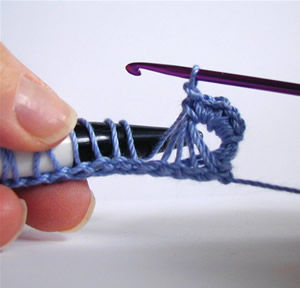
Now make 5 single crochets in the space for the gathered stitches. Note: you are making one single crochet for each stitch in the group. (in this case we have 5 in each group)
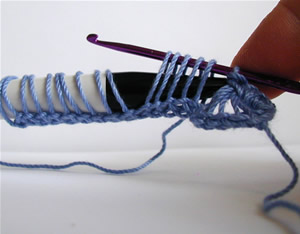
Continue across row gathering 5 stitches,
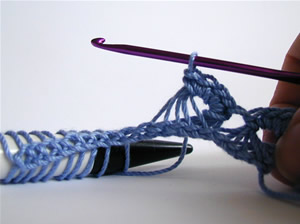
and making 5 single crochets in each group.
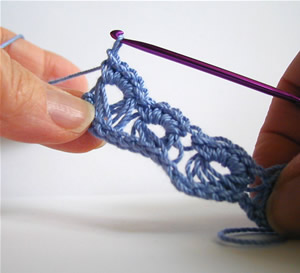
Now 4 groups of 5 stitches made. This is your first row.
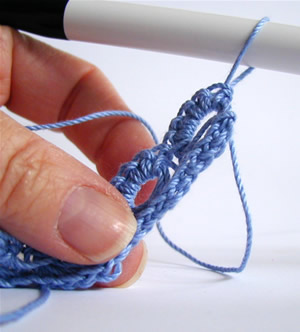
Hook a loop onto your knitting needle at the working end of your row.
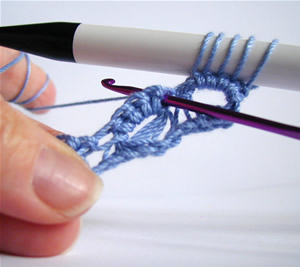
Working across row, insert crochet hook into each single crochet, yarn over and bring the loop up onto the knitting needle.
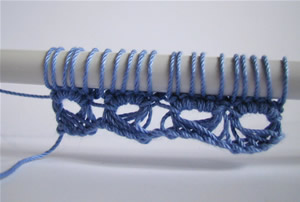
You should now have 20 loops on the knitting needle.
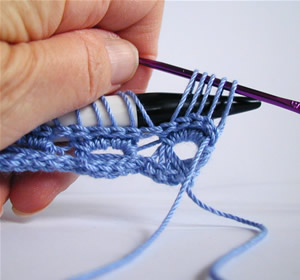
Begin gathering 5 stitches at a time onto your crochet hook.
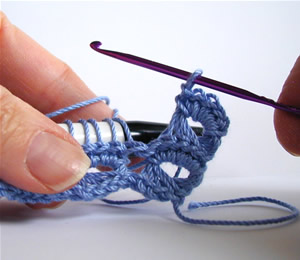
Make 5 single crochets in each group across as you did in row 1.
Continue across and make as many rows as you like. As I said before, you can change the size of your knitting needle for each row if you want. This will result in rows of different group lengths. As always, if you have any questions, don’t hesitate to ask. I am happy to help.


Thanks for the tutorial, Robin!!!! Love the stitch! 😀
This is so beautiful, will try it!!!
nice but where and on what can i use this broomstick lace?
Marinahunny – you can use this stitch for a lacy scarf, just keep repeating the rows. Or you can make a bracelet or even fingerless gloves. Maybe even a table runner for your dining room table. I have made bracelets and gloves using this stitch. 🙂
I started a queen size spread/cover (whatever you want to call it) and crocheted about 3 ft before I got bored and put it away. Did this about 30 years ago when my youngest was little! I still have it but had forgotten how to work it. So glad to find this tutorial…maybe I’ll get busy and finish it?
OH! I wanna try gloves from that stitch! Thanks so much Robin! 🙂
Oh my goodness! I’ve been studying a vintage afghan that was passed down to my mom from my great aunt wondering what the stitch pattern was. Now I know. Thanks so Much!
Thanks very much
Hey! LOVE the st Used it MANY years ago – ha! Love the vintage sts! Can you please tell me how you “did” the sample at the top of the page. I think the smaller row of sts was just done with a smaller knitting needle, but how did you “layer” the two groups of the different sizes.
HI Tamica!
Yes, the one at the top of the page is starting with the smaller knitting needle and then just as I show you in the tutorial, you go on to the next row but instead use a larger knitting needle. Then you get the larger loops!
Great – that’s a “start”. . . . . It “looks” like the larger one’s are “under” the smaller one’s. Is that due to letting the 2nd (smaller) row “drop” down on top of the larger loops, then turn work around to sc facing downward? Just guessing here…..
Or do you turn the work around to do the smaller loops facing downward, then work them off so the sc’s are facing with right sides showing?
Thanks so much for the help. They’re beautiful! I did these “many” years ago, (decades actually!! In the 70’s! It’s good to see them make a comeback!)
Sleepless in Seattle!
Tamica – There’s nothing complicated about the different size loops – just do the first row with the smaller knitting needle and then do the second row with the larger one. It turns out just like the photo at the top of the page! Just follow the tutorial and when it comes time to do the second row when you draw the loops onto the knitting needle, pick up a large one – like a size 50 and you’ll be good to go.
🙂
I really would love to see a video of this, it would make it so easy for me to understand. What a gorgeous stitch, thank you for sharing it!
Do you have any pattrens for the brromstick lace and the loop? I would to try those out on a patteren!
Thank you
Charity
I think it would be nice for a border and things like that, but it is just to beautiful for just a border.
Charity, I don’t have any patterns as of yet. But keep checking back!
I just signed in to your site for the mile a minute patter instruction and I have not recived any thing from you yet? Please try to send me the e-mail patteren my fri4ends sister who live up north cannot find it so I thought you could helpus? It is called EASY MINLE A MINUT CROCHET INSTRUCTIONS they are made in strips. Thank-You
Hi Judy,
Sorry we don’t have those instructions on this site.
Reply to Charity – there are lots of patterns on the Internet. Just do a search on “Broomstick Lace Patterns.” Plus the tips Robin said.
thanks so much for this!
[…] a fashionable scarf, or any way you desire. As the name implies, this wrap is crocheted using the broomstick lace technique. This pattern is great for practicing and learning broomstick lace. Prior experience with […]
[…] Your Craft: Finishing the Project How to Read Crochet Patterns How to Crochet – Basics How to Crochet: Broomstick Lace Different Ways to Crochet in the […]
thank you SO much!! i have really wanted to know how to do this. it looks really hard but once i read it, it sounds pretty easy 🙂
Ooo I love crochet… now i know how to do it…. thanks alot 🙂
I have just found your page and thought you might be interested. I have been doing this crochet on an actual broostick about 24 ins long for years. I have never thought of using a large knitting needles. I feel it is more authentic done my way. I practice many old crafts and try to be as true as possible for demonstration purposes.
Wow! That is very interesting. What do you make with the broomstick lace?
Hi Robin, you can make almost anything, from clothing, to scarves, to blankets! If you’re looking for a pattern, feel free to search for “Broomstick” in the search box at the top of the page and a few should pop up for you.
I have seen baby blankets made with this stitch also. My first encounter with this stitch was almost 40yrs ago.
Hi
your broomstick lace is great.What can I use it for?
Thanks a lot
You can use it for anything that you want a lacy texture for. You can make clothing, blankets, even dishcloths. Have fun with it!
Love Broomstick but how do you end it? And can you increase and decrease for making cloths?
Hi Debbie, you would end it the same way you would end your regular crochet work. You can also increase by adding more stitches to a stitch on the previous row, and decrease by pulling more stitches together.
Boy, Rachel! This brought back memories!
I used broomstick lace to make an afghan for my mom around 1977/1979. My wife and I were just married and her mom was a great knitter, crochet-er, tatter, seamstress and I enjoyed watching her work so much that I wanted to give it a try myself.
I don’t remember exactly when I began the afghan but I was making it for her as a Christmas present. (This was my first experience with crochet. I had done a little embroidery when I was single.) I worked away and decided, around Halloween I’d better concentrate on my project but, being just married and all…well, at Thanksgiving time I KNEW I had to get busy. I worked and worked and, for Christmas, I gave my mom a box, half wrapped because it contained half an afghan. I DID finish it and she loved it.
An interesting point. I don’t remember the brand of yarn I used but the color was denim and very close to the color in your tutorial. Like I said…memories.
My sister now has the afghan and it is still just as warm as it was 30 + years ago.
A week ago I took my first knitting lesson. Being semi-retired and working only 2 days a week gives me time for new adventures in learning. (The lesson was a Christmas gift from my sister.)
My wife still works full time but her interests are in places other than working with fiber. She enjoys genealogy primarily and is looking forward to having more time to pursue that. I’m looking forward to scarves, sweaters, afghans, hats etc….etc…
THANK YOU for the left-handed alternative photographs. I’ve not seen that done before and it’s absolutely brilliant – SO helpful! 🙂
Rachel,
I have just reintroduced myself to broomstich crochet having done it in a single colour many years ago. I am now doing a knee rug and would like to know the correct way to introduce a different colour to the rug. All tutorials I have seen tell one how to do the stitch but not how or where to join in another colour. I hope you are able to help me. Looking forward to hearing from you.
Coral
Hi Coral, you can change colors similar to the way you would change colors in other stitches, such as single crochet, chain stitch, etc. Here’s a general tutorial (but you can use the same idea to change colors in broomstick lace): How to Change Colors in Crochet
You can join in the new color at just about any point you want the new color to be, whether it’s while you’re pull up loops in the forward pass or doing the single crochet in backward pass.
All the tutorials I see for this beautiful stitch only show how to do 4-5 complete stitches, only wide enough for a scarf. How do you make a whole afghan?
Hi Rachel,
Thankyou so much for including a left handed view.
Do you have any ideas about a conversion chart for
Hook/ needle/ yarn?
For Australian sizes.
Kind regards,
Julie Bird.
Hi Robin, I was working on an afghan using the broomstick stitch. After about 6 rows it started going outward, on the left side, like I picked up some extra stitches. My friend that taught me said the stitches were fine and it was probably a tension issue. So, I started over, keeping my tension consistent. Now I’m 4 rows in and it looks like it might be happening again. Any ideas on what I’m doing wrong??
Hi Sharon! Try to double check your stitch count after you do the row. You can count the stitches and make sure that it’s the correct amount. If it’s the correct amount, you can rule out accidentally adding stitches.
Hi Rachel,
Yes, I always count my stitches before I start to cast off so that’s not it. Ugh!! Thanks for the suggestion.
The slight widening in the loops row is natural…its the nature of the stitch and mostly unavoidable. I had this issue last year on my afghan project and ripped out 14 times before realizing this. Try changing your approach. Instead of working a 4-sided shape and turning to go back and forth, I changed my pattern to in-the-round, working from the right-side only. When my circle got big enough I started working the ‘corner’ areas and reducing out. Then I finished with a dozen rounds of border in a more standard stitch to square it up. I only have the pattern written out for personal use but I hope this helps you out! 🙂
I have done this over 40 years making blankets & baby clothes. Never thought to change knitting needle for different sizes. Going to do crocheting my next Special Olympics scarf.