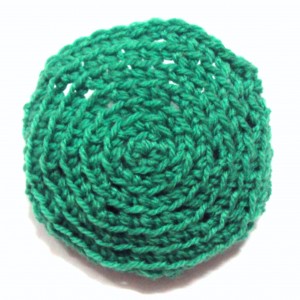
Crochet Pattern: Vortex Tawashi
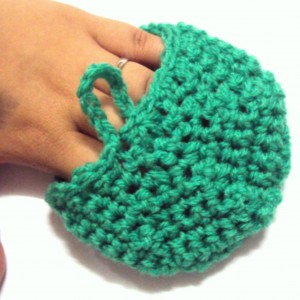
By Claire Ortega-Reyes – 14 Comments| Just can’t get enough of tawashis? I know the feeling all too well. Here’s a tawashi with elements I love: texture, one-piece construction, and spiral work. Another feature I love in tawashis? Practicality. This tawashi makes chores a little easier on your hands, with a pocket-like construction–no need to concentrate on your grip while cleaning! |  |
 |
Texture is made by making stitches in the back loops only (blo) of stitches. The front is worked in a spiral, and the project continues back and forth in rows for the back, to make the pocket. A few chains are made for the loop, and a simple slip stitch border wraps up this handy project. Made with medium weight yarn and size H hook, this project works up fast. |
| Skill Level: |
Finished Size: 4.5″ across
| Materials: Medium Weight Yarn (small amount) Crochet Hook H (5.00 mm) Optional: Stitch Marker |
Gauge: 8 sc stitches x 8 sc rows = 2″
Need help understanding the abbreviations and symbols? Check out the crochet abbreviation chart!
Crochet Pattern: Vortex Tawashi
Pattern Notes: The optional stitch marker is placed at the last stitch of each round. Doing this is particularly helpful for those unused to working spiral rounds. For those who prefer not to use stitch markers, please make sure to count your stitches at the end of each round to make sure you’re on the right track.
Front: All stitches from round 2 onwards are made in back loops only (blo).
Round 1: make an adjustable magic ring, ch 1, 6 sc in ring, place marker: 6 sc
Round 2: 2 sc in each sc round: 12 sc
Round 3: (sc in next sc, 2 sc in next sc) 6 times: 18 sc
Round 4: (sc in next 2 sc, 2 sc in next sc) 6 times: 24 sc
Round 5: (sc in next 3 sc, 2 sc in next sc) 6 times: 30 sc
Round 6: (sc in next 4 sc, 2 sc in next sc) 6 times: 36 sc
Round 7: (sc in next 5 sts, 2 sc in next st) 6 times: 42 sc
Back: Work now proceeds in rows, and with stitches made under both loops.
Row 1: sl st in next sc, turn, sc in next 28 sc, sl st in next sc, turn: 28 sc
Row 2: ch 1, (sc in next 5 sc, sc2tog) 4 times, turn: 24 sc
Row 3: ch 1, (sc in next 4 sc, sc2tog) 4 times, turn: 20 sc
Row 4: ch 1, (sc in next 3 sc, sc2tog) 4 times, turn: 16 sc
Row 5: ch 1, (sc in next 2 sc, sc2tog) 4 times, turn: 12 sc
Row 6: ch 1, (sc in next st, sc2tog) 4 times, turn: 8 sc
Row 7: ch 1, sc2tog 4 times, turn: 4 sc
Row 8: ch 1, sc4tog: 1 sc
Loop and Edging:
Ch 10, sl st in each row and sc around. Finish off and weave in ends.
Enjoy your new tawashi! If you need anything, just leave a comment below and I’ll get back to you as soon as I can. Happy crocheting!


As soon as read this post I could not wait,so I have already followed your pattern with much success.Thank you very much.
cute, but what do you use it for? washing dishes?
That’s great! You can also use it doubled up for extra strength jobs. I’m totally making some tonight!
This would be a great project to do with all those pesky plastic garbage bags collecting in my pantry…LOL! I know you have something somwhere on your website, Rachel, that gives instructions for making “plarn.” Sounds like a great weekend project to do some stocking stuffers and/or hostess gifts. Thanks! 🙂
Um…what is a Tawashi?
First of all, thank you for the pattern and clear instructions. I’m a complete newbie (have never done magic circle nor decrease stitch nor spiral round), and it’s saying something about the quality your instructions that I could actually follow along and finish as far as I did 🙂
I got lost at the end “loop and edging”, though. I chained 10 but am not sure what slip stitch into each row meant, or where to do the last single crochet around?
Sorry to be a bother, but sincerely hope you can help.
Thanks again for the wonderful pattern!
Hello Lilian, thanks for the kind words! The loop and edging part is clearly seen in the second image (http://www.crochetspot.com/wp-content/uploads/2011/06/Vortex-Tawashi-2-300×300.jpg). We make 10 ch, and work slip stitches around the tawashi, thus making a border. We work into the side edges of the back, and the sc stitches of the front, and back to the side edge of the back. Hope that helps!
Hello,
Which side is which? The side that is facing me as I crochet has a lovely spiral pattern (as shown on the first photo), but when I turn it over I get the standard sc stitches view (as shown in your second photo). Which side is used for scrubbing?
LOVE!! Saw this pattern and immediately picked up some ombre yarn leftover from a coffee cup cozy-didn’t even finish the ball-and now I have another cool, coordinated item for the gift-originally just the coffee cup.
I just made one in Lily Sugar’nCream “Scrubby” yarn. I had no idea that someone made yarn just for scrubby making, lol 🙂
what do you use this for? the face?
Is there a Vortex Tawsashi video
I need to see how to make it….
Hi Sandy! Sorry we don’t have a video, but if you need help reading the crochet pattern I’m happy to help. Just let me know exact where you are getting stuck and I can try and explain the instructions to you.
Thank you….