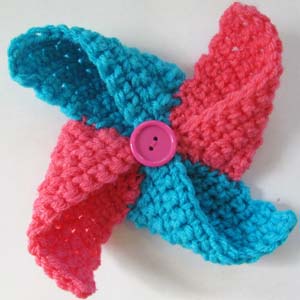
Crochet Pattern: Pinwheel
By Emilee Gettle – 14 Comments| Now that we have some breezy warm afternoons upon us I’m sure you’ve been finding pinwheels at the local dollar shops. Kids can’t resist them. Oftentimes we see them for party decor or even replicated with fabric for quilt blocks. This week I decided to try crocheting a pinwheel and this pattern is what resulted. You can use this project to spruce up throw pillows and other home accessories. Make it out of finer yarn and it makes great appliques, pins, or hair accessories. I used two colors for this pattern but you can easily make each blade out of a different color. |  |
| Skill Level: |  |
Finished Size: 4″ (10 cm) long and 4″ (10 cm) wide
|
Materials: Pink Medium Worsted Weight Yarn (approximately 50 yards) Turquoise Medium Worsted Weight Yarn (approximately 50 yards) Crochet Hook H (5 mm) 1″ (3 cm) Button Straight Pins Yarn Needle Sewing Needle Sewing Thread |
|
Gauge:
3 sc stitches = 1 inch
3 sc rows = 1 inch
Need help understanding the crochet abbreviations and symbols? Check out the crochet abbreviation chart.
Crochet Pattern: Pinwheel (Make 2 Pink and 2 Blue)
Row 1: ch 3, sc in second ch from hook, 2 sc in next ch, ch 1, turn: 3 sc
Row 2: 2 sc in first st, 1 sc in next st, 2 sc in last st, ch 1, turn: 5 sc
Row 3: sc in each sc across, ch 1, turn: 5 sc
Row 4: 2 sc in first st, sc in each st across, 2 sc in last st, ch 1, turn: 7 sc
Row 5: sc in each sc across, ch 1, turn: 7 sc
Row 6: 2 sc in first st, sc in each st across, 2 sc in last st, ch 1, turn: 9 sc
Row 7: sc in each sc across, ch 1, turn: 9 sc
Row 8: 2 sc in first st, sc in each st across, 2 sc in last st, ch 1, turn: 11 sc
Row 9: sc in each sc across, ch 1, turn: 11 sc
Row 10: 2 sc in first st, sc in each st across, 2 sc in last st, ch 1, turn: 13 sc
Row 11-12: sc in each sc across, ch 1, turn: 13 sc
Finish off.
Assembly
First of all, we are going to create the “fan blades†of the pinwheel. I like to use straight pins to pin the triangles in place for easy stitching. With the triangle pointing upwards, fold the left corner of the triangle to the top point of the triangle. Pin in place and repeat with the remaining three triangles.
Now stitch along the left side of the blade catching both layers to secure the blades.
Using yarn and needle sew a pink blade to a blue blade. The blue blade will have the double layered edge and the pink blade will have a straight, single layer edge.
Now sew both halves of the pinwheel together and finish off by sewing a button in the center.
Got a question? Need help with this project? Jot your comments below and I’ll get back with you!


Cute. I think if you didn’t sew down the blades…but put button holes at the tips of the folding part, this could potentially unfold into a washcloth. That would be a great accent in a gift set!
This is so cute! I hope I’ll get a chance to tried making this, beautiful!
Very nice! I haven’t visited Crochet Spot in a while. Is the pattern by Emilee or Claire? Facebook has Claire, but here it says Emilee. Happy Mothers Day to all the mothers!
Whoops, that’s my mistake on facebook! This awesome pattern is by Emilee 🙂
Very cute…..just what I need to add to the front of a little girls purse
that I’m making.
Thanks
I like pinwheels! This is cute and summery. I am not sure how I want to use it……maybe a summer garland?
This is adorable and would be lovely instead of a bow on a gift!
LOVE that idea!
Hi there! This project is reaaaalllly cute 🙂 question, I’m a newbie to crocheting… I need help understanding… Row 1: ch 3, sc in second ch from hook, 2 sc in next ch, ch 1, turn: 3 sc..what does 3 sc mean?:( it doesn’t tell me where to go.. Do I just go into the main hole I went in?o_O
Also, what does it mean by…sc in stitch? N
Hi. It means to start the row with 3 chains. Then insert your hook in the 2nd chain you created. Then do one single crochet. Then make two single crochet in the last chain. The (3sc) at the end of the row instructions is there just to tell you how many stitches you should have by the time you end the row. I hope that helps!
Do you have alink for this pattern in PDF so I can put it in my Nook?
This pattern looks neat and easy–I never would have thought of that, but it’s so simple! I’ll have to try it!
I was wondering if your pinwheel will actually turn when put on a stick and if so how do you do that?
Hi,
I love this pinwheel and would like to make it into a bunting for my granddaughters nursery. Any thoughts on how to string them so they keep their shape and drape nicely.
Love your art. Thanks,
Bonnie