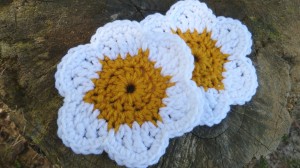
Crochet Pattern: Daisy Coaster
By Amy Yarbrough – 12 Comments| Make these for the little girl in your life with the love of floral, or use them to adorn a table on your veranda or anywhere else. Flowers are excellent accessories in the summer months as they remind you of the beautiful life growing and blooming all around us. |  |
| Skill Level: |  |
Finished Size: 5″ (12.5 cm) in diameter
| Materials: Worsted Weight Yarn (approximately 6 yards of color A and 12 yards of color B) Crochet Hook I (5.50 mm) |
Gauge:
Rounds 1 – 2 in pattern measure 1″ (2.5 cm) in radius
Need help understanding the abbreviations and symbols? Check out the crochet abbreviation chart.
Crochet Pattern: Daisy Coaster
Round 1: with color A, make adjustable double ring (but loop over finger loosely 4 more times), ch 3 (counts as 1 dc), 11 dc in ring, sl st in top of beginning ch-3: 12 dc
Round 2: ch 2 (counts as 1 hdc), hdc in same st, 2 hdc in each dc around, join color B with sl st in top of beginning ch-2: 24 hdc
Round 3: ch 1, *(dc, tr) in next st, dtr in next st, (tr, dc) in next st, sl st in next st, repeat from * around, make the last sl st in beginning ch-1: 36 sts
Round 4: ch 1, *sc in next st, 2 sc in each of next 3 sts, sc in next st, sl st in next st, repeat from * around, make the last sl st in beginning ch-1: 54 sts
Finish off.
If you run into any problems, just leave me note in the comments below and I’ll get back to you!


your pattern is very cute , thank you again
you come up with such pretty & cute ideas, I like it very much. Thanks for sharing!
Thanks so much! I am glad you guys like them.
Thank you for the pattern. I’m a beginner but I made a set of 4 in an afternoon without major problems. For other beginners though one caution–be sure you make your slip stitches in the right place or there won’t be the right amt of space for each petal!
Don’t understand how to start this pattern…(LOPPS ON FINGERS)..HELP!!
Go to this link: http://www.crochetspot.com/how-to-crochet-adjustable-double-ring/
It gives the instructions for the double adjustable ring but loop over fingers 4 more times than Candace instructs to achieve the proper thickness for this pattern.
Amy
So cute! Your posts are ever inspiring!
this I really like it is very hard pattern but it is something that very attractive as a gift for a grandmother or your mother to receive
Hi! I love this pattern, thank you for sharing it!
I’m just a bit confused. I’m not sure why the adjustable ring plus four more loops is needed to make the center piece. Since the four extra loops is a special stitch beyond the adjustable ring instructions, a few photos of how the four loops work might be helpful. 🙂
Hi Lori,
I’m so pleased you like my pattern!
The instructions say to wrap the yarn over your finger an extra four times the same way you would to make an adjustable ring. In doing this you create a thicker center which simply adds to the chunky look of the coaster.
Does this help?
Amy
Ah okay, yes that does make sense; it’s the same as the single adjustable ring, it just creates a thicker center. I will have to give this a try. Thank you for the clarification! Have a happy 4th! 🙂
You’re very welcome, LoriD!