How to Make a Crocheted Granny Square into a Granny Rectangle
By Caissa "Cami" McClinton – 23 CommentsThe inspiration for this week’s tutorial happened at my weekly crafts group meeting. A new friend of mine, Barbara, is an experienced knitter but recently learned to crochet. She told me that she is working on a continual granny square blanket, which would end up being one big square. She said she would like to make it into a rectangle without adding more squares to the end. I told her that it could be done and then figured out this pattern.
For the purpose of practicing this skill, we’ll make a small rectangular swatch. Yarn and hook size don’t matter for this practice swatch.
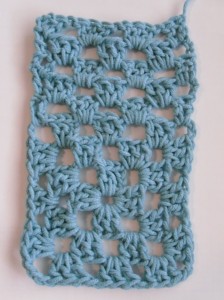
This is what your swatch will look like if you use only one color.
You may mouse over images for left-handed views.
Abbreviations:
ch – chain
dc – double crochet
Foundation: Make a 3-round granny square using the following pattern.
Crochet Pattern: Granny Square
Foundation: ch 4, sl st in forth ch from hook forming a loop
Round 1: ch 3 (counts as 1 dc now and throughout), 2 dc in loop, ch 3, (3 dc in loop, ch 3) 3 times, sl st in top of beginning ch-3: 4 ch-spaces
Round 2: sl st in next 2 dc, sl st in next ch-3 space, ch 3, do not turn, 2 dc in same ch-3 space, ch 3, 3 dc in same ch-3 space, ch 1, *(3 dc, ch 3, 3 dc) in next ch-3 space, ch 1, repeat from * 2 more times, sl st in top of beginning ch-3: 8 ch-spaces
Round 3: sl st in next 2 dc, sl st in next ch-3 space, ch 3, do not turn, 2 dc in same ch-3 space, ch 3, 3 dc in same ch-3 space, ch 1, *3 dc in next ch-1 space, ch 1, (3 dc, ch 3, 3 dc) in next ch-3 space, ch 1, repeat from * 2 more times, sl st in top of beginning ch-3: 12 ch-spaces
Fasten off and then join yarn in middle ch of any corner.
The photo below shows this done.
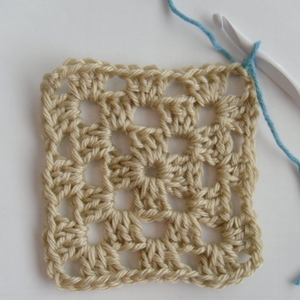
Row 1: ch 3 (counts as 1 dc now and throughout the pattern), dc in same ch-3 space, ch 1, (3 dc in next ch-1 space, ch 1) 2 times
The photo below shows this in progress.
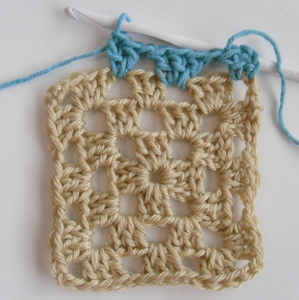
dc in first ch of next ch-3 space, dc in ch-3 space: 3 ch-spaces
Row 2: ch 4 (counts as 1 dc and 1 ch), turn
The photo below shows this done.
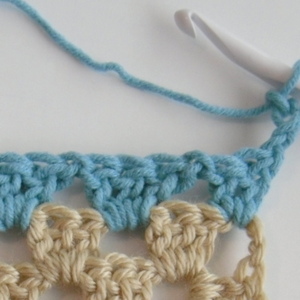
(3 dc in next ch-1 space, ch 1) 3 times, skip next dc, dc in top of ch-3: 4 ch-spaces
The photo below shows this done.
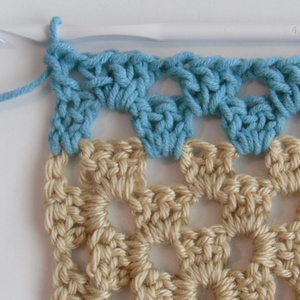
Row 3: ch 3, turn, dc into next ch-1 space, ch 1, (3 dc in next ch-1 space, ch 1) 2 times
The photo below shows this in progress
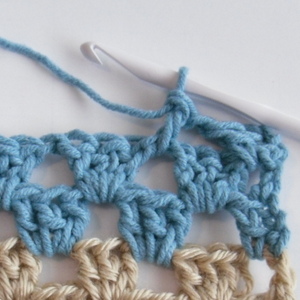
dc in next ch-1 space, dc in top of ch-3: 3 ch-spaces
The photo below shows this in progress.
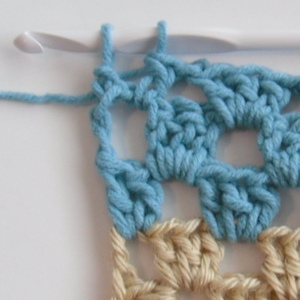
Repeat rows 2 & 3 until desired length.
If you have worked with granny squares before, I think this is a pretty easy technique to pick up. You could certainly do the same thing on the other side of your granny square as well. When you think about adding borders and changing colors, the design possibilities are endless!
If you have any questions, need any help, or even just want to say hello, please leave a comment below!


Thank you so much!!! I was going to make a red, white and blue neverending granny square afghan, but my husband didn’t want a square! (I ended up creating a new pattern for the Red, White and Blue Ripple Afghan). I can’t wait to try your technique!!!!
This may be a stupid question, but how do you calculate the measurements of the starting rectangle to achieve the final desired size.
Did you ever get this figured out? I want to make a poncho using 2 rectangular granny square but can’t figure out how to get the width I need with the length I need.
I have a couple of patterns for a granny square rectangle wherein you start with a rectangle from the start not building onto a square start. Found them on the internet over the years.
I always look forward to reading what you share about crocheting. This rectangle granny square is something I have wanted to use to make a shawl. I have always loved the granny squares patterns.
Thank you for your time and experienced advice.
I hope you enjoy good health and a happy family life. ;0
You have saved me with thisgranny rectangle pattern!! there seems to be no end of shapes you can make with a granny square starter: round, square, oblong,star, triangle and any number of corners you can add for some really unique shapes.(try putting two together to make a purse)
Problem is, you have to find the pattern first!!!!!
I have the usual yarnaholics stash of patterns and yarn. . . somewhere at the back of the closet!!!
I am enjoying this website tremendously and have passed it on to folks who say “I could never do that.”
Have taken to stating folks out by making a crochet hat from bulky yarn using their fingers!! this also has the advantage of teaching yarn tension faster that anything else I’ve tried; I allow about 1 hour for this to include ripping out, boo-boos, and laughing!i encourage people to rip stuff out if it doesn’t suit them; this is much easier than knitting!!!! Thanks again!
Thank you all for your wonderful comments! I am so glad to have created a pattern that people need. Fran, it is not a stupid question. What I would do is just make your granny square as wide as you’d like the rectangle to be. Then add the edges like you see in the tutorial until it is the length you’d like.
Hi its’ me again,
Google crochet granny rectangle and several websites come up. I found crochetagain.wordpress.com to have a very nice pattern crocheting around the rectangle. I do like Cami’s rectangle and will add it to my collection.
Fleur
I make a rectangular Granny bed throw by making a square as wide as I want it to be, then adding rows of 3 dcs in spaces at both ends of the square to make the length that I want. I then crochet a border of as many rows of scs, dc’s, or clusters around the entire bed throw as I’m in the mind to do. I’ve received many compliments using this pattern.
You can also make a bed cover by sewing (say) 6 granny squares into a 2 x 3 rectangle – then carry on crocheting around all sides
To have it look the same on both long ends, I would work half the length wanted on one end, end off, and then work the same length on the other end. This is a neat idea but I don’t like the way your full square is only at the bottom and then the other end looks totally different.
Glad you wrote about this, Cami! I love this technique especially because it can be easily customized in so many ways. I used a similar idea recently for a football blanket. (I posted a couple pictures of it here, beginning about halfway through the post, if you want to take a look – http://hardworkinghandmade.com/a-winter-hat-now-and-a-few-others/ – )
I’d echo what Gladys and Wanda said–for a balanced, symmetrical look, end the top rows at a little less than half the total length you want, then flip it and add an equal number of rows to the other side of the starting square, too.
Of course that depends on your overall design goal, though. I can see where for some concepts, it would be desirable to have the square appear somewhere other than center. Hmmm…example…a blanket patterned after the American flag, with blue-and-white granny square rounds for the stars section, and red-and-white stripe rows added to only the right and bottom sides of that square? 🙂
I was so happy to find this post here tonight! I’m currently on round 5 of a giant granny square for my son, & he asked me if I could make it more rectangular than square. I told him that it wasn’t possible! Now I’ll be able to extend the sides to make his rectangle. Thank you so much.
Hi, you’re tutorial and pics afe cery helpful! I’m making a giant granny square afghan and need to add rows to lengthen ends so it’s a rectangle. I’m confused about why when you begin Row 1 you CH 3, DC 1 time instead of 2 DC. Could it work to CH 3, DC 2 here to make it look like the other sets of 3 DC?
Thanks!
Hi Shelly! It looks like Caissa chose to use 2 dc for both of the ends. Maybe because it gives a straighter edge. If you prefer the look of the 3 dc, go for it! Feel free to make it your own 🙂
Omg thank you for this!
I honestly cannot make sense of these instructions. Have restarted this 3 x and something is always off.
I have looked at several granny sites for rectangle directions but I could never get one to turn out. Finally I gave up & made two one round squares. Then I sewed together on one side & opened them up. Now I was ready to start my rectangle granny. I don’t know if it has any bearing on my design, but I ‘m left handed. This will be a never ending granny too.
Thank you sooo much. I thought it that way but didn’t think it would work but you showed me wrong. I hope my mom loves what I’m making her
When adding rows to the end you will be switching from the right side to the back side. Does this look ok?
help, i think i need this in a book, i cant make sense of turning a square into a rectangle ………i hate writing instructions down off the internet
You can print out the instructions. Use the print button at the end of the post, it is next to the Facebook and Twitter buttons.
Thank you! I’m probably missing something, but why are the outsides only 2 chains (or double crochets) wide instead of 3 like all of the others? Would it work with 3 wide?