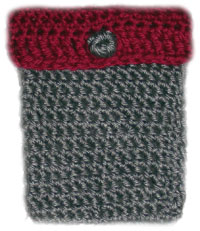
Crochet Pattern: Adjustable Camera Case
By Rachel Choi – 6 CommentsThis little pouch was created to go over my camera, which is some what big compared to those new slim ones. The pattern includes instructions for adjusting the case to fit your own camera! You can also use this small pouch for your phone, keys, makeup, ipod or anything else you want to put into it. Just follow the directions to make it the size you desire. If you need help, feel free to ask me!
Finished Size: 3 3/4″ (9.5 cm) wide, 5″ (13 cm) tall |
 |
|
Materials: Medium Weight Yarn (approximately 50 yards of main color and small amount of contrasting color) Crochet Hook H (5.00 mm) Yarn needle |
|
Gauge: not that important for this pattern
Crochet Pattern: Camera Case
With main color, start by chaining 15 or a chain that is the width of your desired case.
Round 1: ch 2, hdc in third ch from hook and in each ch across, turn to work into remaining loops on opposite side of the chain, hdc in each ch across, sl st in top of beginning ch-2: 30 hdc
Round 2: ch 2, hdc in each hdc around, sl st in top of beginning ch-2: 30 hdc
Repeat round 2, 13 times or until the case is as long as you desire.
Row 3: change to contrasting color, ch 2, turn, hdc in next 15 hdc: 15 hdc
Note: Row 3 starts the beginning of the flap, if you changed the number of chains at the beginning of the pattern, then the number of hdc made on the above row will be the number of chains you made before row 1.
Row 4 – 5: ch 2, turn, hdc in each hdc across: 15 hdc
Row 6: ch 4, turn, tr in each hdc across, finish off: 15 tr
Button
Round 1: with main color, ch 2, 6 sc in second ch from hook: 6 sc
Round 2: 6 sc in same ch (overlapping previous round), finish off: 6 sc
Align button with center of row 6 and attach to pencil case with a yarn needle.
Need help with this pattern? Let me know and I’ll be glad to help!


This camera case is fabulous!
I also wanted to let you know that I linked to your crocheted 4-leaf clover from our holiday crochet round-up blog post last week.
Happy New Year!
Kristen
Editor
FaveCrafts.com
Thanks Kristen!! I really appreciate it 🙂
i’m relatively new to crocheting. can you explain why round 2 starts out with a ch 2? this seems to cause my case to get wider as i build up the height.
Hello! The chain 2 at the beginning is used to make the beginning of the round the same height as the rest of the hdc stitches on the round. Without it, the beginning will be shorter and not be leveled. If your case is getting wider and wider, try to count the number of stitches you make after you complete each row. As long as the number of stitches is the same, the case will stay the same width.
I know this is from a few years ago, but maybe you can still help me out? Do you do an hdc in the slip stitch from the previous row? And after you do the chain 2 to start a new row, do you then put the first hdc in thespace where the ch 2 is, or in the next one? (I hope this makes sense!)
Hi Natalie! After you do the ch 2 to start the new row you will make your first hdc into the hdc in the previous row, not the ch 2 where the slip stitch is. The only thing that should be in the ch 2 is the slip stitch. Let me know if you need more help with it!