How to Crochet: Horizontal and Vertical Ribbing
By Erin Burger – 11 CommentsA simple way to add texture to garments, accessories or bathroom/kitchen projects is to add ribbing. Both vertical and horizontal ribbing can be created by learning three very easy and helpful techniques.
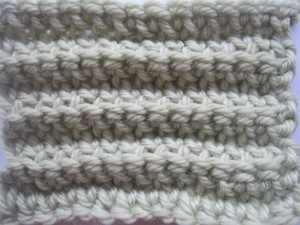
Horizontal ribbing
To make a successful horizontal stitch you simply have to learn where the back loops in a sc, hdc, dc or tc are. Crocheting in Front, Back and Both Loops is a good place to start learning!
Start by chaining any number of chains
Row 1: sc in 2nd ch from hook and each ch across
Row 2: ch 1, turn, sc in back loops only of first sc and in each sc across
Repeat Row 2 until appropriate length is reached.
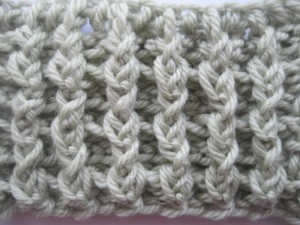
Vertical ribbing
To make a successful vertical ribbing stitch, you have to learn Fpdc and Bpdc, starting here at Front and Back Post Stitches is a good start! Learning those two techniques and practicing the instructions below should help you add some texture to your everyday crochet.

Start by chaining an odd number, plus three more chains
Row 1: dc in 4th ch from hook and each ch across
Row 2: ch 2, turn, dc in first dc, fpdc around next dc, (bpdc around next dc, fpdc around next dc) across, ending with a dc in last dc
Row 3: ch 2, turn, dc in first dc, (bpdc around next dc, fpdc around next dc) across, ending with a dc in last dc
Repeat Rows 2 and 3 until appropriate length is reached.
Have any questions or comments about ribbing? Please don’t hesitate to share/ask here!


Thanks for the Vertical Ribbing tutorial. I was having trouble doing this on a flat piece and your directions were so clear. You rock!
Lovely! I knew the horizontal ribbing, but never knew how to make the vertical ribbing. Thanks for sharing!
That seems so simple. Thanks for making it so clear!
I’m seeing a skull cap for my husband with the vertical ribbing. 🙂
this is really beautiful, but help learners by explaining the abbreviations please.
Hi! Wonderful tutorial, it’s very helpful so far. I’m so happy that ribbing is also a crochet technique, because I have no skill at all in knitting. Well, thank you!
Isaw your ribbing styich directions, but I have a great question. Do you know of any ways that you could alternate post stitches starting and ending? for any projects or different looks?
Ex:
Row1: fpdc, bpdc, fpdc, bpdc….
Row 2: bpdc, fpdc, bpdc, fpdc….
Row3: fpdc, bpdc, fpdc, bpdc….
Row 4: bpdc, fpdc, bpdc, fpdc….
On and on through project, or
Ex:
Rows 1 & 2: fpdc, bpdc, fpdc, bpdc….
Rows 3 & 4: bpdc, fpdc, bpdc, fpdc….
On and on through project.
I want to find a project that would incorporate this design if there isn’t already one. If there is, could you possibly add a link on the page for a couple easy projects incorporating the design? Thank you very much in advance for whatever is dug up and/or added.
Jason- What you might be thinking of is the basket weave pattern where you do 3-5 rows starting with 3-5 FPDC, 3-5 BPDC, etc.; then starting with 3-5 BPDC, 3-5 FPDC.
It’ll form what looks like a box, and is very pretty.
The fpcd and bpdc is stretchy, but not the original chain. Is there any way besides a bigger hook to make the original reeeaaalllyyyy stretch?
Thanks.
Hi Maureen!
The larger hook would probably be the easiest way. The only other thing I can think of is working a fdc or fsc, but it won’t be super stretch, just not as tight as a regular chain.
A double crochet chainless foundation would help. Chainless foundations have more give than chained. There are tutorials on YouTube.