Free Crochet Patterns

Free Crochet Pattern: Crochet Hook Case

Posted in Free Crochet Patterns on April 11th, 2009 by Rachel Choi – 78 Comments

hook holder

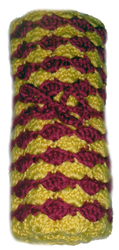
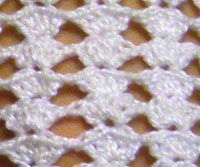
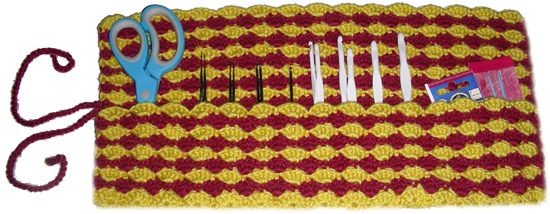
This crochet hook case is made with a series of shell stitches. It uses the same shell stitch pattern as the shell stitch blanket pattern. To make this case, we start by creating a simple rectangle shape that is as wide and tall as you want your case to be. Then we create another layer for the pockets inside. The pocket layer is then sewn to the hook case to form as many smaller pockets as you desire. Last but not least, a tie strap is attached so that you can roll your hook case up and secure it!

Skill Level: crochet skill level easy
hook holder

read more »

Free Crochet Pattern: Tunisian Simple Stitch Neck Warmer

Posted in Free Crochet Patterns on April 3rd, 2009 by Rachel Choi – 16 Comments
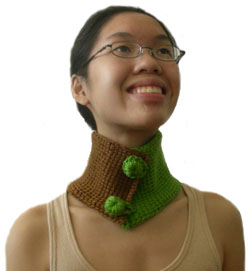
Here is my very first Tunisian simple stitched neck warmer! This is a small item that is great to practice your Tunisian stitches on. If you don’t know how to crochet Tunisian simple stitches, here is a Tunisian simple stitch tutorial that shows you how. The basic idea of this neck warmer is to start with a chain that is as wide as you want your neck warmer to be, then start making rows and rows or Tunisian simple stitches to make it as long as you want it. There is one color change in this pattern to give your neck warmer some style. Just follow the instructions below to get started! tunisian-neckwarmer
Skill Level: beginner crochet skill level

Finished Size: 4 ¼” (11 cm) wide, 17” (43 cm) long, 1” (2.5 cm) diameter of buttons

Materials:
Medium Weight Yarn (Green, Brown)
Tunisian Crochet Hook I (5.5 mm) or a regular crochet hook without large handle
Yarn Needle
Scissors

Gauge:
9 TSS = 2”
7 rows = 2”
Gauge Swatch: 2’’w x 2’’h (5cm x 5cm) ch 9.
Row 1: work TSS in second ch from hook and in each ch across
Row 2 – 7: work TSS in second stitch and in each stitch across
Finish off.

Special Crochet Stitch: Tunisian Simple Stitch (TSS)
Here is a Tunisian simple stitch tutorial for reference.

Crochet Pattern: Neck Warmer
With green, start by chaining 20, or as wide as you want your neck warmer
Row 1: Work TSS in second chain from hook, and in each chain across
Row 2 – 53: work TSS in second stitch and in each stitch across
Row 54: work TSS in second stitch and in each stitch across, changing to brown in last TSS made
Row 55 – 74: work TSS in second stitch and in each stitch across
Row 75: sl st in second stitch and in each stitch across, finish off

Button (Make 2)
Row 1: with green, ch 4, sl st in forth ch from hook forming loop
Row 2: 10 sc in loop
Row 3: 10 sc in loop (overlapping previous row)
Row 4: 8 sc in loop (overlapping previous row), finish off

Button Strap (Make 2)
Row 1: ch 15, sl st in first ch forming loop, finish off

With yarn needle, sew buttons onto brown end of neck warmer and button straps onto green end.

If you need help with crochet this Tunisian simple stitch neck warmer, just leave a comment!

April Fool’s Crochet Pattern: Spaghetti

Posted in Free Crochet Patterns on April 1st, 2009 by Rachel Choi – 13 Comments
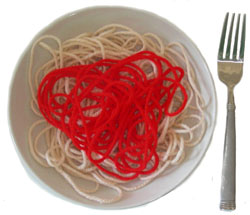
Who doesn’t love a nice warm bowl of homemade spaghetti? Well here is a crochet pattern to knock the socks off of anyone starving for a bowl. Whether you’re an avid cooker or a terrible cooker, you are guaranteed to make a spectacular spaghetti dish with these easy and fast not so crochet instructions.

Skill Level: crochet skill level easy
spaghetti

Finished Size: enough to satisfy your appetite

Materials:
Medium Weight Yarn (Beige, Red)
Index finger and thumb (or equivalent fingers as necessary)
Scissors
1 Bowl
1 Fork
1 person to play a trick on

Special Crochet Stitch: The Finger Grab
Place the indicated yarn between index finger and thumb.
Apply ample pressure to squeeze strand of yarn, such that it does not slip from between fingers.
Pull yarn the indicated distance then let go.
Note: the finger grab may be tricky for some, just remember that practice makes perfect!

Gauge: each finger grab should be 12” (30.5 cm) long

Crochet Pattern: Spaghetti
Start by placing bowl under work. By finishing off each finger grab, it should land in the bowl.
Row 1 – 50: With beige, finger grab, finish off.

Sauce
Row 1 – 10: With red, finger grab, finish off.

If you need help with crocheting spaghetti, no worries just leave a comment!

Free Crochet Pattern: Rainbow Coaster

Posted in Free Crochet Patterns on March 29th, 2009 by Rachel Choi – 5 Comments

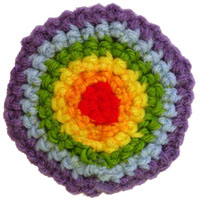
Inspired by the rainbow beanie that I made for my cousin the other day, I decided to make a quick rainbow coaster. I love the colors of the rainbow and I think that Mother Nature is so great at picking out colors that match! Here is the very simple, easy and fast pattern for you to crochet the rainbow coaster.

Skill Level: crochet skill 
level easy
rainbow-coaster

Finished Size: 3” (8 cm) diameter

Materials:
Medium Weight Yarn (Red, Orange, Yellow, Green, Blue, Purple)
Crochet Hook H (5.00 mm)

Need help understanding the abbreviations? Check out the crochet abbreviation chart.

Crochet Pattern: Rainbow Coaster
Round 1: with red, ch 2, 6 sc in second ch from hook, changing to orange in last sc made: 6 sc
Round 2: 2 sc in each sc around, changing to yellow in last sc made: 12 sc
Round 3: (2 sc in next sc, sc in next sc) around, changing to green in last sc made: 18 sc
Round 4: (2 sc in next sc, sc in next 2 sc) around, changing to blue in last sc made: 24 sc
Round 5: (2 sc in next sc, sc in next 3 sc) around, changing to purple in last sc made: 30 sc
Round 6: (2 sc in next sc, sc in next 4 sc) around, sl st in next sc, finish off: 36 sc

If you need help with this pattern, just let me know by leaving a comment!

Free Crochet Pattern: Bunny Egg

Posted in Free Crochet Patterns on March 27th, 2009 by Rachel Choi – 12 Comments
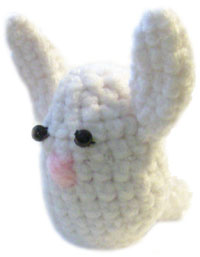
Here is a goofy, yet still cute bunny that is made using the crochet egg pattern. All that is added is a pair of ears, a tail and face. The bunny egg makes a great little gift for Easter or for someone who loves bunnies and eggs. This project is perfect for using your scarp yarn! Below are the instructions for you to follow.

Skill Level: crochet skill level easy

Finished Size: 3” (8 cm) tall, 2 1/2” (6.5cm) wide ear to ear

crochet bunny-egg

Materials:
Medium Weight Yarn
Crochet Hook F (3.75 mm)
Polyester Fiberfill
2 Beads
Yarn Needle
Sewing needle
Scissors

Gauge: not too important, just crochet tight enough so that the filling does not come out the bunny

Need help understanding the abbreviations? Check out the crochet abbreviation chart.

Crochet Pattern: Bunny Egg
Round 1: ch 2, 6 sc in second ch from hook, place marker: 6 sc
Round 2: (2 sc in next sc, sc in next sc) around: 9 sc
Round 3: (2 sc in next sc, sc in next 2 sc) around: 12 sc
Round 4: (2 sc in next sc, sc in next 3 sc) around: 15 sc
Round 5: (2 sc in next sc, sc in next 3 sc) 3 times, 2 sc in next sc, sc in next 2 sc: 19 sc
Round 6: sc in each sc around: 19 sc
Round 7: (2 sc in next sc, sc in next 6 sc) 2 times, 2 sc in next sc, sc in next 4 sc: 22 sc
Round 8 – 10: sc in each sc around: 22 sc
Round 11: (decrease, sc in next 6 sc) 2 times, decrease, sc in next 4 sc: 19 sc
Note: Fill egg with fiberfill while decreasing.
Round 12: (decrease, sc in next 2 sc) 4 times, decrease, sc in next sc: 14 sc
Round 13: decrease in each sc around: 7 sc
Finish off, weaving egg shut.

Ears (make 2)
Round 1: ch 2, 4 sc in second ch from hook, place marker: 4 sc
Round 2: (2 sc in next sc, sc in next sc) around: 6 sc
Round 3: (2 sc in next sc, sc in next 2 sc) around: 8 sc
Round 4 – 5: sc in each sc around: 8 sc
Round 6: (decrease, sc in next 2 sc) around, sl st in next sc, finish off: 6 sc

Using photo as a guide, sew ears to bunny with a yarn needle.

Tail
Create a small pom pom and sew to back of bunny. Here is the “How to Make Pom Poms” tutorial if you need it.

Sew on face as desired.

This pattern was requested by a Crochet Spot Newsletter Subscriber! If you would like to receive the free newsletter too, just fill out the orange box at the top of this page.

If you need help with this pattern, just leave a comment!

Free Crochet Pattern: Egg

Posted in Free Crochet Patterns on March 26th, 2009 by Rachel Choi – 33 Comments

Here is an egg, which is good for Easter or to put in your egg carton to replace the ones you’ve eaten. You can even make this egg, put arms and legs on it and make it dance around. Whatever you choose to do with this real size egg, it is super easy to crochet, so enjoy!

Skill Level: crochet skill level easy

Finished Size: 2” (5 cm) tall, 1 ½” (4 cm) wide, approximately the size of a regular egg

egg
Materials:
Medium Weight Yarn
Crochet Hook F (3.75 mm)
Polyester Fiberfill
crochet yarn size 4

Gauge: just make sure you crochet tight, so that the filling will not come out

Need help understanding the abbreviations? Check out the crochet abbreviation chart.

Crochet Pattern: Egg
Round 1: ch 2, 6 sc in second ch from hook, place marker: 6 sc
Round 2: (2 sc in next sc, sc in next sc) around: 9 sc
Round 3: (2 sc in next sc, sc in next 2 sc) around: 12 sc
Round 4: (2 sc in next sc, sc in next 3 sc) around: 15 sc
Round 5: (2 sc in next sc, sc in next 3 sc) 3 times, 2 sc in next sc, sc in next 2 sc: 19 sc
Round 6: sc in each sc around: 19 sc
Round 7: (2 sc in next sc, sc in next 6 sc) 2 times, 2 sc in next sc, sc in next 4 sc: 22 sc
Round 8 – 10: sc in each sc around: 22 sc
Round 11: (decrease, sc in next 6 sc) 2 times, decrease, sc in next 4 sc: 19 sc
Note: Fill egg with fiberfill while decreasing.
Round 12: (decrease, sc in next 2 sc) 4 times, decrease, sc in next sc: 14 sc
Round 13: decrease in each sc around: 7 sc
Finish off, weaving egg shut.

This pattern was requested by a Crochet Spot Newsletter Subscriber! If you would like to receive the free newsletter too, just fill out the orange box at the top of this page.

If you need help with this pattern, no worries just let me know by leaving a comment!

Free Crochet Pattern: Easy Basket

Posted in Free Crochet Patterns on March 25th, 2009 by Rachel Choi – 62 Comments
In the spirit of Easter, or any other occasion that may require a basket, here is a very fast and easy crochet basket pattern to follow. This pattern can easily be adjusted to make the basket larger or smaller than the noted finished size. Just follow the crochet tips at the bottom of this pattern to alter your basket as needed.

Skill Level: crochet skill 
level easy

Finished Size: 3 ¼” (8 cm) diameter, 4 ½” (11.5 cm) tall
Note: for a different finished size, follow the instructions to alter this basket

crochet basket
Materials:
Medium Weight Yarn
Crochet Hook H (5.00 mm)
Yarn Needle
crochet yarn size 4

Gauge: not really important

Need help understanding the abbreviations? Check out the crochet abbreviation chart.

Crochet Pattern: Basket
Note: stitches are crocheted in the back loop only unless otherwise indicated.
Round 1: ch 3, 12 dc in third ch from hook, sl st in ch-3: 12 dc
Round 2: ch 2, 2 dc in each dc around, sl st in ch-2: 24 dc
Round 3: ch 2, (2 dc in next dc, dc in next dc) around, sl st in ch-2: 36 dc
Round 4: ch 2, dc in both loops of each dc around, sl st in ch-2: 36 dc
Round 5 – 7: ch 2, dc in each dc around, sl st in ch-2: 36 dc
Finish off.

Handle
Start by chaining 30, or length of desired handle
Row 1: ch 2, dc in third ch from hook and in each ch across: 30 dc
Finish off.

Using photo as a guide, sew handle to basket with yarn needle.

Crochet Tips:

  • To increase height of the basket, repeat the last line in the pattern until the desired height is reached.
  • To increase the width of the basket add the following lines after round 3 then continue with the rest of the pattern:
    Round 4: ch 2, (2 dc in next dc, dc in next 2 dc) around, sl st in ch-2: 48 dc
    Round 5: ch 2, (2 dc in next dc, dc in next 3 dc) around, sl st in ch-2: 60 dc
    Round 6: ch 2, (2 dc in next dc, dc in next 4 dc) around, sl st in ch-2: 72 dc
    …

If you need help with this pattern, just let me know by leaving a comment!

Crochet Pattern: Easy Adjustable Slippers

Posted in Free Crochet Patterns on March 19th, 2009 by Rachel Choi – 143 Comments

Update: Please see the Easy Adjustable Slippers Version 2 for the new and improved updated version of this pattern, along with step by step photos for visual learners!

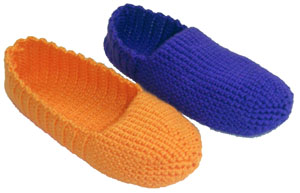
This crochet pattern is very versatile since you can create different slipper styles just from this one pattern. Using the easy adjustable slipper pattern you can crochet slippers for everyone in the family, whether they are for men, boys, women, girls or even babies. The original pattern is written for size 6 women, but this pattern is meant to be altered to fit anyone. Just follow the simple instructions to alter the size and style of your slippers. crochet easy slippers
Skill Level: crochet skill 
level easy

Finished Size: Any size you want it!
Following the exact round and row count given: 4” (10 cm) wide, 9” (23 cm) long, fitting approximately a women’s size 6

Materials:
Medium Weight Yarn
Crochet Hook G (4.00 mm)
Yarn Needle
Measuring Tape or Size Chart
Scissors
crochet yarn size 4

Gauge: not important. For best fit, measure foot size and follow instructions for altering slipper.

Need help understanding the abbreviations? Check out the crochet abbreviation chart.

Crochet Pattern: Slipper

Note: Round 1 – 8 starts the toe of the slipper by creating a circle. For best fit, make sure that the diameter of the circle is slightly smaller than the width of the wearer’s foot. To adjust the circle size, simply add or subtract rounds as needed.

Round 1: ch 2, 6 sc in second ch from hook, place marker: 6 sc
Round 2: 2 sc in each sc around: 12 sc
Round 3: (2 sc in next sc, sc in next sc) around: 18 sc
Round 4: (2 sc in next sc, sc in next 2 sc) around: 24 sc
Round 5: (2 sc in next sc, sc in next 3 sc) around: 30 sc
Round 6: (2 sc in next sc, sc in next 4 sc) around: 36 sc
Round 7: (2 sc in next sc, sc in next 5 sc) around: 42 sc
Round 8: (2 sc in next sc, sc in next 6 sc) around: 48 sc

Continue increasing the circle until the diameter is slightly smaller than the width of the wearer’s foot.

Note: Round 9 – 27 creates the front/toe of the slipper. You may choose to make this portion as long or short as you desire. To adjust length add or subtract rounds as needed. The length of the slipper upon completion of these rounds should not go pass the ankle of the wearer’s foot.

Round 9 – 27: sc in each sc around: 48 sc

Continue until the desired length of the front of the slipper is obtained.

Note: Row 28 establishes the length of the two sides plus the bottom of the slipper. The length of this row should be greater than the diameter of the slipper. 30 single crochets is the recommended length that is used in this example. You may increase or decrease the number of single crochets made to better fit your slipper size.

Row 28: sc in next 30 sc: 30 sc

Note: Row 29 – 43 creates the rest of the slipper, which includes heal and back of foot. Upon completing this set of rows your slipper should exactly reach the back of the wearer’s ankle. Increase or decrease the number of rows as you see necessary.

Row 29 – 43: ch 1, turn, sc in next 30 sc: 30 sc

Finish off. With yarn needle, sew back of slipper together.

If you need help with crocheting slippers, feel free to leave a comment!
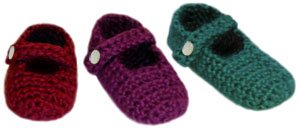
Do you need baby sizes? Check out the Crochet Pattern: Baby Mary Jane Slippers – 3 Sizes. This pattern includes the instructions for sizes 0 – 3 months, 3 – 6 months, and 6 – 12 months!

Be sure to check out the Crochet Spot Store for more easy crochet patterns!

crochet baby mary jane slippers

Free Crochet Pattern: Shell Lace Fingerless Gloves

Posted in Free Crochet Patterns on March 16th, 2009 by Rachel Choi – 147 Comments
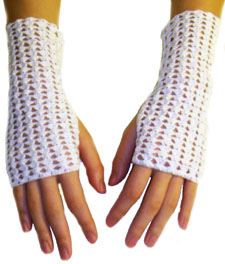
These fingerless gloves are made with size 10 crochet thread for a light and elegant look and feel. The shell stitches give it a wonderful lacy look that can be worn during winter but also in the spring and the summer. Just follow the easy and simple instructions to crochet these lovely fingerless gloves.

Skill Level: crochet skill level easy

Finished Size: 3” (8 cm) wide, 7” (18 cm) long

Materials:
Crochet Thread Size 10 (approximately 100 yards)
Crochet Hook US 7 (1.5 mm)
Sewing needle

Gauge: Not really important. For best fitted size, make the starting foundation chain the circumference of the wearer’s palm.

Need help understanding the abbreviations? Check out the crochet abbreviation chart.

shell-lace-fingerless-glove

shell-lace-fingerless-glove

Crochet Pattern: Fingerless Glove (makes 1 glove)
Start by chaining 78 or chain that is the circumference of the wearer’s palm
Note: Starting chain must be a multiple of 6, since each shell uses 6 chains
Row 1: ch 2, sc in second ch from hook, (skip 2, 5 dc in next ch, skip 2, sc in next ch) across
Row 2 – 30: ch 2, turn, skip 3, 5 dc in next dc, (ch 1, skip 5, 5 dc in next dc) across, skip 2, dc in next st

Sew sides of glove together leaving a 2” (5 cm) hole 1” (2.5 cm) from the end.

If you need help with crocheting fingerless gloves, I would love to help! Just leave a comment!

Fingerless Gloves for Men

Posted in Free Crochet Patterns on March 14th, 2009 by Rachel Choi – 52 Comments
I love fingerless gloves and so should men. They are great for keeping your palm and wrist warm and at the same time protect them from the environment. These fingerless gloves are great if you’re doing heavy lifting or riding a bike since they can protect you hands from calluses. Crocheted fingerless gloves aren’t just for women, they are for men too. crochet mens fingerless glove
Skill Level: beginner crochet skill level

Finished Size: 4 ½” (11.5 cm) wide, 6” (15 cm) long
Note: For best fitted size, make the chain in row 1 the circumference of the wearer’s palm.

Materials:
Medium Weight Yarn
Crochet Hook H (5.00 mm)
Yarn Needle
crochet yarn size 4

Gauge:
12 dc = 3’’
4 rows = 2’’
Gauge Swatch: 3’’w x 2’’h (7.5cm x 5cm) ch 14.
Row 1: dc in third ch from hook and in each ch across
Row 2 – 4: ch 2, turn, dc in each dc across
Finish off.

Need help understanding the abbreviations? Check out the crochet abbreviation chart.

Crochet Pattern: Fingerless Glove (makes 1 glove)
Row 1: ch 34, dc in third ch from hook, dc in each ch across: 32 dc
Row 2 – 11: ch 2, turn, dc in each dc across: 32 dc

Use yarn needle to sew sides of glove together leaving a 2” (5 cm) hole 1” (2.5 cm) from the end.

If you need help with crocheting fingerless gloves, just leave a comment and I would be glad to help!