Tutorials and Help

How to Crochet: Extended Single Crochet Stitches (exsc)

Posted in Tutorials and Help on November 19th, 2009 by Rachel Choi – 39 Comments

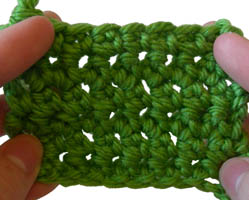
Extended single crochet stitches (exsc) are very similar to single crochet stitches, but as the name suggests, they are extended to be slightly taller.

Here is the abbreviated instructions for exsc – (pull up a loop in next stitch, yarn over, pull through 1 loop on hook, yarn over, pull though final 2 loops on hook)

extended single crochet

Below is the step by step, picture tutorial that will walk you through how to make an extended single crochet stitch. This tutorial is for both right and left handed people. For left handed pictures, roll your mouse over the image and it will change for you.

Starting with a swatch to practice on, pull up a loop in the next stitch. To do so, insert your hook into the next stitch, yarning over (wrap the yarn around your hook) and pulling through the stitch on your hook. You should now have 2 loops on your hook.


read more »

How to Minimize Weaving in Ends in Crochet

Posted in Tutorials and Help on November 12th, 2009 by Rachel Choi – 19 Comments

If you are like me, you hate to weave in a bunch of ends of yarn when you are done your crochet project. Normally there is at least a beginning and ending piece of yarn that you have to weave in. But there can also be other strands of yarn from when you change colors or have to cut and attach your yarn at a new position in your work. The number of ends you have to weave in can add up.

Here is a simple tip that can help you reduce the number of ends you have to weave in at the end of your project. In the example in the photos, I am changing colors, and have an end that I need to tuck into the work. This method can also be used for other situations as well!

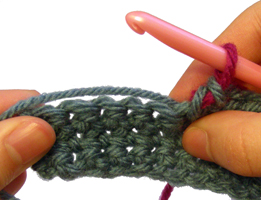
The idea is to hold your end up to your work as shown below. (Mouse over the image for a left handed view)


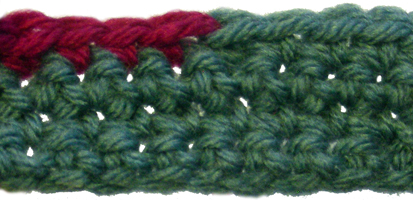
Then crochet as you normally would, but over the strand of yarn. This way, you are hiding the yarn that you would normally have to tuck in later. See, you can’t even see the end that was crocheted over!


This is the same idea as carrying your yarn when you change colors in crochet. You can use this method anytime you are crochet over an area that is close to where your strand of yarn is sticking out of. Such as if you are crocheting a border, you can hold the ends of the yarn along the sides while crocheting the border over them.

How to Crochet on Opposite Side of Chain

Posted in Tutorials and Help on November 3rd, 2009 by Rachel Choi – 70 Comments

Crocheting in the round is a very useful technique when you want to make bags, hats and other round objects. In this tutorial I will show you how you can crochet around a foundation chain. This method is used a lot in my crochet patterns to prevent having to sew your project together.

This tutorial is for both right and left handed people. For left handed pictures, roll your mouse over the image and it will change for you.

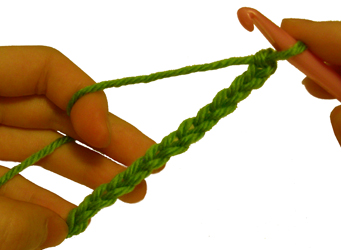
Start by crocheting a foundation chain. If you are working with a pattern, it will tell you how long to make this chain.


read more »

5 Tips to Prevent Yarn from Splitting While You Crochet

Posted in Tutorials and Help on October 29th, 2009 by Rachel Choi – 5 Comments

It is really annoying when you crochet and your yarn splits! You end up with only part of the strand of yarn on your hook instead of the entire strand. Here are some tips to help you prevent your yarn from splitting while you crochet:

  1. Use a bigger hook – The bigger your hook, the less chance that your hook will split your yarn. Smaller hooks are more pointy and tend to “stab” your yarn in half. While bigger hooks obviously have a larger hook to grab you strand of yarn without splitting it.
  2. Take your time – If you take your time, and move extra slow when you crochet, there is no way you can split your yarn. Try working in slow motion for a few stitches and be sure that your yarn is properly under your hook before you pull it. You can speed up, once you get the hang of it.
  3. Work with the opposite end of the yarn – Yarn is made with a bunch of plies of yarn twisted together. Sometimes your yarn splits because you are working against the direction that the yarn is twisted in, so you are basically untwisting it. By working with the opposite end of the yarn you can work into the same direction that the yarn is twisted in, so that it doesn’t split.
  4. Use a different brand – Different hooks made by different companies are shaped differently. There isn’t one hook that is great for everyone, so try out different types of hooks to see which one works best for you. Be sure to try out different brands of yarn as well.
  5. Practice – Practice makes perfect, as the old saying goes, and it is so true. I remember when I first started crocheting, my yarn would split all the time. But now, using the exact same hook and brand of yarn, it doesn’t split anymore because I have practice crocheting. So just be patience and practice, you can do it!

Do you have a tip to prevent yarn from splitting that you would like to share?

Scrap Yarn for Bird Nests

Posted in Tutorials and Help on October 20th, 2009 by Rachel Choi – 30 Comments

There are many things you can do with your scrap yarn, but if you’re like me, you feel guilty for throwing it out (even if it is just a really small scrap). Here is an idea that I’ve heard lots of people talk about!

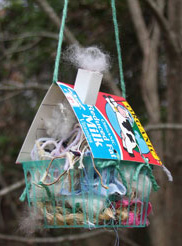
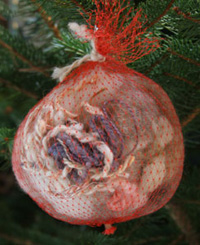
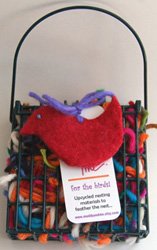
Some people put out bird feeders for the birds, but why not put out materials for the birds to build their nests with too? You can create a “bird nest kit”. To do so, use a small netted bag (like the plastic ones you get oranges or onions in), and place your scraps of yarn inside. You can also use other containers that have large enough holes for the birds to peck through. Hang it on a tree so that the birds can take materials as they need it.

Here are some pictures of bird nest kits:

scrap yarn bird nest kit scrap yarn bird nest kit scrap yarn bird nest kit

The first 2 pictures are from funinthemaking.net. The last picture is from a seller on Etsy.com: “Maddy & Me”

As you can see, you can get very creative in creating a bird nest kit with your scrap yarn!
I was also wondering if these bird nest kits would be safe for birds and the environment. What do you think and have you tried it?

How to Find the End of the Yarn in a Pull Skein

Posted in Tutorials and Help on October 13th, 2009 by Rachel Choi – 19 Comments

Lots of skeins of yarn these days are rolled up so that one end of the yarn runs through the middle of the skein. Although it is sometimes easier to find the end of the yarn that is on the outside of the skein, using the end on the inside has its advantages. Using the center end will not cause your skein to roll all over the place when you crochet or knit and you will not have to put down your work to unravel the yarn.

However, the middle end of the yarn maybe be hard to find! Here are 3 easy steps to find the center strand of the pull skein:

  1. Insert your thumb and index finger of one hand into the center of the skein. Do the same with your other hand, entering it into the opposite side of the skein.
  2. Squish the skein so that your fingers can touch. Feel around to find the very center of the skein.
  3. Pull the center of the skein out with one hand. (you will pull out extra yarn with it, but the end of the skein should be there too)

Before you begin crocheting with the center end of your skein, make sure that the outside end of the yarn is visible too. Sometimes the outside end is tucked into the skein, but this can cause it knot up if you don’t pull it out before your start working.

Yarn Containers

Posted in Tutorials and Help on October 10th, 2009 by Rachel Choi – 23 Comments

Keeping your yarn clean and traveling with it can be a hassle without a proper container or bag to put your work in. There are some clever containers that you can make at home by reusing / recycling materials.

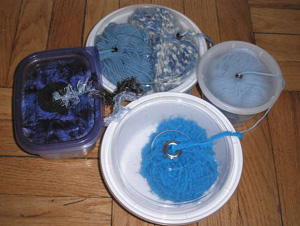
The basic idea is to use a container and poke a hole at the top so that your strand of yarn can go through it. You can use any container you like, such as an old storage container, food container, or small canister. If your container is big enough you can also store your hooks and pattern sheet in it too!

Here are some examples of yarn containers:

These containers I found at instructables.com. They have a tutorial there for making these yarn containers as well. Looks like they just used good old food containers.

yarn containers

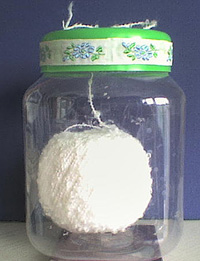
This container I found at Drenka’s Blog. She used an old plastic container that used to hold spices and even decided to decorate the container with a ribbon.

yarn container

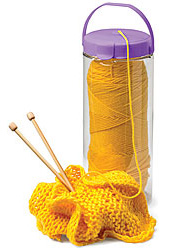
There are also yarn containers that you can buy in the store if you’re not into doing it yourself. They are nicely designed in different sizes and come with a handy handle. (Err..that should be a crochet hook in the picture)

yarn container

Do you have a yarn container idea you would like to share?

Where is the Back Ridge of a Chain in Crochet?

Posted in Tutorials and Help on September 29th, 2009 by Rachel Choi – 19 Comments

There are a few ways to crochet into your foundation chain. The most common way is to insert your hook under the top loop on the front of the chain. However, you may want to insert your hook in the back ridge of a chain instead. Where is the back ridge?

Here is a picture of the front of several chains.
crochet chain
Here is a picture of the back of the chains. The back ridge is the small “hump” on the back of the chain.
back ridge
Why crochet into the back ridge?
Symmetry – the beginning of your work will look more like the end of your work. The 2 loops of the chain that look like the front and back loops of a stitch will appear at the beginning of your work.

Do you have a question about the back ridge of a chain stitch? Or do you have info you would like to share? Leave a comment!

5 Quick Crochet Tips for Beginners

Posted in Tutorials and Help on September 3rd, 2009 by Rachel Choi – 28 Comments
  1. Pick the right color to work with. When you first start crocheting certain colors of yarn make it easier to see the stitches and others make it dreadfully hard. Try to avoid using very dark colored yarns such as black and very light light colored yarns such as white.
  2. Pick the right type of yarn. You don’t need fancy yarn when you first learn to crochet. In fact the facy yarns such as eyelash yarn and boucle will make it harder for you to learn and see your stitches. Stick to ordinary, simple and cheap yarn.
  3. Use a big hook. Bigger hooks make it easier to see stitches. As you may notice by now, being able to see the stitches is a big part of learning to crochet.
  4. Have fun. So what if this sounds cheesy. Don’t crochet if you’re not having fun doing it! Studies show that crocheting is actually good for your health, but if it’s stressing you out, it’s probably a good idea to take a break.
  5. Ask Rachel (me) for help. Don’t be ashamed to ask for help if you need it. I won’t bite. There’s nothing more dreadful than being frustrated over something hard to understand (I’ve been there). You can also find more help in the Crochet Tutorials section.

Do you have a crochet tip for beginners to share?

How to Crochet Edging onto Clothing

Posted in Free Crochet Patterns, Tutorials and Help on August 27th, 2009 by Rachel Choi – 15 Comments
Do you have old clothes that are boring and you don’t wear anymore? If so, here is a way to spruce them up and give them a brand new look! You can add crocheted edging to your shirts, sleeves, skirts or any other piece of fabric you wish.

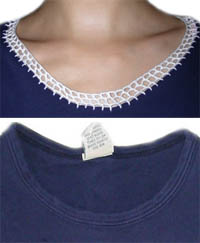
In this example, I transform the plain neckline of my old shirt into pretty crocheted edging using a simple edging pattern. Remember, you can do this for all sorts of fabric using different edging patterns. Use this example as a guide for the edging you choose to crochet onto your clothing.

crochet edging

Materials:
Old T-shirt or other fabric
Scissor
Size 10 thread (you may use other threads or weights of yarns if desired)
Crochet Hook US 7 (1.5 mm)
Note: Use a hook that is appropriate for the thread/yarn you chose to use. The smaller the hook the easier it is for it to pierce the fabric. (Learn more about types of yarn and recommended crochet hooks)
Optional: If your hook is not able to pierce through the fabric you may use a darning needle or other sharp tool to pre-poke the holes into your fabric
read more »