Tutorials and Help

Learning to Crochet

Posted in Fun Ramblings, Tutorials and Help on August 12th, 2009 by Rachel Choi – 11 Comments
When I was in middle school, I saw one of my closest friends crocheting and I thought it was so amazing! The way a ball of yarn was being turned into a piece of cloth was definitely stare worthy. I ended up going home to ask my mom how to crochet and if I remember correctly she taught me how with a chopstick. Yea, we didn’t have a crochet hook and I really wanted to learn how.

I learned the basic foundation chain, single crochet and double crochet. At the time technique and making things look perfect wasn’t a priority so I learned those skill as I went along. I was just so excited about all the things that I wanted to make!

Today I’m pretty sure that I know more about crocheting than my mom who taught me, since I’m always learning something new from people, books and crochet tutorials online. So if you’re just learning to crochet, here are some basics to start with:

How to Hold a Crochet Hook
How to Hold Yarn in Crochet
How to Crochet: Slip Knot
How to Crochet: Chain (ch)
How to Crochet: Single Crochet Stitches (sc)
How to Crochet: Double Crochet Stitches (dc)

Don’t worry too much about perfection, it’ll come with experience. But here are “7 Tips to Establish Consistency in Crochet” if you feel you need them. Also, feel free to dig into the Crochet Tutorials Archives for more How-To’s!

Do you have a crochet learning experience to share?

Why Tunisian Crochet Curls and How to Get Rid of It

Posted in Tutorials and Help on August 9th, 2009 by Rachel Choi – 8 Comments

Tunisian crochet (also know as afghan stitch) curls, it’s natural. If you’re curious, here is the easy answer to why Tunisian crochet curls:

Tunisian crochet curls because of physics! Unlike ordinary crochet where the stitches are located on the top of the work, Tunisian stitches are located on the front of the work. Every time you make new stitches, they are slightly forward and not exactly on the top of your previous row. This is why your work will end up curling forward.

To uncurl Tunisian Crochet, here are some helpful tips:

  1. Blocking. In my opinion this the best thing to do. Blocking crochet is the one simple step to “mold” your work into the way you want it. Whether you choose to steam it with an iron or wet it and let it dry, blocking can be fast and easy to do. Learn more about Blocking Crochet.
  2. Use a bigger hook. Larger hooks reduce the amount of tension in your work. The less tension, the less curl there will be.
  3. Alter foundation chain. Try turning your foundation chain upside down and pull up your loops into the back ridge of each chain instead. The back ridge is located behind the two loops of the chain that makes the “V” shape.
  4. Use different stitches. Purl stitches are know to create less curl than other Tunisian stitch. By varying the types of stitches that you use, it can reduce the curl.

In my experience, blocking works the best! Do you have a tip to share?
If you want to learn Tunisian crochet, get started by learning How to Crochet Tunisian Simple Stitch.

All About Stitch Markers in Crochet

Posted in Tutorials and Help on August 4th, 2009 by Rachel Choi – 21 Comments

Stitch markers are really helpful in keeping track of a particular place in your work. A marker can be a scrap piece of yarn, safety pin, paper clip, plastic ring, or just about anything else that can easily be placed into the loop of a stitch.

Markers in the Round
If you are working in the round markers are used to keep track of where the round ends and the next round begins. When you crochet around in a circle, it is very easy to lose track of where to stop and start a new round if you don’t use a marker. To place a marker, just insert it into the loop that is on your hook to mark the beginning of the round. At the end of every round, you should move the marker and put it into the new loop that is on your hook. You know you are at the end of the round after you make a stitch into the stitch right before the stitch with the marker in it.

Markers for Sewing
If you are reading a pattern, it may tell you to place a marker so that you can refer back to that location in your work later. Often times this will be a place where you will need to sew together with another part of your work.

Markers as References
Markers can have a unlimited amount of functions. They can be used to help you count stitches if you place then every 10 or so stitches. Markers can even be used to indicated where you are suppose to increase, decrease or do a set of stitches.

Do you have a question or info about stitch markers to share?

How to Crochet: Back Post Double Crochet (bpdc)

Posted in Tutorials and Help on July 31st, 2009 by Rachel Choi – 13 Comments

Back post double crochet is very similar to front post double crochet. The only different is the way you insert your hook. If you already know how to do front post double crochet, then this going to be a piece of cake! If you don’t already know how, then visit the “How to Crochet: Front Post Double Crochet (fpdc)” before attempting this tutorial.

Here is what you do:

Yarn over just like you will do if you were making a double crochet

Insert your hook through the back of your work, across the front of the indicated stitch, then through your work again, such that the hook is at the back of your work again. It will look like this from the front:

bpdc

Now finish your double crochet as you normally would: yarn over, pull up a loop, yarn over, pull through 2 loops on your hook, yarn over, pull through the final 2 loops on your hook.

Still need help? Let me know!

How to Crochet: Front Post Double Crochet (fpdc)

Posted in Tutorials and Help on July 30th, 2009 by Rachel Choi – 66 Comments

Are you ready to start making texture in your crochet work? If so, then lets get stared with the basics! Front post double crochet is also known as front raised double crochet. Front post can be done using many stitches, but for this tutorial we will focus on the popular double crochet stitch. You will need to know the basics of crocheting before attempting this tutorial. Visit the Crochet Tutorials Section for more help.

The only thing that is different in a front post double crochet compared to a regular double crochet is the location you insert your hook to make your stitch.

This tutorial is for both right and left handed people. For left handed pictures, roll your mouse over the image and it will change for you.

To make a front post double crochet, follow the instructions below:

Yarn over (wrap the yarn around your hook)


read more »

What the Heck is a Gauge?

Posted in Tutorials and Help on July 25th, 2009 by Rachel Choi – 16 Comments
I’m asked this all the time and yes, gauge is important in crochet and knitting alike.

So what is a gauge?
A gauge is a small swatch of work, typically made up of a small piece of the pattern or a stitch that is used in the pattern. The purpose of making a gauge is to ensure that the tension and size of your stitches match the designer’s. This way your finished item will be the same size as the size indicated in the pattern.

crochet gauge

How do you make a gauge swatch?
In all of my patterns, there are pattern instructions for you to follow to make your gauge. Some patterns will tell you to repeat certain rows in the pattern. After creating your gauge swatch, be sure that the finished size is the same as dimensions indicated for the gauge. If you find that your swatch is too big or too small, try using a smaller or bigger sized hook.

Is gauge really important?
Sometimes. Depending on what you’re making, you might not care if your work turns out the proper size. I don’t care if my refrigerator magnet turns out a little too big, but if I’m making a sweater, it better fit me. It’s up to you to determine when you think it’s important, but when in doubt make the gauge anyway.

Do you always make gauge swatches or are you guilt of skipping it?

7 Tips to Establish Consistency in Crochet

Posted in Tutorials and Help on July 23rd, 2009 by Rachel Choi – 25 Comments

If you are new to crocheting, one of the toughest things to master is making consistent stitches in your work. If you’ve ever tried making a square and it ended up not so square, then you know what I’m talking about!

Here are some crocheting tips to establish consistent crochet work:

1. Count, count, count! It is really important to count the stitches in a row or round so that you know you aren’t adding or missing stitches by accident. You can also use stitch markers to help you count.

2. Slide loops back. When you put “loops” on your hook, be sure to slide them back to the part of the hook that is leveled. The edge where the hook is, is normally skinnier than the rest of the hook. Pushing the loops back to the leveled part of the hook will ensure that all the stitches you make will consistently be the same size and have the same tension.

3. Not too tight or loose. Make sure that the loops on you hook aren’t too tight or too loose. It should be loose enough so that it is easy for you to slip your hook in and out of loops. It should be tight enough such that the loops are securely wrapped around the leveled surface of the hook.

4. Know how long to make your turning chain. As a rule of thumb you make 1 chain for single crochets, 2 for half double crochet, 3 for double crochet, and so on. This will ensure that the beginning of your new row/round will be the same height as the rest of the row/round.

5. Use different hook sizes. Sometimes you may find that your foundation chain is much tighter than the rest of your work. Try using a larger sized hook for the foundation chain or for the adventurous try the foundation single crochet (can be altered for other crochet stitches too).

6. Practice. Practice makes perfect, as the old saying goes. Sometimes the best way to learn is from doing, no matter how long you end up doing it for.

7. Crocheting should be relaxing and fun. No brute force needed. If you notice you’re pushing and pulling your hook with a lot of strength, then there’s probably something wrong.

Do you have a crochet tip to add?

How to Crochet: Tunisian Knit Stitch (tks)

Posted in Tutorials and Help on July 14th, 2009 by Rachel Choi – 40 Comments
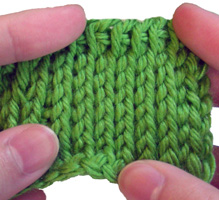
Have you ever wanted your crochet to look like knitting? Well here is the stitch for you! The Tunisian knit stitch is really similar to the Tunisian Simple Stitch also known as the afghan stitch. Please check that tutorial first before attempting this one since I’ll be making lots of references to it.

The only difference between the Tunisian simple stitch and the Tunisian knit stitch is the location you insert your hook during the forward pass/row.

This tutorial is for both right and left handed people. For left handed pictures, roll your mouse over the image and it will change for you.
read more »

Finish Off and Weave in Ends in Crochet

Posted in Tutorials and Help on July 11th, 2009 by Rachel Choi – 40 Comments

I’m often asked, “What is the best way to finish off and weave in ends?”

My answer: When I finish off I like to make one chain then cut the yarn and pull the strand of yarn through the chain if I’m working in rows. This makes a small little knot. If I’m working in the round I like to slip stitch in the next stitch, then cut the yarn. Then I weave the ends into the back side of the work. If you’re really scared that it’s not secure, such as when you do a color change, then feel free to tie small knots. Yes, I make knots.

I have a feeling that every time someone asks me this question, they expect some magical answer. But hey, I’m human and I just tell you what I do.

How do you finish off and weave in ends? Feel free to share your technique in the comments section below!

P.S. You can view a photo tutorial of techniques that Erin uses to weave in ends in her post: Perfecting Your Craft: Finishing the Project

How to Hold Yarn in Crochet

Posted in Tutorials and Help on July 5th, 2009 by Rachel Choi – 22 Comments

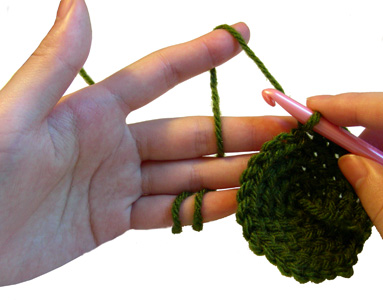
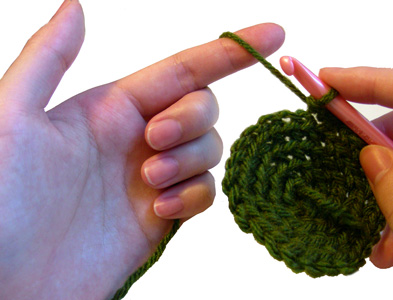
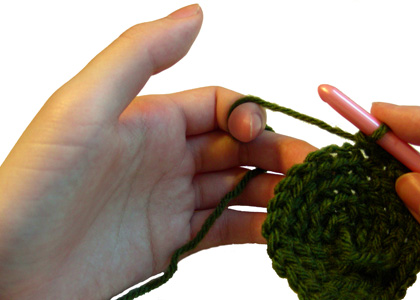
Just like there isn’t one way to hold a crochet hook, there sure isn’t one way you have to hold your yarn. It’s all about experimenting and finding what works for you! So here are some ideas for holding your yarn to get you started if you are a beginner. In all the pictures the thumb is normally down helping to hold the work, but for the sake of showing where the yarn is, the thumb is up.

For left handed pictures roll your mouse over the image and it will change for you!

I’ve seem many people hold their yarn like this, wrapping the yarn around the pinky finger and over the pointer finger.


Others like to do something similar, but weave the yarn between the ring and middle finger to give it more tension.


And then there’s the method to grip the yarn with 3 fingers and then over the pointer finger again.


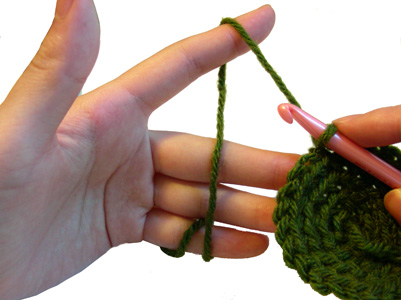
I’m sure I missed some other methods, but for the life of me I can’t crochet using any of the above methods because I can’t keep my finger straight! So here is a picture of what I do. I weave the yarn between my ring and middle finger then make a hook with my pointer finger.


Feel free to try some methods out and if none work for you, there’s no shame in inventing your own method!

How do you hold your yarn?