Crochet Finish Technique: “Crochet Evenly Aroundâ€
By Corinne Munger – 118 CommentsMany crochet items appear unfinished due to the uneven look of the sides. There are little “bulges†and “indents†that just don’t look as even (pretty) as the first or last rows and it can make an item look unappealing. To fix this, many patterns simply say, “Crochet Evenly Aroundâ€. What does that mean and how do you accomplish this?
What it means is that you need to crochet all the way around your piece, and place the stitches evenly around the edges so that there is an equal amount of stitches on both sides, and, of course, an equal amount on the top and bottom of your piece. You may have taken a stab at doing this only to end up with a ruffled edge, or too tight of an edge that makes your edges pull. But “crocheting evenly around†is actually easier than it seems. There are just a few simple rules to remember, but first let’s look at the example.
Step 1: When your piece is complete, you want to turn your work to start the edging (you can change colors at this point if your edging is to be a different color). Please note that it is best to make the first row of edging in single crochet, and then if you want to make a fancier edging, you’ll have a smooth base to work from. So, turn your work and single crochet to the end of the row. When you reach the end of the row, make 3 single crochet stitches in the corner – this is the First Rule of Thumb for this technique. This will “turn†around the corner so that you can start crocheting down the first side. Always crochet 3 stitches in the corners.
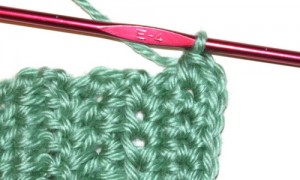
3 sc in the corner
Step 2: The second rule of thumb to remember when crocheting the sides: The size of the stitch you are crocheting over determines how many stitches to crochet. In other words, if you are crocheting down the side of a single crochet, you will crochet 1 stitch over that single crochet stitch. If it were a half-double or double crochet, then you will need to crochet 2 stitches over them. And of course, if it is a triple crochet, you will crochet 3 single crochet stitches. Get it?
So if you have 10 rows of double crochet in your piece, when you’re working down the side, you would end up with 20 single crochet along the edge (2 stitches for each double crochet = 20 stitches) If you were crocheting along the edge of a piece that had 15 rows of single crochet, you would end up with 15 single crocheted stitches along the edge, and so on.
Here’s a little test: If you had a piece that had 30 rows, 10 of which were single crochet and the other 20 were half-double crochet, how many stitches should you have along the edge? Did you come up with 50? 10scx1=10sc and 20hdcx2=40sc 10+40=50sc)
Step 3: When you get to the end of the side edge, you will again place 3 single crochet stitches in the corner. You will now be at the bottom of your piece and you are going to single crochet along the bottom.
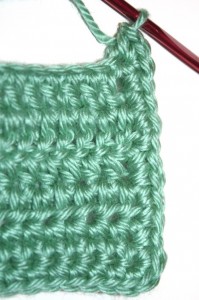
Crocheted Side Edge
The third rule of thumb: when crocheting along the bottom, you will only crochet in the remaining loop of your initial chain. One single crochet for each loop is all that is needed. Crochet across to the next corner and place 3 single crochet stitches in the corner. You will now be turned to start crocheting down the other side.
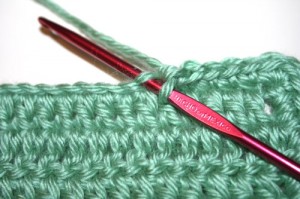
Crochet on the bottom edge
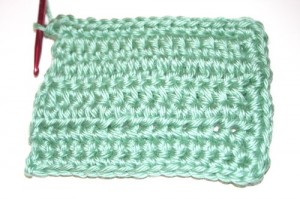
A square with edging 3/4 around
Repeat step 2 for this side. When you reach the corner, add 2 single crochet stitches to the 1st single crochet made in your edging (so that there are 3 total) and slip stitch. If you are going to add a fancy, decorative border, or just want to add more rows to your edging, you will begin it here. Be sure to chain the correct amount for your next stitch for your next row as needed (1 for sc, 2 for dc, etc.). If you are just adding more “simple” crochet (sc, hdc, dc, tr), Always remember to place 3 stitches in the corner (this would be in the 2nd stitch of the 3 corner stitches).
And that is “Crochet Evenly Around”!
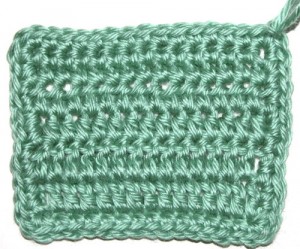
A completed square with edging
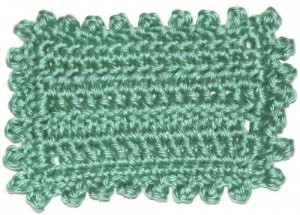
A decorative edging
Need more help crocheting evenly around? Feel free to leave a comment below!
In response to our first posters comment: “Where do I insert the hook?”, here are some additional pictures and instructions. Hope this helps!
This sample was made with one row of double crochet and one row of half double crochet – the first row was made crocheting 5 dc (double crochet) and the second row was made crocheting 5 hdc (half double crochet). After the second row, ch 1 then turn and sc in each st across. 3 sc in corner stitch to turn.
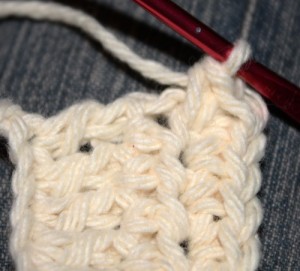
3 sc in corner to turn
You will then turn your piece and will have a ch 2 (sideways) as your first stitch to crochet into. Make 2 sc around/under (same thing) the ch 2.
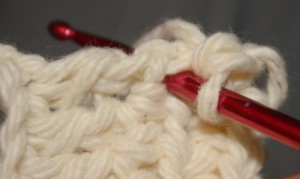
Insert hook under chain 2
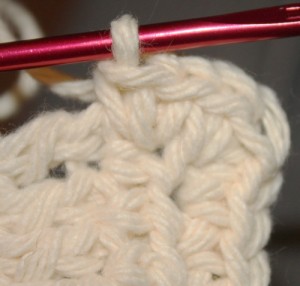
2 sc under (around) ch 2
The next stitch you come to is a dc. Note that a double crochet has two “halves” if you will. You will be inserting your hook into the “top” half of that stitch so that you are basically crocheting AROUND it or UNDER it (again, same thing) and sc 1.
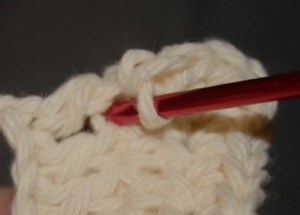
Insert hook under first 1/2 of dc
Do the same thing on the “bottom” half of the dc.
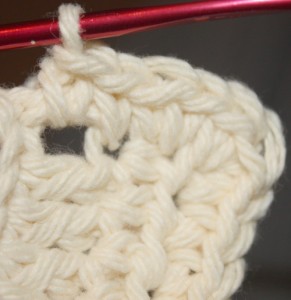
SC completed under (around) bottom half of dc
Now you may see that there’s a “hole” formed by making this stitch. It’s actually not as bad as it looks in this picture. But if you want to avoid this, you can take a different approach by crocheting into the outermost “loop” of the dc, as shown here:
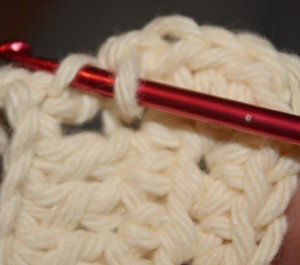
Sc INTO side LOOP of bottom half of dc
You will then be at the end of the row, so you will ch 3 into the corner and your piece will again turn. The first stitch you are looking at now is a ch 2 (this is your turning chain from the dc row). You will simply make 2 sc around the ch 2.
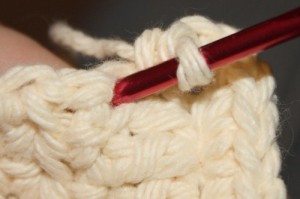
Sc into bottom half of dc
And then 2 more sc into (around/under) the last hdc.
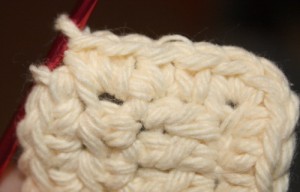
2 sc under hdc
And here is your finished sample with a completed border
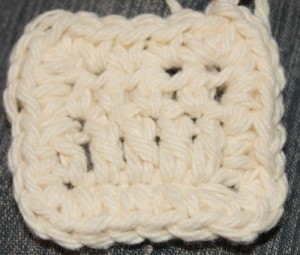
Completed round of edging


This is an area I struggle with… When doing an edging and crocheting on the side of a half double or double crochet where do I insert the hook?
Hope this addition helps you out! Let me know if you still have problems – Corinne
Corinne,
I am at the end of a crocheted throw and just about ready for the edging. The throw is done with a “Side-saddle/Cluster” stitch which is beautiful, but leaves an extremely scary row end…both ends. I believe I can handle the top and the bottom, but I have no idea how to tackle the sides. Any suggestions would be greatly appreciated. Dennise
Hi Leslie, I’ve added lots of pictures and some additional instruction in hopes of explaining this better to you – give it a try and let me know how it works out! Thank you for your question. This is a difficult one to explain, but once you get it, it’s easy as pie! The key is to be consistent, no matter which route you take. As long as it looks even and lays flat when a round is complete, it’ll be fine – that’s the goal.
Thanks for the pictures on finishing the edges! Awesome!
Thanks so much for this great tutorial. I have always struggled with this, but not any more.
Yay! Happy to hear this helped!
Thank you for this – I was thrilled to find it in your newsletter because I’ve always had a problem crocheting down the sides of finished piece.
So glad to hear that it helped you! Please let us know if there are other instructions you’d like to see!
One of the best tuts I’ve seen. Thanks for the time & effort !!
Thank you for your comment. I hope this helps you in whatever you make – now and in the future!
Thanks a lot for this article. It helped me quite a bit when I was trying to finish a borner around a baby blanket that was a combination of double crochet and single crochet stitches.
Glad this helped you! It does seem tricky when working with different sized stitches – just remember the “Rules of Thumb”.
This was a nice reminder for me since I ‘m working on a granny square afghan that I need to finish.
Hi Margaret – Thanks for pointing out the “granny square” regarding this tutorial. Granny squares are especially tough because you MUST end up with the same amount of stitches on all sides – on all pieces – so that when you sew them or crochet them together, they actually match up! lol I never really understood why so many crochet sites regard granny squares as “easy”. Maybe making 1 square is, but finishing and assembling can be complicated – made worse by not having even sides! I hope this tutorial helps bringing it all together a little easier!
Finally after so many years of crocheting a system that sounds like a Winner!!!
Thank~You so Much!!
Nancy
Let us know when you use this tutorial and how it works out for you! Thanks for your comment!
That is awesome! Now I know what I have been doing wrong all this time. I am making a baby blanket for my sister and it has ruffles so everything has to be perfectly square. I just tried this and never would have figured it out myself. All the stitches are perfect. Thank you so much.
What a great tutorial! Nice big pictures. Easy for these old eyes.
Just to give another view, for myself I don’t always use 3 stitches in the corners. most times this will do, but there are occasions where the work will curl for me with 3 sc. This really annoys me too! LOL I feel like it should work. What does sometimes work for me is to use a taller stitch in the center (sc, hdc, sc) or sometimes I will need 5 sts or need to put chains between stitches. This is probably caused by the way I make my stitches and my personal tension.
For the sides, and this might not work for everyone, but for myself I find that if I am working in dc, if I use a hook one size smaller for the sides my work lies perfectly flat. For sc I have to fiddle with it, sometimes skipping a stitch here and there to make it lie flat. For hdc I use the same size hook and put one stitch in each hdc post. As I said though, this is an individual thing.
Hi Sandie – These are some wonderful suggestions. Yes, we all crochet with different tensions. I, for one, am a very loose crocheter and have had to make adjustments by whole life. As one progresses in crochet and becomes more familiar with their own style, they too can use different stitches/techniques to get the same result in any pattern. There are no “true” hard and fast rules in crochet, so there’s always room for adjustments. These are really good points that you made. Thank you for your contribution!
I have two questions. 1) I a having problems with the gauge on my crocheting patterns. I used the required hook for the wrist pattern and it was too big. I went down to a size I and it’s smaller but still not the required gauge. I have the correct number of stitches, but still too any rows. 2) On patterns, when I finish my chain and do the first row, after I turn for the second row, where do I take my first stitch? In the turning chain stitch or the first stitch after the turning chain? I usually end up with a space at the beginning of the rows after that. Thanks
Hi Martha, you seem to experiencing things I went through for a long time. WHENEVER I start a new pattern, I already know that I MUST use a hook 2 sizes smaller than the instructions call out. I crochet that loosely! So keep going down in size on your particular pattern until you get the same size as the gauge calls out. As you continue to crochet, over time, you may tighten up your work and then you can adjust again. It happens. For your second question….. If a pattern tells you to chain, let’s say. 30, it SHOULD then tell you “sc in third ch from hook” so you will count 3 chains (from the hook) and insert your hook into the next, or 4th chain. For the next rows, your pattern should say something like ch 3, turn. Once you’ve turned your piece, then your next (1st) stitch for that row will be the stitch AFTER the ch 3. If you count your stitches while crocheting, you will be able to tell if you’ve crocheted the correct number. Even after some 45 years, I still count – because when I don’t, “wonky” things happen! Hope this helps you!
May I make a suggestion for beginning a piece? When I make a beginning chain, and do not use the foundation sc or dc stitch, I make each stitch on row one in the “hump” of each chain. This looks like a finished stitch and makes an easy edge to put a border on. I hope I have explained it well enough! LOL
Thanks, Collette. I’m going to try that technique on my next project.
I always use the “hump” (don’t know what else to call it – not sure it has a name!) method except for the rare occasion it is not compatable with the pattern or just doesn’t look good. I was so happy to have discovered it as it makes that starting chain so much easier to put the border on. I love it!
can anyone tell me please what a pattern means when it says (now crochet only over the outermost 18 sc/tr at right side)? I am making a dress and I have finished the front and back torso, and that is my next instruction and I have no idea what Im supposed to do. Thanks
When the circumference is 12″ how big should the finished piece be?
I’m not completely sure what you’re asking, but if you want to know what the diameter is, it would be about 3.82″ (12″ divided by pi 3.142). The diameter is the measurement across the piece and the circumference goes all the way around. Hope that helps!
Sorry, I didn’t word that correctly. I’m making boot cuffs and the person’s leg measures 12″ circumference. Do I make the cuff 12″ also, or a little larger so I can go on more easily?
Ok, I understand now…. If the person’s leg is 12″ around, I probably wouldn’t go any larger as yarn always stretches. If anything, I would consider making it a little smaller so that it stays put. Since it’s a boot cuff (I’m assuming for the top of the boot), it won’t make a big difference since it can’t really move with the boot on. A 12″ crocheted band will stretch considerably (unless it’s made of a non-stretchy yarn) so I’m sure that size will be fine.
AMAZING!!!! Thank you!! I’m not so intimidated in doing my next afghan 😀
This is a great techniques for making an ‘eternal’ blanket.
I came across it almost by mistake and I am using it with my young beginners (my own two sons and two girls to whom I teach English)
We start with a chain and then rows to form a square.
We then crochet around the edge exactly as described above – with 3 single stitches in each corner stitch.
We then continue doing this ‘for ever!’ … with colour changes of course …
My example piece is now more than ‘cushion size’ but the children’s ambitions of producing a blanket for their beds are some way off!
If your ambition is a bedcover it is worth starting with an oblong in the middle before going around it, therefore producing an oblong blanket in the end.
I know it ha been years since the original reply,, but the students could make a pillow top, or multiple sxpieces that later become a blanket
Multiple square pieces..
Thank you for your great instructions.
I am finished with a large afghan that was done in single crochet but I’m having problems how to go down the edges with a single crochet border. I have 350 rows and I started down the side putting a sc in each row but the stitches are a lot bigger than the top stitches. I have read to space sc’s evenly down the side but I was wondering if there was a formula to go by or some other solution.
Hi Linda! 1 sc for each row of sc is a good rule of thumb. But if it seems to be too many stitches, then you can try to do 1 sc for every other row of sc instead. Try working a few stitches along the side, then laying your piece down to see if it looks okay. That way you don’t have to do the entire side before you realize it looks funny 🙂
I have found that if I use a hook one size smaller for the sc edging there is less trouble with bulging. I guess that would depend on your personal tension though. Something to try.
I have finally finished the first side, I sc in 7 rows then skipped one row. This seems to be the best.
Now your third rule of thumb is to sc in one loop on the bottom end. When I do my first row of sc, I sc in the bump of the chain stitch, so would I still only sc in one loop or do I go ahead and sc in both loops that are left on my chain stitch??
I would go ahead and sc into both loops. There’s no right or wrong way to do it though, it’s whatever way you like!
Thank you so much for all your help.
Hi Corinne,
Thanks for leaving a comment on my blog. I must admit to not having done any work on it for over a year now. In fact, I’m just starting to think about it again!
Your crochet instructions are extremely clear, and the idea of stitching all the way round a piece does neaten it beautifully.
thank you for your tutorial, im just wondering can you help me please, how do i crochet evenly over decreases ?! some of my stitches look longer than others, i know i must be putting the hook in the wrong place, but i just cant seem to figure it out ! any help would be really appreciated thanks 🙂
Thanks Corinne for the tutorial. How do you handle a border that is sc all around, then hdd all around and sc all around. I start off fine with the sc but once I change the stitch and then return to the sc, I always have extra stitches than I originally had. With a hdd row, I add 5 stitches to the corner which seems to work fine. But when I return to the sc, how do I handle that corner with the 5 stitches. Thank you for any comments you may have.
Hi Pat! After the hdc, when you go back to the sc, you would do the 3 sc in each corner. It’s just that the corner shifts a little bit because you had the 5 hdc in the previous row. So you’ll make the 3 sc into the center hdc of the 5 hdc.
Thanks but do you skip over any part of the 5 stitches of the hdd? If not I would think that I end up with more stitches on each side. My afghans are beautiful but I ALWAYS seem to struggle with corners. Ugh.
Thank you so much! I’ve been struggling with this for a while. Once I saw those last pictures, it all kind of snapped into place!
THANK YOU so much for this tutorial. I only started learning crochet in February and this tutorial has helped me so much. It all makes sense now. Again, THANK YOU!!!!
I have a pattern for a dog sweater that is granny squares. The instructions to begin the granny square has you chain five then two dc into the center, then ch2 and 3dc into the center 3times to create the square. To complete it instructs you to slip stitch into the third chain stitch. I cannot seem to complete the square so the chain five stich lays properly. What would be the effect if I only chained three instead of five? I thought the purpose of the chain is to give you the hight of the stitch, why would you chain five for a double crochet?
Thank you!
Geri Jarvis
Hi Geri, it sounds like in your pattern the chain 5 will count as 1 dc and 2 chains. The first 3 chains you make is like the equivalent to 1 dc. And the remaining 2 chains is like the “ch 2” you are making between each 3 dc. When you get to the end you’ll probably only need to make 2 dc instead of 3, since the first 3 chains will be apart of that group of double crochets.
But if the chain is suppose to count as part of the first set of double crochets, then it should probably be ch 3 instead. Might want to check with the designer if you can. If it is a pattern on Crochet Spot, let me know which one and I can take a better look.
I love this I love this!! Finally, and I love all the comments and suggestions too,
the only way it could be better? Do a live tutorial on you tube!! Now that would
be even greater!! TY so much for taking the time to do this for us, I know
that I’m thrilled and seems a lot of other crocheter’s are also! Cat
My piece has 71 rows of dc. They want me to evenly work 163 dc across end or rows. If I double 71 it only gives me 142. Where do I add the extra 21 rows?
I am working with an afghan pattern and the edging instructions state to chain one…do not turn and sc evenly around the edge with three sc in each corner. If I chain one at the end of my last row and do not turn my work, should I start the first sc going down the side of the afghan? To me this would be logical so ther would be three sc in each corner and you finish in the top left corner. Does it really matter if you turn or do not turn your work?
Yes, you would start along the side of the work. Turning will determine which side of the blanket will be the front. The side that is facing you when you are working the border is usually the front of the work. Depending on your pattern it might not matter though.
Thank you for confirming!
Thank You so much for your excellent tutorial about straight edges. You are so good at explain things. Thank You again.
Ahhh…you made is so clear! Thank-you!
I have a few questions. Instead of turning in the ‘first rule’, could you sc two more times in that last stitch at the end of your project and continue with the uneven edge?
Also how do you stitch another row of scs after completing the border? Do you just continue another row or do you have to chain and turn?
Thanks 🙂
Hi Rachel!
Yes, you can continue with the uneven edge. There are variations of how to crochet evenly around, this tutorial just shows you an example of one way.
If you want to make another row of single crochet you will just go around again. Turn and chain is up to you or the pattern you are working with. Depends on what side you want to be the front and also if you are crocheting seamlessly like a spiral or not. Feel free to experiment and see what look you like!
thanks a lot for your detail tutorial. Edging a crochet project have been a hardest thing all along for me.
Thank you so much for this wonderful information!! Finally I can give a clean and completed look to my work. This was so easy following your instructions. Thanks again!!!
HI I am crocheting a christening blanket and the directions say work 157 sc evenly spaced across end of rows… I am trying to figure out how many sc on each of the four sides but the math does not make sense to me…help!! Thank you.
Melodie
Hello! It doesn’t have to be perfect, as long as you end up with the number of stitches you need. One side may have more than another, a slight difference isn’t that noticeable. I’m not sure if you are working 157 sc total or 157 sc on each side. If you are using a pattern on Crochet Spot, let me know which pattern it is and I may be able to take a better look at it and help better.
Thank you! This post was super helpful to me. I’ve only been crocheting for one year, and my afghans always seem weird due to my bunched up borders! Not any more 🙂
Thank you!
I’ve just discovered your blog while I was learning a new stitch for a baby blanket in Knit and Crochet Daily, and I’m so grateful for your help cause I’m a selftaught in crochet.
Thank you.
This tutorial is of great help to me, I will save it with my favorites.
I made a double crochet blanket with 100 chains and approximately 60″ long. I did not count the number of rows, so how can i determine the number of single crochet to make down the sides when creating a border/edging? Help!
I have a blanket that I am working on the edging finally. The short edges are the easy part but when I get to the long edge I cannot seem to get it out evenly. It requires 163 stiches spaced evenly by working in the free loops. I counted my free loops and I have like 69 free loops? Any help would be appreciated.
Thank you!!
When u want to add another row of trim u say that when u get to corner again to always add three stitches putting 3 in the second stitch of the first three stitch corner so do u skip the stitch before and after the 2nd stitch?
Hi Jan! You will make a single crochet into the first and third single crochet on the corner. They will act as part of the sides.
I AM SO VERY NEW TO CROCHETING ..I KNOW THE BASIC STITCHES..I DO KNOW THAT A PATTERN FOR A DISH CLOTH ..TELLS ME WHEN I COME TO THE END OF THE ROW …CH I AND TURN… HOW DOSE THAT WORK OUT WHEN WORKING THE EDGES WITH SC ALL AROUND AS A FINISH CONFUSED…THANK YOU THE TOP AND BOTTOM ARE FINE
ITS THE SIDES THAT LOOK VERY SAD…HELP ME THE NEWBE KID ON THE BLOCK
Oh how I wish I had seen this a year ago! Haven’t crocheted in years, but wanted to make a Christening blanket for my first grandchild, I did very well on the blanket itself, but never could get it ‘finished’ properly. What you say makes total sense!
I love this pattern. I am working on my fifth blanket. It is so easy, just as you said. Thank you
I read a good tip, I believe in a crochet borders book (or possibly on line), suggesting that the first round of single crochet be done in the color of the main piece in order to have it blend in better and even up the sides to create a smooth base for subsequent decorative edging. Once the first round is done, the color may be changed for the decorative part of the border. If I can find the book or site again, I’ll be able to give the author credit and share the source for everyone’s use.
Thank you so much for pasting this. I have been crocheting for many years, but taught myself so I never knew this.
Hi I added a single crochet border to my blanket which is all done in single crochet. Different colts joined with invisible seam that part came out fine. I did the single crochet border one row all around the correct amount of stitches I was careful but it looks a little wavy. Is this normal because I used different skeins joined? If not what do I do? Thanks.
Hi Mary! Some ruffling is normal, but if it is a lot of ruffling you may have too many stitches on your border. The number of stitches isn’t always an exact number, such as 1 or 2 sc per row. Sometimes you have to lay your work down as you are crocheting to see if it is turning out correctly and not ruffling or cupping and adjust accordingly.
Thanks Rachel I have it laid out on a double bed. I made the border there, how do I adjust it if there’s to many stitches? I saw a video where person did 2 sc stitches in the corner a chain stitch then another sc stitch. Then he used only the small holes added a chain stitch then sc. He did every other stitch. Will this work too? This is my third attempt. My practice square patch was perfect.
You can adjust by using less stitches. You would have to undo some of the work and redo it. Sometimes it is trial and error. The border you described sounds like it would work too. There are so many different borders you can use!
Hi Rachel thanks for all your help. I’ll try again. Lol
Hi Rachel
I’m redoing my border as I mentioned in a video I saw and it seems to be working well. What I did was to begin, 1 sc in top corner chain 1 skip a hole then 1 sc chain 1 skip a hole repeat. Every other hole. ( the small holes.) I’m checking as I go along. So far it’s laying straight like I want it to. My yellow yarn is a little thinner in texture so there’s only a minuscule not very noticeable difference not much. It lays very flat so third times a charm. Thank you for your advice. It was very helpful in figuring this out. It’s a gift for my brother in Germany who will be coming to the Western Catskills to visit me and pick it up. Thank you again. I love your pattern for this technique it’s easy to understand.
That’s great Mary! I’m so glad that it is turning out well 🙂
Hi
I am making a 4inch border on an afghan and my corner where I end and start in the round is adding sets to the sides and edges. I have ripped out and started over so many times I am going to throw it away. can you help? The pattern calls for sc and the beginning corner starts with Ch 1, (sc, ch1, sc) in same sl st – corner made. Follow the pattern till I have to join with sl st in beginning sc. Then it wants me to sl st in ch1 corner sp, ch 1, (sc, ch 1, sc) in the same ch1 corner sp. I am counting 2 added sets. Am I correct? My corner starts to get lop sided after a few rounds.
Hi Christine! You may want to ask the designer of the pattern if you can. He/she will probably be able to help you the best.
From what you mentioned it looks like you’re doing ch 1, sc, ch 1, sc in each of the corners. So when you get to the very corner space you’ll work that into it. You are making 2 sets, but seems like only 1 set is added to make the round slightly bigger than the last.
Again, it might be best to ask the designer of the pattern if you can. I don’t want to give you the wrong info.
Ok so when u r counting the stitches dwn the side do u count the 3 corner stitches? Do u count the very corner st once for each side or just once?
The middle stitch of the 3 stitches will be the corner stitch. The first stitch is counted on one of the sides and the last stitch is counted on the other side.
Hi, I am having problems with the middle corner stitch when it comes to joining my pieces together. Do I sew this stich to one side and not the other or do I try and attach it to both sides or do I do something completely different?