Crochet Finish Technique: “Crochet Evenly Aroundâ€
By Corinne Munger – 118 CommentsMany crochet items appear unfinished due to the uneven look of the sides. There are little “bulges†and “indents†that just don’t look as even (pretty) as the first or last rows and it can make an item look unappealing. To fix this, many patterns simply say, “Crochet Evenly Aroundâ€. What does that mean and how do you accomplish this?
What it means is that you need to crochet all the way around your piece, and place the stitches evenly around the edges so that there is an equal amount of stitches on both sides, and, of course, an equal amount on the top and bottom of your piece. You may have taken a stab at doing this only to end up with a ruffled edge, or too tight of an edge that makes your edges pull. But “crocheting evenly around†is actually easier than it seems. There are just a few simple rules to remember, but first let’s look at the example.
Step 1: When your piece is complete, you want to turn your work to start the edging (you can change colors at this point if your edging is to be a different color). Please note that it is best to make the first row of edging in single crochet, and then if you want to make a fancier edging, you’ll have a smooth base to work from. So, turn your work and single crochet to the end of the row. When you reach the end of the row, make 3 single crochet stitches in the corner – this is the First Rule of Thumb for this technique. This will “turn†around the corner so that you can start crocheting down the first side. Always crochet 3 stitches in the corners.
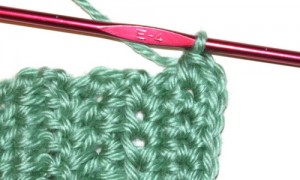
3 sc in the corner
Step 2: The second rule of thumb to remember when crocheting the sides: The size of the stitch you are crocheting over determines how many stitches to crochet. In other words, if you are crocheting down the side of a single crochet, you will crochet 1 stitch over that single crochet stitch. If it were a half-double or double crochet, then you will need to crochet 2 stitches over them. And of course, if it is a triple crochet, you will crochet 3 single crochet stitches. Get it?
So if you have 10 rows of double crochet in your piece, when you’re working down the side, you would end up with 20 single crochet along the edge (2 stitches for each double crochet = 20 stitches) If you were crocheting along the edge of a piece that had 15 rows of single crochet, you would end up with 15 single crocheted stitches along the edge, and so on.
Here’s a little test: If you had a piece that had 30 rows, 10 of which were single crochet and the other 20 were half-double crochet, how many stitches should you have along the edge? Did you come up with 50? 10scx1=10sc and 20hdcx2=40sc 10+40=50sc)
Step 3: When you get to the end of the side edge, you will again place 3 single crochet stitches in the corner. You will now be at the bottom of your piece and you are going to single crochet along the bottom.
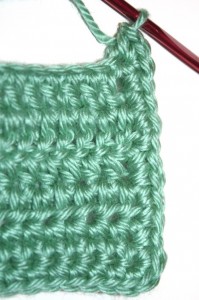
Crocheted Side Edge
The third rule of thumb: when crocheting along the bottom, you will only crochet in the remaining loop of your initial chain. One single crochet for each loop is all that is needed. Crochet across to the next corner and place 3 single crochet stitches in the corner. You will now be turned to start crocheting down the other side.
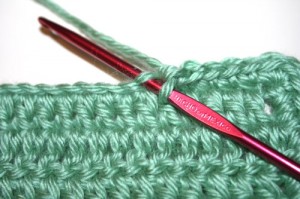
Crochet on the bottom edge
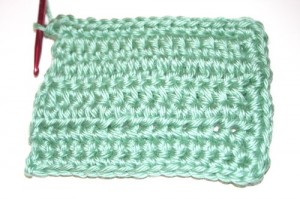
A square with edging 3/4 around
Repeat step 2 for this side. When you reach the corner, add 2 single crochet stitches to the 1st single crochet made in your edging (so that there are 3 total) and slip stitch. If you are going to add a fancy, decorative border, or just want to add more rows to your edging, you will begin it here. Be sure to chain the correct amount for your next stitch for your next row as needed (1 for sc, 2 for dc, etc.). If you are just adding more “simple” crochet (sc, hdc, dc, tr), Always remember to place 3 stitches in the corner (this would be in the 2nd stitch of the 3 corner stitches).
And that is “Crochet Evenly Around”!
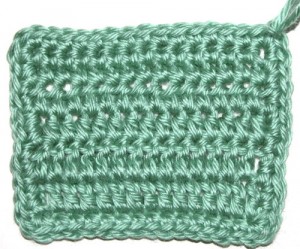
A completed square with edging
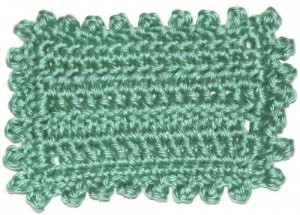
A decorative edging
Need more help crocheting evenly around? Feel free to leave a comment below!
In response to our first posters comment: “Where do I insert the hook?”, here are some additional pictures and instructions. Hope this helps!
This sample was made with one row of double crochet and one row of half double crochet – the first row was made crocheting 5 dc (double crochet) and the second row was made crocheting 5 hdc (half double crochet). After the second row, ch 1 then turn and sc in each st across. 3 sc in corner stitch to turn.
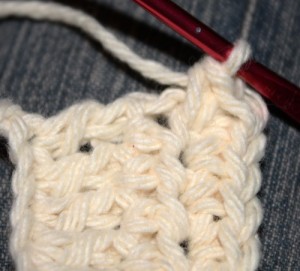
3 sc in corner to turn
You will then turn your piece and will have a ch 2 (sideways) as your first stitch to crochet into. Make 2 sc around/under (same thing) the ch 2.
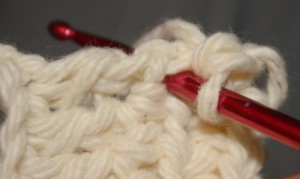
Insert hook under chain 2
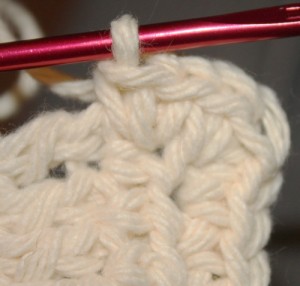
2 sc under (around) ch 2
The next stitch you come to is a dc. Note that a double crochet has two “halves” if you will. You will be inserting your hook into the “top” half of that stitch so that you are basically crocheting AROUND it or UNDER it (again, same thing) and sc 1.
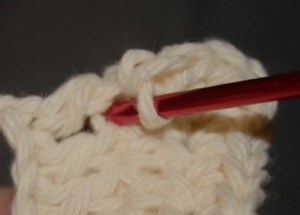
Insert hook under first 1/2 of dc
Do the same thing on the “bottom” half of the dc.
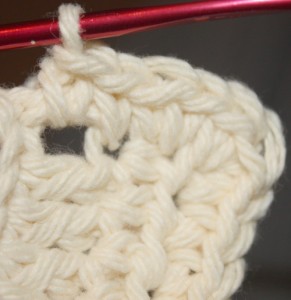
SC completed under (around) bottom half of dc
Now you may see that there’s a “hole” formed by making this stitch. It’s actually not as bad as it looks in this picture. But if you want to avoid this, you can take a different approach by crocheting into the outermost “loop” of the dc, as shown here:
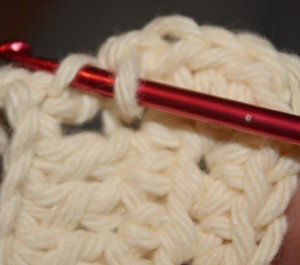
Sc INTO side LOOP of bottom half of dc
You will then be at the end of the row, so you will ch 3 into the corner and your piece will again turn. The first stitch you are looking at now is a ch 2 (this is your turning chain from the dc row). You will simply make 2 sc around the ch 2.
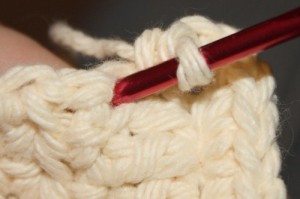
Sc into bottom half of dc
And then 2 more sc into (around/under) the last hdc.
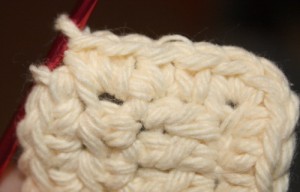
2 sc under hdc
And here is your finished sample with a completed border
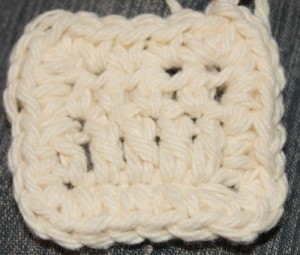
Completed round of edging


Can anyone please tell me if these stitches for borders are in US crochet terms or UK crochet terms. Thanks
Hi Sophie! All of the patterns here on Crochet Spot are in US terms.
Do you have instructions for finishing edges for hairpin lace other than tassels. I would like to have the same edge all the way around my afghan. Would appreciate your help…Thanks
How would you work the first border around a corner to corner where the stitches along the sides vary? Thank you.
Hi Mimi! You can work around the border using this same technique even if stitches around the border are different. You will vary the number of stitches depending on the height of the stitches used in your project.
Hi there,
I have followed the instructions here to create a border around my blanket. The whole thing is double crochet, so I have made 2 single crochet stitches along the sides for each row of double crochet. The top and bottom lie flat, but the sides still end up “ruffley” if that makes sense. I can’t figure out what I’m doing wrong.
Hi Olivia! Ruffling is usually due to having too make stitches along the sides. Although 2 stitches per double crochet is recommended, it doesn’t always work out for everyone due to individual tension. I would recommend trying fewer stitches and laying your work flat every few stitches to check your work as you crochet. If it starts to ruffle crochet less stitches, if it bowls then add more.
would using a different size crochet hook to edge solve that problem? I have the same problem with the edge not laying flat and I tried what you said: do a few and check, add or remove to get it flat but it still doesn’t look right
Also- what do you do if you’ve made stripes? I made a waves baby blanket repeating four colors three shades of pink and cream
2 rows cream
2 rows dark pink
2 rows cream
2 rows med pink
2 rows cream
2 rows light pink
2 rows cream
When I tried to do the edging on the side, no matter what color I used, and I tried all four! the stitches were so glaring THERE contrasting the wave rows,that they made the blanket look sloppy. Is there a solution to that problem? or is that just the way a multicolor striped blanket going to look?
You can try using a different hook size and see if that helps you. It may just take some practice and repetition to get it to look the way you want. Also, try not to be too hard on yourself, you are probably working the stitches just fine. For the different colors, yes, it will have that stark contrast. One tip that may help is to try and insert your hook into the same place on the sides of each row so that it gives it a more consistent look.
thanks. I get what you’re saying-keep experimenting. And, yeah, I have this perfectionist streak!
Another thing you might try is to measure the side and measure the top. Let’s say the top is 24 inches and the side is 36″. How many stitches were in the top? Let’s say it was 96 (4 stitches per inch). In that case multiple 4 (stitches per inch) x 36 (inches) = 144 stitches on the side.
The last row that I did when I finished my blanket has kinda cluster stitches in double crochet. This kinda has a scallop look along the top of the blanket. My question is that when doing the single crochet edging should I do 2 sc in each of the 3dc that make up the cluster? Thank you for any advice you can give me on this.
I see all comnents was made in 2012.
I hope you can still answer my question.
How can i fix or unraffle my starting chains of my blanket that is nearly finished because it looks like i have more stuches at the end of the blanket than i started with.
Would it be possible to clip my first row of starting chains and row and to pic up the stiches and finished off by making increasing stiches in between to get the same amount of stiches that i have now at the end if my blanket?? Hope you can understand what i meen.
Hello! I wouldn’t advise cutting the starting chain. Crochet really only unravels neatly if you are undoing the last row you made. I would suggest leaving the blanket as is and being sure to check your work more carefully when you go to make your next blanket. Sorry!
Thanks for advice in detail. I’m a new crocheter and just finished first substantial project – a blanket. Pattern was not as descriptive re: How to stich side border edging and none on top and bottom. I wanted an all around border. Searched all over for detailed advice as I know no one locally. The blanket now has an simple edging all 4 sides and I’m so happy. Ready to start my next challenge. Again, thank you for sharing your knowledge and skills.
If I have chain 4 as my turning chain down the side of the blanket of each row, how do you recommend performing the single crochet border?
Thanks!
Hi Erin! You can do about 3 to 4 single crochets on the side of each row. I would recommend trying a few stitches then laying the piece flat to see if it looks right. Then you can adjust the number of stitches if you need to.
Thank you so much
The problem that I run into with my borders is when the top is scalloped or a shell pattern, how do I create a straight finish all around? My top always comes out uneven and you notice it when you go to fold the blanket. HELP
Hi Maria! I like to make an extra row of single crochet when the top is wavy. That is usually enough to get it to start to lay flat. Then when you do the actual border it will be flat like the rest of the border.
Hi, Maria! I have resolved this issue by crocheting a half-double crochet in the first stitch of the shell, then a single crochet in each of the next three stitches of the shell (assuming it is a standard five double-crochet shell stitch), another half-double crochet in the last stitch of the shell, and skipping the single crochet that is in between shells. Then I single crochet around. I hope that helps, and good fortune!
Hi! My question is similar to Erin’s…if I have chain 3 as my turning chain down the side of the blanket of each row, how do you recommend performing the single crochet border? I’m guessing 3 sc in each row?
This is my first border so I really appreciate any guidance!
Hi Carla! Yes, you can do 3 sc. I would still recommend trying a few stitches then laying the piece flat to see if it looks right. Then you can adjust the number of stitches if you need to.
I love these tips! Thank you. I wonder if you have a suggestion for how to handle things when your foundation chain is very tight. If I make one SC for each chain, my work doesn’t lie flat. If I add an extra SC every other chain, it lies flat but I have many more SC on the bottom of my piece than at the top. I would assume the latter is better but have been looking for some suggestions online. Thanks!!
Yes, the latter would be better. For future reference on new projects, you can also make the starting chain looser. One trick is to use a crochet hook one size larger to make the foundation chain and then switch to your normal hook for the rest of your work.
Thank you so much! I did use a larger hook but it’s still always something I struggle with. 🙁 It’s not TOO bad but the border definitely has been giving me trouble. Thanks for your help!!
I have made a reversible shell baby blanket but just don’t know how to pick up side edge stitches to make it look neat as one side shell ends white and the other grey and visa versa when turned over. So when picking up there is always a problem side. It is hard to explain. I have tried all ways. The sides even look better un edged but then the top and bottom look odd. Any suggestions please? Liz
Maybe only edge the top and the bottom if the sides look better without the border on it?
Thanks for the tutorial. It will help me immensely!
I have a project with 35 rows of single crochet that I need to go down the sides with 25 single crochets, what is the best way to figure this out without having to pull it out?
Thank you
janet
What do I do when the instructions want a specific number of stitches around each side?