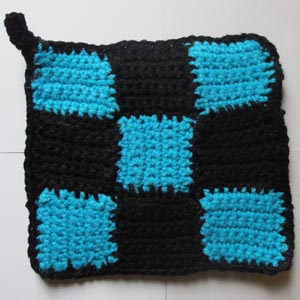
Crochet Pattern: Amish Nine Patch Potholder
By Emilee Gettle – 9 Comments| When I was young I knew an Amish lady who became a dear friend of mine. I loved visiting her small mercantile that was filled with every kind of calico and solid colored fabric imaginable. Amish ladies in the community made crafts to sell in her store to earn a little extra spending money. I love the simple color combinations of Amish crafts and created this potholder along the lines of what Lizzie might be selling in her store today. Since it is super thick it will guard against hot pots and pans perfectly. This project would also make a cute little pillow! |  |
| Skill Level: |  |
Finished Size: 8″ (20 cm) long and 8″ (20 cm) wide
|
Materials: Black Medium Weight Yarn (approximately 95 yards) Turquoise Medium Weight Yarn (approximately 50 yards) Crochet Hook H (5 mm) |
|
Gauge:
4 sc stitches = 1 inch (3 cm)
2 sc rows = 1 inch (3 cm)
Need help understanding the crochet abbreviations and symbols? Check out the crochet abbreviation chart.
Crochet Pattern: Amish Nine Patch Potholder
Nine Patch Square (Make 5 turqouise blocks and 4 black blocks.)
Row 1: Ch 10, sc in 3rd sc from hook (ch 2 counts as one sc now and throughout) and in each sc across: 8 sc
Row 2-8: ch 2 turn, sc in each sc across: 8 sc
Finish Off.
Assembly
You need to assemble the blocks into three rows and then assemble the three rows together into one square.
First start with three blocks: slip stitch a blue block to a black block and then finish with another blue block.
Then, slip stitch a black block to a blue block and finish with another black block.
Now, for the third set of blocks slip stitch a blue block to a black block and finish with another blue block.
Weave in any loose ends.
Potholder Back
Row 1: ch 30, sc in third ch from hook and in each ch across: 28 sc
Row 2-24: ch 2 turn, sc in each sc across: 28 sc
Finish off.
Potholder Assembly
With wrong sides facing, sc around the outside perimeter of the potholder to secure both sides together.
Loop
Row 1: ch 10, sc in third ch from hook and in each ch across: 8 sc
Fold over and sl st onto the corner of the potholder. Finish off.
What’s cookin’? Need help with this project? Jot your question below and I’ll get back with you!


Emilee! This is super cute and I LOVE the pillow idea! They will make great last minute Christmas presents! Thanks so much for sharing!
Angie… thanks so much! It is so nice to have handmade gifts tucked away for the hoildays for special people on your list! So glad that you thought this pattern would be worthy! 🙂
Thank you! We have 8 grandchildren and I can make a few and make some x’s and o’s for tic tac toe! Would be a fun thing for all of us to do!
OH Elizabeth!!! I adore that idea…perfect little travel game!!
Emilee Love your pattern. Keep up the good work!
I enjoy working along on some of your projects and seeing new ones weekly!
wow ! i live a few amish communities and this looks just like the colors they use… rachel your patterns are so fun !
Don’t understand your assembly instructions. They are too vague. Do I do slip stitche across the tops of all the squares in order then down another side to connect more??
Hi Kathy,
So sorry for the confusion! To assemble the square you will need to start with three small squares (2 blue and 1 black). First sl st the bottom of the blue block to the top of the black block. Next sl st the bottom of the black block to top of your last blue block. Do this for all three rows (alternating the colors according to the photograph). Then slip stitch each row (of three blocks) together.
I hope that helps! 🙂
Yes, yes thank you very much. I can visualize what you intended originally now! 🙂
Now I’m having difficulty with slip stitching the edges together because it does not leave a smooth edge and won’t lay flat once put together. I may just whip stitch the pieces together rather than struggle with slip stitching through heavy cotton yarn. My yarn is worsted weight cotton. The blocks will be lumpy if I use sl stitch.