Crochet Pattern: Bridgette Bunny Pillow
By Amy Yarbrough – 8 Comments
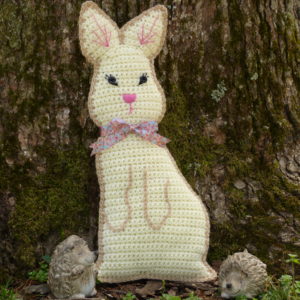
Do you remember the animal shaped pillows that used to be popular some years ago? I vaguely remember my brother having one growing up. They have made a comeback more recently, like everything always does, and you can buy them from various crafters today. While brainstorming a pattern for Easter, following the line of thought where bunnies and eggs were concerned, I began considering a way to adequately create a chocolate bunny. I started designing a 2D bunny form when I recalled these pillows and my design idea took on form.
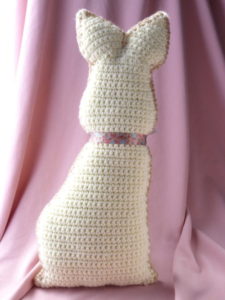
This bunny-shaped pillow is crocheted just like a normal pillow, with two identical panels, but with extra shaping to create the bunny form. Before the panels are joined, the details like the face and arms are embroidered with simple embroidery and surface crochet. Joining the panels tops off the bunny shape with a few decreases in the indentions and increases at the tips. And for the finishing touch, a lovely floral ribbon bow!
Give a more lasting gift this Easter of homemade quality, and simultaneously bring back a little bit of vintage!
| Skill Level: |
Finished Size: 8†(20cm) x 18†(46.5cm)
| Materials: Medium Weight Yarn (approximately 150 yards of color A, 30 yards of color B) Crochet Hook 7 (4.50 mm) 2 black buttons Polyester Fiberfill Pink and black floss and needle Ribbon |
Gauge:
7 sc = 2’’
7 rows = 2’’
Gauge Swatch: 2’’w x 2’’h (5 cm x 5 cm) ch 8.
Row 1: sc in second ch from hook and in each ch across: 7 sc
Row 2 – 7: ch 1, turn, sc in each sc across: 7 sc
Finish off.
Need help understanding the abbreviations and symbols? Check out the crochet abbreviation chart.

Crochet Pattern: Bridgette Bunny Pillow
Pillow Panel (make 2)
Row 1: with color A, ch 30, sc in second ch from hook and in each ch across: 29 sc
Row 2: ch 1, turn, sc2tog, sc in each sc across until 2 sc remain, sc2tog: 27 sc
Row 3: ch 1, turn, sc2tog, sc in each sc across: 26 sc
Row 4: ch 1, turn, sc2tog, sc in each sc across until 2 sc remain, sc2tog: 24 sc
Row 5 – 6: ch 1, turn, sc in each sc across: 24 sc
Row 7: ch 1, turn, 2 sc in first sc, sc in each sc across: 25 sc
Row 8: ch 1, turn, sc in each sc across: 25 sc
Row 9: ch 1, turn, sc2tog, sc in each sc across: 24 sc
Row 10 – 17: ch 1, turn, sc in each sc across: 24 sc
Row 18: ch 1, turn, sc in each sc across until 2 sc remain, sc2tog: 23 sc
Row 19: ch 1, turn, sc in each sc across: 23 sc
Row 20: ch 1, turn, sc in each sc across until 2 sc remain, sc2tog: 22 sc
Row 21: ch 1, turn, sc in each sc across: 22 sc
Row 22: ch 1, turn, sc in each sc across until 2 sc remain, sc2tog: 21 sc
Row 23: ch 1, turn, sc in each sc across: 21 sc
Row 24: ch 1, turn, sc in each sc across until 2 sc remain, sc2tog: 20 sc
Row 25: ch 1, turn, sc in each sc across: 20 sc
Row 26: ch 1, turn, sc in each sc across until 2 sc remain, sc2tog: 19 sc
Row 27: ch 1, turn, sc in each sc across: 19 sc
Row 28: ch 1, turn, sc in each sc across until 2 sc remain, sc2tog: 18 sc
Row 29: ch 1, turn, sc in each sc across: 18 sc
Row 30: ch 1, turn, sc in each sc across until 2 sc remain, sc2tog: 17 sc
Row 31: ch 1, turn, sc in each sc across: 17 sc
Row 32: ch 1, turn, sc in each sc across until 2 sc remain, sc2tog: 16 sc
Row 33: ch 1, turn, sc in each sc across: 16 sc
Row 34: ch 1, turn, sc in each sc across until 2 sc remain, sc2tog: 15 sc
Row 35: ch 1, turn, sc in each sc across: 15 sc
Row 36: ch 1, turn, sc2tog, sc in each sc across until 2 sc remain, sc2tog: 13 sc
Row 37: ch 1, turn, sc in each sc across: 13 sc
Row 38: ch 1, turn, sc2tog, sc in each sc across until 2 sc remain, sc2tog: 11 sc
Row 39: ch 1, turn, sc2tog, sc in each sc across until 2 sc remain, sc2tog: 9 sc
Row 40: ch 1, turn, 3 sc in first sc, sc in each sc across until 1 sc remains, 3 sc in last sc: 13 sc
Row 41: ch 1, turn, 2 sc in first sc, sc in each sc across until 1 sc remains, 2 sc in last sc: 15 sc
Row 42: ch 1, turn, sc in each sc across: 15 sc
Row 43: ch 1, turn, 2 sc in first sc, sc in each sc across until 1 sc remains, 2 sc in last sc: 17 sc
Row 44 – 47: ch 1, turn, sc in each sc across: 17 sc
Row 48: ch 1, turn, sc2tog, sc in each sc across until 2 sc remain, sc2tog: 15 sc
Row 49: ch 1, turn, sc in each sc across: 15 sc
Row 50: ch 1, turn, sc2tog, sc in each sc across until 2 sc remain, sc2tog: 13 sc
Row 51 – 55: ch 1, turn, sc in each sc across: 13 sc
Row 56 – 59: ch 1, turn, sc2tog, sc in each sc across until 2 sc remain, sc2tog: 5 sc
Finish off.
Ears
Row 1: with color A, join yarn on side of Row 56, ch 1, sc along sides of next 3 rows, sc across Row 59 and down side to opposite side of Row 56: 14 sc
Row 2: ch 1, turn, 2 sc in first sc, sc in next 5 sc, 2 sc in each of next 2 sc, sc in next 5 sc, 2 sc in last sc: 18 sc
Row 3: ch 1, turn, sc in each sc across: 18 sc
Row 4: ch 1, turn, 2 sc in first sc, sc in next 7 sc, 2 sc in each of next 2 sc, sc in next 7 sc, 2 sc in last sc: 22 sc
(Finishing one ear)
Row 5: ch 1, turn, sc2tog, sc in next 7, sc2tog: 9 sc
Row 6: ch 1, turn, sc in each sc across: 9 sc
Row 7: ch 1, turn, sc2tog, sc in next 5 sc, sc2tog: 7 sc
Row 8: ch 1, turn, sc in each sc across: 7 sc
Row 9: ch 1, turn, sc2tog, sc in next 3 sc, sc2tog: 5 sc
Row 10: ch 1, turn, sc in each sc across: 5 sc
Row 11: ch 1, turn, sc2tog, sc in next sc, sc2tog: 3 sc
Row 12: ch 1, turn, sc in each sc across: 3 sc
Row 13: sc2tog, skipping second sc: 1 sc
Finish off.
(Next ear)
Join yarn in 12th sc of Row 4 and repeat Rows 5 – 13.

Features Embellishments
Eyes
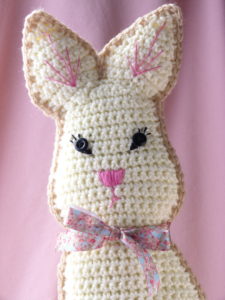
Sew on buttons with black floss and add eyelashes and a small triangle to point the eyes.
Nose and Mouth
With pink floss, embroider nose and mouth.
Ears
With pink floss, embroider 5 long stitches for the pink of the ears.
Paws
With color B, surface sl st across front panel for paws.
Tip: I like to use stitch markers to guide my surface slip stitches.
Assembling Pillow
Hold pillow panels together with the front panel facing, and join color B in the first row of the right side. Sc through both panels, working 3 sc in first row, sc to neck, sc3tog over neck indention, sc to ear indention, sc3tog, sc up to tip of ear, 3 sc in top of ear, sc down ear and surface sl st through rows 1 – 3 between ears and back up, sc to top of next ear, 3 sc in top of next ear, sc to next ear indention, sc3tog. Stuff ears before moving on. Continue sc to neck indention, sc3tog, stuff head, sc down left side to Row 1, stuff body, being careful to stuff corners well, sc across bottom to seal, finish off.
Cut a strand of ribbon and tie a bow around the neck.
Let me know if you run into any problems! I will do what I can to help you with your crocheting.


OMG this is so adorable!! I would love to make this. Hopefully I can find a good tutorial for sewing on buttons.
Hello Twinkie Lover! I’m so glad you like it. Sewing on buttons is a breeze! I did a few passes with the embroidery thread and needle before adding the eyelashes and shape. Let me know if you need any help!
Keep Crocheting,
Amy
Very Cute!
Thank you, Amy, for the Bridgette Bunny pillow pattern. It is elegant. I plan on crocheting one this week. It is a nice size. I appreciate your generosity.
My pleasure, Alice! Thank you for the lovely compliments.
This is so adorable.
Dear Amy,
This looks like a very old time bunny. I will love making them for my grandchildren for Christmas.
Hello Jill,
My pleasure! I put a lot of time into this pattern so I am very appreciative when people let me know they like it. I hope you enjoy the pattern and your grandchildren enjoy the handmade gifts!
Keep crocheting,
Amy