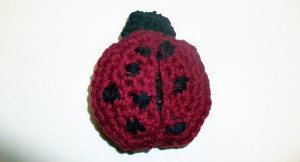
Crochet Pattern: Ladybug
By Candace – 8 Comments| I’m normally not very big on insects, but ladybugs are a notable exception. For their simplicity, they’re quite pretty, and they’re pretty much synonymous with warm weather. This pattern requires some simple assembly and stuffing as well as embroidery on the wings. |  |
| Skill Level: |  |
Finished Size: 3 1/2″ (9 cm) diameter
|
Materials: Medium Weight Yarn (approximately 30 yards of black and 20 yards of red) Crochet Hook H (5.0 mm) Yarn needle Stuffing |
 |
Gauge:
Rounds 1-3 in body pattern measure 2″ (5 cm) in diameter
Need help understanding the crochet abbreviations and symbols? Check out the crochet abbreviation chart.
Crochet Pattern: Hey Ladybug
Body (Black Yarn)
Round 1: Make an adjustable ring, ch 1, 8 sc in ring, sl st in beg ch-1: 8 sc
Round 2: ch 1, 2 sc in each sc around, sl st in beg ch-1: 16 sc
Round 3: ch 1, (2 sc in next sc, sc in next sc) around, sl st in beg ch-1: 24 sc
Round 4: ch 1, (sc in next sc, 2 sc in next sc) around, sl st in beg ch-1: 36 sc
Round 5 – 6: ch 1, sc in each sc around, sl st in beg ch-1: 36 sc
Round 7: ch 1, (sc2tog, sc in next sc), sl st in beg ch-1: 24 sc
Round 8: ch 1, (sc in next sc, sc2tog), sl st in beg ch-1: 16 sc
Round 9: ch 1, sc2tog around, sl st in beg ch-1: 8 sc
Stuff and draw closed. Finish off.
Head (Black Yarn)
Round 1: Make an adjustable ring, ch1, 8 sc in ring, sl st in beg ch-1 to close: 8 sc
Round 2: ch 1, 2 sc in each sc around, sl st in beg ch-1: 16 sc
Fold in half and sew closed.
Wings (Red Yarn, Make 2)
Row 1: Make an adjustable ring, ch1, 4 sc in ring, turn: 4 sc
Row 2: ch 1, 2 sc in each sc around, turn: 8 sc
Row 3: ch 1, (2 sc in next sc, sc in next sc) around, turn: 12 sc
Row 4: ch 1, (2 sc in next sc, sc in next sc) around, turn: 18 sc
Row 5: ch 1, sc in each sc around: 18 sc
Finish off.
Embroider on dots and assemble pieces using photo as a guide.
Need help while crocheting? Feel free to leave a comment below and I’ll help you out!


So cute. Thanks!
Seriously cute! I may make some of these for Christmas ornaments. 🙂
How cute! Will be making a slew of these!!!
THANKS SO MUCH FOR SUCH AN EASY PATTERN…NOW I CAN ADD TO MY EVER GROWING (300+) LADYBUG COLLECTION!!!
This is exactly what I needed to put on a toaster cover for a friend!!! Thank you for publishing it 🙂
Wing instructions dont make sense..row one. U work 8 sc…and end up with 4 sc?…how
Ah, you’re right. I’ll update it so it’s correct.
Thanks