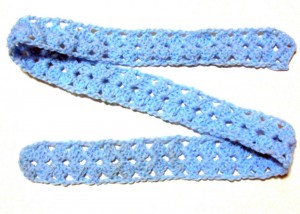
Crochet Pattern: Shelly Sash
By Claire Ortega-Reyes – 17 CommentsThis versatile piece can be worn a number of ways: a traditional headband, a hippie headband, a sash, a scarflette, a hair tie–the possibilities are endless. Plus, the simple repetitive pattern allows you to make it as long or as short as you wish.
|
 |
Finished Size: 1.5″ wide x 40″ long
| Materials: Light or DK-weight yarn Crochet Hook F (3.75 mm) |
Gauge: Not important.
Special Stitch:
Shell: (3 dc, ch 2, 3 dc) in one stitch or ch-space
Need help understanding the abbreviations and symbols? Check out the crochet abbreviation chart!
Crochet Pattern: Shelly Sash
Row 1: ch 4, dc in first ch (beginning ch 3 counts as dc here and throughout), (2 dc, ch 2, 3 dc) in same ch–one shell made: 1 shell
Row 2: ch 3, turn, shell in ch-2 sp, dc in last dc: 2 dc and 1 shell
Rows 3-70: repeat row 2, finish off and weave in ends.
Enjoy your sash! Make it as short or as long as you want by making less or more rows. Use crochet thread to make it into gorgeous yet easy trim for anything at all. Make it shorter and use them as straps for garments or bags–the possibilities truly are endless with this easy pattern!
If you need any help, just leave a comment below and I’ll get back to you when I can. Happy crocheting!


So cute!
For the Row 1 – is it dc in the first chain next to the hook or the first chain made? Is the ch sp (chain space) the area under the chain? Thanks so much! I can’t wait to get one finished!
yvonne it appears to me it is the first chain made so the next 3 will be ur 1st dc in that row …btw soo cute!! love it ,,i would use it as a belt……happy crocheting everyone
I would make shell st around the outer edge, (maybe using two different colors -one for the body, one for the outer edge) perfect skinny scarf! Nice, simple and fast. Just in time to start our Christmas crocheting………..LOL
This is so pretty!
I need a new head band too!
That would make a nice headband, or belt.
Yvonne, it has to be the first chain from the hook. Otherwise, it would make a ring, instead of a long piece. Have fun!
I really, really like your posts. I enjoy them too much. Thank you for being generous with your creations.
A big hug for you
I saw this belt a while ago when I was sick. I could not find it after so I’m super happy that you inclosed all the directions to make it. Thank you so much. I’m learning so much from these web sites.
Rose
Hi there, first of all I really love this sash! And I tried to make a beginning several times, but I dont get the row two part (I know.. I’m not getting very far 😉
This part I get: ch 3, turn, shell in ch-2 sp
But I don’t know what you meen with this part: dc in last dc: 2 dc and 1 shell
If I do that I get al lot of dc, but no spaces.. Can you please help me?
I’m going to make a belt for my daughter 🙂
Thanx! marijke
Hello!
The 2 dc and 1 shell that is after the colon is the stitch count for the row. It tells you what you should have made already so you can double check your work. You don’t need to do it again.
Hi, thank you so much! Yah now I get it 🙂
Hi was just wondering what kind of yarn or thread you used for this pattern? I love the colors especially the pink variegated one thanks!
Hi,
I like the shelly sash but I am not able to follow. Can you help me please. Do I have to make chains first and then work the pattern or start with the pattern directly. The 2nd row am not able to follow.
Hi Lia! You will start with row 1. No need to make a chain before row 1, just the ch 4 that starts at the beginning of row 1.
On row 2, you will ch 3, then turn, then make a shell in the chain-2 space that was created on row 1, then dc in the last dc. When you are done the row you will have a total of 2 dc and 1 shell. The shell instructions are listed above the pattern as (3 dc, ch 2, 3 dc) in one stitch or ch-space.
Let me know if you need more help with it!
Hi Rachel
Am still not able to understand. I have understood
That first row 4 chains
Second row make 3 chains and then turn and make a shell in second space from beginning or from 3 chain turn? Then 2 DC in the two spaces left. Then 3rd row how to do.
Sorry to trouble you.
You will make a shell in the chain-2 space. The chain-2 space is the space/hole/gap that was created by chaining 2 on row 1. You will insert your hook into that space to make the shell. Here is a tutorial about chain spaces if you need it: https://www.crochetspot.com/what-is-a-chain-space-ch-sp/