Free Crochet Pattern: Bunny Egg
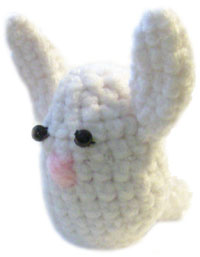
By Rachel Choi – 12 CommentsHere is a goofy, yet still cute bunny that is made using the crochet egg pattern. All that is added is a pair of ears, a tail and face. The bunny egg makes a great little gift for Easter or for someone who loves bunnies and eggs. This project is perfect for using your scarp yarn! Below are the instructions for you to follow.
Finished Size: 3†(8 cm) tall, 2 1/2†(6.5cm) wide ear to ear |
 |
Materials:
Medium Weight Yarn
Crochet Hook F (3.75 mm)
Polyester Fiberfill
2 Beads
Yarn Needle
Sewing needle
Scissors
Gauge: not too important, just crochet tight enough so that the filling does not come out the bunny
Need help understanding the abbreviations? Check out the crochet abbreviation chart.
Crochet Pattern: Bunny Egg
Round 1: ch 2, 6 sc in second ch from hook, place marker: 6 sc
Round 2: (2 sc in next sc, sc in next sc) around: 9 sc
Round 3: (2 sc in next sc, sc in next 2 sc) around: 12 sc
Round 4: (2 sc in next sc, sc in next 3 sc) around: 15 sc
Round 5: (2 sc in next sc, sc in next 3 sc) 3 times, 2 sc in next sc, sc in next 2 sc: 19 sc
Round 6: sc in each sc around: 19 sc
Round 7: (2 sc in next sc, sc in next 6 sc) 2 times, 2 sc in next sc, sc in next 4 sc: 22 sc
Round 8 – 10: sc in each sc around: 22 sc
Round 11: (decrease, sc in next 6 sc) 2 times, decrease, sc in next 4 sc: 19 sc
Note: Fill egg with fiberfill while decreasing.
Round 12: (decrease, sc in next 2 sc) 4 times, decrease, sc in next sc: 14 sc
Round 13: decrease in each sc around: 7 sc
Finish off, weaving egg shut.
Ears (make 2)
Round 1: ch 2, 4 sc in second ch from hook, place marker: 4 sc
Round 2: (2 sc in next sc, sc in next sc) around: 6 sc
Round 3: (2 sc in next sc, sc in next 2 sc) around: 8 sc
Round 4 – 5: sc in each sc around: 8 sc
Round 6: (decrease, sc in next 2 sc) around, sl st in next sc, finish off: 6 sc
Using photo as a guide, sew ears to bunny with a yarn needle.
Tail
Create a small pom pom and sew to back of bunny. Here is the “How to Make Pom Poms†tutorial if you need it.
Sew on face as desired.
This pattern was requested by a Crochet Spot Newsletter Subscriber! If you would like to receive the free newsletter too, just fill out the orange box at the top of this page.
If you need help with this pattern, just leave a comment!


These are precious. I love all of your Easter patterns. Thanks for commenting at my blog. 🙂
Thanks Michelle! You do have awesome stuff on your blog 🙂
Argh! You have the cutest patterns! I’ll be linking to this. As soon as I get some extra time I want to dive into your archives. I love crochet projects!
Thanks Rachel!
Don’t worry my archive isn’t too large, I just started CrochetSpot around the beginning of Feb!
Thank you Rachel! My Grandkids will love them!
Pattyjo
That’s great Pattyjo!!!
Rachel,
I have a question about this egg pattern. Is there a way that you could make this a bigger egg? I know that you would probably increase the stitching but I wouldn’t have the faintest idea on how to do it. I appreciate the help. thanks!!!!!
I don’t think there is an easy solution for making it bigger, you would have to continue increasing after round 4, until it is as wide as you want it. Then just sc in each sc around until the middle of the egg is as long as you want it. Then decrease the bottom. It’s more like a guess and check kind of thing.
hey love the pattern, i had trouble with the ears they were kinda small and my bunny looked like a mouse it is cute just the same ,just had to add a couple rows for the ears ,thanks for the patterns
Hey Tara!
I’m glad you made it work out! It is a pretty goofy bunny, lol!
I love it!! Now don’t take this offensively, but the way the ears were placed they reminded me of Yoda! I was thinking. I could make it with some green and brown yarn, remove the tail, and it would be perfect! Sooooooooooooo cute!
Okay, it IS goofy, but is also SOOO cute – I just love it! Thank you so much, you are very talented! And this is the best egg pattern around! Thanks again!