How to Crochet Edging onto Clothing
By Rachel Choi – 15 Comments| Do you have old clothes that are boring and you don’t wear anymore? If so, here is a way to spruce them up and give them a brand new look! You can add crocheted edging to your shirts, sleeves, skirts or any other piece of fabric you wish.
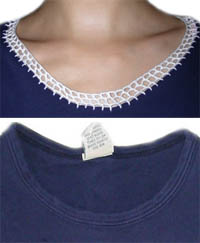
In this example, I transform the plain neckline of my old shirt into pretty crocheted edging using a simple edging pattern. Remember, you can do this for all sorts of fabric using different edging patterns. Use this example as a guide for the edging you choose to crochet onto your clothing. |
 |
Materials:
Old T-shirt or other fabric
Scissor
Size 10 thread (you may use other threads or weights of yarns if desired)
Crochet Hook US 7 (1.5 mm)
Note: Use a hook that is appropriate for the thread/yarn you chose to use. The smaller the hook the easier it is for it to pierce the fabric. (Learn more about types of yarn and recommended crochet hooks)
Optional: If your hook is not able to pierce through the fabric you may use a darning needle or other sharp tool to pre-poke the holes into your fabric
Here is my old, plain shirt. Boring, right?
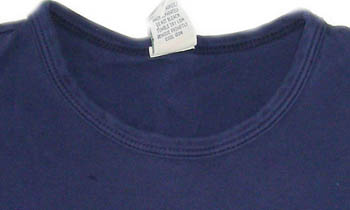
The first thing I’m going to do is cut the neckband off. You can cut the neck hole bigger or wider if you desire. The neckband will be replaced with crochet edging.
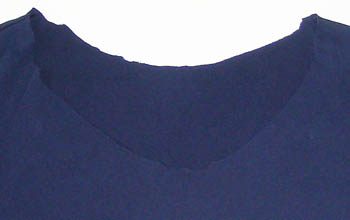
Fold the edge of the neckline under approximately 1/4″ so that it hides the raw edges created by cutting the cloth. You may choose to place pins around the neckline to keep the edge folded under. Personally, I fold the edge under while I crochet, since I’m afraid of pricking myself with the pins.
Now it’s time to crochet! Starting with a slip knot on your hook, insert your hook at the shoulder seam directly underneath the 1/4″ fold. Your hook should go through one lay of fabric (not both) and will prevent the fold from coming apart when you make your stitches. Now, yarn over and pull the strand of yarn through the fabric and the loop on your hook. This will secure the thread onto your fabric.
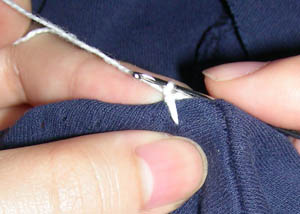
Use the following pattern to create your crochet edging around the neckline:
Round 1: ch 6, (dc into fabric, ch 3) around, place marker
Note: Make sure that the space between each double crochet is the length of the chain 3.
Here is what the first round looks like:
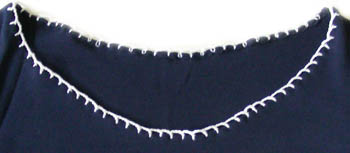
Now use the rest of the pattern to finish the edging. You will no longer need to crochet into the fabric. Instead you will be crocheting into the previous round of stitches. This pattern is created in a spiral and no joining is necessary after each round.
Round 2: (dc in next ch-3 space, ch 3) around
Round 3: (dc in next ch-3 space, ch 2) around, sl st in next ch-3 space, finish off.
Here is what the finished neckline looks like. Much prettier than the old, boring neckline.
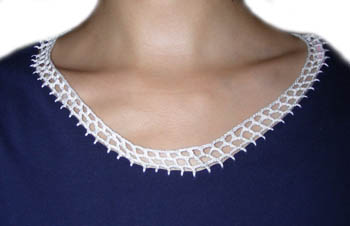
Remember, you can add crochet edging to more than just necklines! You can add edging to your sleeves, skirts, fleece blankets, or any other fabric you desire. You can even use different edging patterns!
This tutorial was requested by a Crochet Spot Newsletter Subscriber! If you would like to receive the free newsletter too, just fill out the orange box at the top of this page.


This seems like something my sister wuould do if she knew crochet. Thats cool, I”ll probably end up trying it on something. What I’ll try it on, I’m not sure yet though xDD
That is great. Thank you for sharing!
How pretty, I love it! I’ve never crocheted on my clothing before, thanks so much for the tips and the push! I’ll be linking as well.
Great idea. I wear a lot of T shirts and they are looking pretty worn, so I’m going to spruce them up. Thanks.
I read that if you prefer, you can sew a line of running stitch along the neckline with the same color thread as the shirt, then crochet into the stitching and you won’t have to pierce the garment, does that make sense?
could you make a tutorial on weaving ends in? Im making a blanket, entirely out of double crochet and there are lots of ends left behind. I have no idea how to weave them in! thanks so much for your help. 🙂
Hi Destiny, there are a ton of methods for leaving in ends, you can read about it here: Finish Off and Weave in Ends in Crochet
I also would like to know if you can use the same color as the garment and do running stitches and crochet from there and not cut the fabric.
Sure, why not? Try it out!
Hi Rachel! I’ve been a Crochet Spot reader for awhile now; I enjoy your blog and reading all the comments. I’ve got 2 questions about crocheting an edging onto clothes. First, I crocheted an edging on a pair of my socks (so I could tell my socks from my daughters’). When I put them on I broke the thread when I tried to stretch the sock. What should I have done to prevent that from happening?
My 2nd question is I have a top with a v-neck that goes a little too low for my comfort and I’d like to crochet an insert for that, but I don’t really know how to go about it.
Thank you for any help you can give me!
Hi Brenda, there are some stretchy yarns, commonly used to crochet socks, that you can use to crochet your edging onto your socks so they will stretch with it. For the V-neck, you can find a stitch pattern that you like and make a triangle or square, then sew it to the inside of the shirt. You can also make it up as you go, get creative! Let me know how it works out for you.
Thanks for posting this….this technique would be great on some of my sweater arms that seem to shrink over time…or any other long sleeve shirts. Will definitely be working on this as the weather is changing.
OMG! Thankyou! I’ve been looking for directions on how to add a crochet border on a beanie I have. Its too short and I want to make it longer. Thankyou!
I have a sweatshirt and I was wanting to cut a V out of the back and crochet up the back. How would I do this? Would I attach the yarn along the edges and then fill in the space? Or would I crochet the yarn into the fabric as I fill it in? Hope that made sense! Thanks!
Hi Shannon! You can do it either way, both ways will work. You can try it on a scrap of fabric or an old t-shirt first to see what works for you.