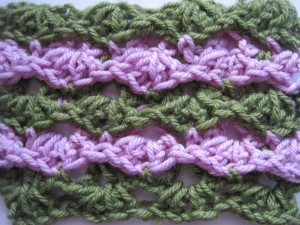
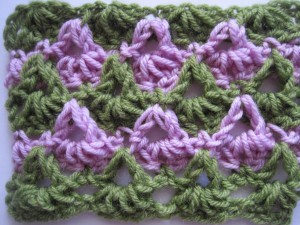
How to Crochet: Multi-Colored Stitches Part 4
By Erin Burger – 11 CommentsI think it’s a fact that some stitches just scream for multi-color! This series gives instructions for stitches like these, includes photos to see what the end result look like, and suggests color sequences to best display the stitch.
Multi-Colored Reversible Fans Stitch


The Color Sequence as pictured above is 2 colors alternating every two rows.
Beginning ch and Row 1: Color A
Rows 2-3: Color B
Rows 4-5: Color A, continuing until finished
Ch a multiple of 6, plus 3
Row 1: (2 dc, ch 1, 2 dc) in 6th ch from hook, *skip 5 ch, (2 dc, ch 1, 2 dc) in next ch, repeating from * across, until 3 ch remain, skip 2 ch, dc in last ch, break off Color A
Row 2: join Color B, ch 1, turn, sc in first dc, *ch 1, sc in next ch-1 space, ch 1, (dc, ch 2, dc) in 3rd ch of beginning ch’s skipped 5 chains, repeat from * across, ending with a sc in beginning ch
Row 3: ch 3, turn, 2 dc in first sc, (2 dc, ch 1, 2 dc) in each ch-2 space across, ending with 3 dc in last sc, break off Color B
Row 4: join Color A, ch 1, turn, sc in first dc, *ch 1, (dc, ch 2, dc) in sc between the last 2 dc group and next 2 dc group of two rows previous), ch 1, sc in next ch-1 space, ch 1, repeat from * across, ending with sc in beginning ch
Row 5: ch 3, turn, (2 dc, ch 1, 2 dc) in each ch-2 space across, ending with dc in last sc, break off Color A
Repeat Rows 4 and 3, then 4 and 5 until desired length is reached, continuing to repeat Color Sequence.
Have any questions or comments about this multi-colored stitch? Ask away!


Rachel~ that looks so pretty! I’m going to have to try it.
What do I do with the yarn strands from the previous color? Do I somehow carry them up the sides. Can you please elaborate on how to do that, if that’s the case? You don’t say to cut, thank heavens!
(I think you have a little bitty typo here: “Rows 4-5L Color A, continuing until finished”. I looked at my keyboard and saw that you hit the “L” key in shift mode instead of the colon: Was scratching my head about what “Rows 4-5L . . .” were!
Happy Holidays to you!
Hi Cheryl,
Unfortunately I do say to Break off the colors at the end of Row 1, Row 3 etc… Sorry! I hate weaving in the ends but while I was working on these instructions I couldn’t figure out a good way to carry the yarn.
Thanks for the heads up on the typo! I’ll fix it right away.
-Erin
That looks really nice. Im trying to crochet a baby blanket but can’t really find a stitch for a boy, what do you recomend?
Hi Erin,
I guess I read thru the pattern too fast and missed the “break off yarn” part!
This is OT—but I noticed that there is a silhouette that represents me and my comment. Is there a place here where I can add a photo? I looked but must have missed it!
Thanks and Happiest of New Years to you and everyone here at Crochet Spot. (I just LOVE this site! ♥)
Cheryl
Hi Bananas.
I did a series over the last few months that started here: http://www.crochetspot.com/three-special-stitches-for-your-crocheting-arsenal/ and has several more parts (you can search special stitches on the homepage’s search). The moss stitch in the first section is the one I use for a lot of boy or unisex baby blankets. It’s also great for sewing applique onto.
Thanks.
Erin
Cheryl,
Hi, you can be a fan of Crochet Spot and post a photo on there. http://www.facebook.com/pages/Crochet-Spot/256283508901
-Erin
These were very easy instructions for me as I’ve crocheted many years. However, I’m not an “experienced” crocheter and still have a lot to learn. One of them is: how DO you carry yarns from one place to another? I’ve always avoided patterns with multiple colors because of this. I just do the “break-off-color” bit patterns. Could you do instructions for this sometime? I’m in no hurry now as my New Year resolution is to FINISH what I’ve started.
Rachel, this is my favorite site on the internet. Your work is so beautiful, helpful, instructive and generally great to read. I hope you can keep it up!!
Hi Bunnie,
There are some patterns where you can either pick the yarn back up at a spot usually designated in the pattern, or carry it from one row up to the next up the side of the work. This usually either doesn’t show up on the work, or if it does it can be easily hid by adding a trim up and down the side of the work where the work is carried.
In this particular pattern you need to break off at the end of the rows where it is indicated to do so. I worked this stitch out a couple ways and found that it was best to do it this way. After doing many many crochet projects I have found that weaving in the ends isn’t that big of deal after you get used to it, see these links for info. on how to do it: http://www.crochetspot.com/perfecting-your-craft-finishing-the-project/
or
http://www.crochetspot.com/how-to-minimize-weaving-in-ends-in-crochet/
Thanks for your interest and comments!
Erin
I do not like to cut the yarn on multi color projects, either. So, I cut the yarn off long and make the FRINGE on the side where I cut the yarn, OR I do as another person suggested and carry it LOOSELY down the edge and then cover it up with a really nice edging.
Hi Erin,
I have a question regarding how to start the new color once you’ve broken off the old-
How do you go about adding/attaching the new yarn so that it doesn’t end up being 1) one big bulky mess and 2) secure so that it doesn’t just unravel?
It seems that whenever I do, I end up making a knot of sort, and pulling through the end of the yarn (kinda like this- make a single crochet and pull through the end through the loop, so that it makes a knot).
I’m a beginner crocheter, and hope to learn more as time goes on! Crocheting has been in my family for several generations- my grandmother, mother, and aunts all crochet! Thanks for having this site, and thanks for the help in advance!
Hi Mary,
You can read the post http://www.crochetspot.com/perfecting-your-craft-finishing-the-project/ for tips and info about finishing up ends. You have the right idea though.
Thanks for your question
Erin