How to Roll Up a Crocheted Rose
By Rachel Choi – 29 CommentsRecently I’ve gotten quite a few request for some pictures of how to roll up the crocheted rose. The rose that I will be rolling up is from my original crochet rose pattern. If you are new to reading crochet patterns, you may find the detailed explanation of the crochet rose pattern useful, since it explains the rose pattern without the abbreviations.
There isn’t an absolute right or wrong way to roll up a rose. Here is the way that I did it.
First I leave some extra yarn at the end of the rose for sewing later.
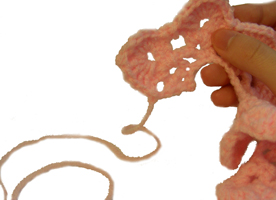
I start with the end that doesn’t have the extra yarn and roll the first petal to make the center.
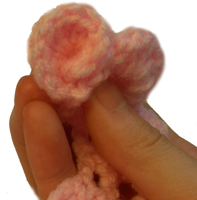
I wrap the next 2 petals around it.
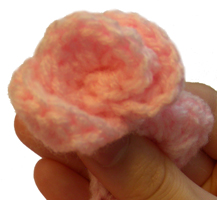
Then the next 3 petals around that. Each time I wrap around I try to hold the center tight and make each round looser and looser. (don’t mind my thumb, I was trying to hold the rose from unraveling)
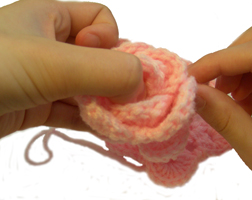
Then the next 4 petals around that. Try to stagger your petals so that petals from each around don’t line up with petals from previous rounds.
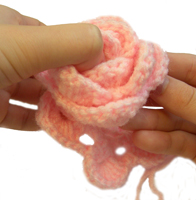
Then lay the rest of the petals underneath the other rose petals.
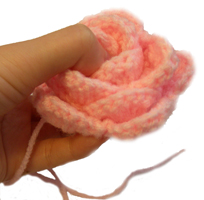
Lastly, use the extra yarn and sew the flower together. Weave the yarn needle through the bottom of the rose and also into the different rounds of petals made. Remember there isn’t an exact science for rolling up a rose, so just play around with it and find what works best for you.
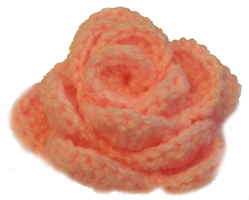
If you still need help with rolling up a crocheted rose, let me know by leaving a comment and I would be glad to help!


Rachel,
Thank you so very much for the pictures and instructions on rolling up the rose. They are a great help and exactly what I needed. You are a good teacher, and obviously a lovely person. Thanks again for sharing your talent and taking the time to be so helpful and kind. God bless.
I made several of the roses and gave to family and friends for Mother’s Day and they were a huge hit. Thanks for such a simple pattern. I already have other people asking for more. Thanks for taking the time to share your patterns and for always being being there for us.
God Bless
Hello Rachel,
I have made the most gorgeous brooches with your rose pattern. Battled a bit to start off with but it turned out just fine.
I however don’t roll my rose, it seems to fall into place on its own without rolling and looks very pretty.
I have pasted a photo of my brooches on my blog
Today I am making the daisy pattern. Not using wool but cotton.
Kind regards
CarolAnn Blakeway
South Africa.
How do I get to your blog, I would love to see your rose that you made and the daisys that your have done as well. Thanks, Barbie.
Hey Barbie! You can click on her name, it’s a link to her site 🙂
Hi, Carol-Ann. Your post helped me to stop worry-warting about rolling my rose. It just didn’t want to come out right. I followed your suggestion of letting it roll up by itself and it turned out Perfect! Now I’ve got to figure out how to sew it together so it stays that way. 😉
Tomi Inglis
Hello, So glad you are coming right with the rose. It is beautiful but you need a bit of patience and remember practise makes perfect.
I have just looked at the photos Rachel has put on the rolling of the rose and it explains it beautifully. You need to be very neat and tidy with tiny stitches to hold the rose together.
I never got as far as doing the daisy – so sorry. My blog a bit outdated as well. I have been making beaded bookmarks and bracelets and organic soap.
If you let me have your e-mail address I will send you a couple of pictures of my rose brooches made with leaves and then of course the rose.
Best regards
Carol-Ann
Carol-Ann, I tried to follow the instructions on how to roll the rose but it just wasn’t working for me. I finally just let it roll on its own and gave it a little bit of help. It looks very natural now.
I saw your broaches and they are gorgeous! Unfortunately, I can only think of one person I know that would wear one if I made her one. However, I belong to a small craft club here in my neighborhood (older ladies) and I’m seriously thinking of showing them my roses. They just might be interested in making something similar to yours. I don’t have a printer or I would print out your pics and show them what you’ve done.
Hello Tomi, This rose has brought many people from all over the world together – Fabulous don’t you think? If you are going to use the rose as a brooch with a brooch pin then it would have to be flat at the bottom and yes you must catch each little loop of the original chain when you sew it. You let it roll itself a bit and you stitch, then let it roll again and you stitch again until you get to the end.
I have put my roses on baby crochet hats – it seems to be the fashion now, and it looks gorgeous. I am expecting a new grandchild and hopefully the one I made her with a lovely rose on will fit perfectly.
Keep up the good work – busy hands and busy minds will keep us young.
Happy crocheting.
Carol-Ann
Thank you for the detailed instructions. I am just re-entering the crocheting arena after many years away. It is wonderful to find resources such as yours to help.
Love this pattern, but would like to make a smaller rose. How do I calculate the number of chains for starting chain. Thanks.
Hi Nickola, you can subtract a multiple of the number of chains that are used within the repeat of the pattern. You can also check out the rose bud pattern for the smaller version of this rose.
Hello. Thank you very much for the pictures. wanderfull. I learnd it and make it.:)
Rachel, I just wanted to thank you SO MUCH for your wonderful website!!! I’m 6 months pregnant with my first baby girl and have been a busy bee crocheting all kinds of things for my little bean. I’m a first time crocheter, and you have made things super easy with your simple and easy to follow instructions. Thank you! Bri
“Sew the flower together”. HA! This is where the problem begins and my beautifully rolled rose falls apart. Would it be possible to post pictures of actually sewing the bottom together? I’ve always struggled with that part and nobody ever explains it. Sure appreciate it!
Hello Rachel,
I can’t seem to get the pattern right. I crochetted thinking I was following your instructions, but in the end it did not look like the picture. I don’t understand what you mean on Rows 2 and 3 by “2dc, ch2, 2dc in first ch-2 space”. What is the ch-2 space? Do I insert the hook in each big hole along the chain? I love the rose and would like to make it the right way!
Thanks.
Nina
Hi Nina, yes the ch-2 space is the hole/space created by chaining 2 on the previous row. The space is right underneath the ch-2. Here’s a tutorial that might help you visualize it: What is a Chain Space (ch-sp)?
Nina, the ch 2 spot is the one between the 2 dbl crochets in the previous row. 😉
Sorry this is so late after you posted but I just made the rose myself and just joined.
thank you rachel, i love this pattern!!!!!!!!!!!!
Thank you so much for this. I have tried and tried and will try again…hopefully with some luck this time.
I’m still having a little trouble. I am thinking about stitching the petals in reverse so the starting and finishing threads are on the inside petal so that I can sew as I roll. Has this been tried?
Hi Pamela, I haven’t tried it that way, but feel free to try it. I’d love to know how it goes! You can also attach a thread of yarn to wherever you want on the rose and start sewing from there.
great pattern!
could you possible go more in-depth on how to sew the rose in the bottom, mine looks either squished or lumpy and I’m wondering if there is a science to how this is done!
Thanks!
To Rachel: I haven’t crocheted for a long time and your rose was really a fun challenge. Could you give a pointer or two on how and where to sew it together?
Also, my petals want to roll inward at the outside edge. Is it because I crocheted it too tight?
Thank you so much for making some of your patterns available for free. They are exquisite! 🙂
Tomi, you can weave the yarn through the bottom of the rose and also into the different layers of petals. There’s no exact way to do it. Simple, keep weaving the yarn though the different layers of the rose until it is held together.
Rolling inward is natural. You may want to block your rose petals before your roll it into a rose if it really bothers you. Here’s more info on blocking if you need it: Blocking Crochet
Thanks, Rachel! I’ve never blocked anything I’ve crocheted so it wasn’t in my head to do that. Duh! LOL
As far as sewing the rose together, would running the yard through the bottom and gathering it work? Would it help to keep “the stem” from going flat? I think I’m going to try that. I’ll let you know how it works. 🙂
BTW, I didn’t use the yarn that you suggested. I used #10 thread with a 1.4MM hook. Going to do the same for the leaves. I want a really tiny rose to go on a crocheted hat I’m making for my granddaughters.
Thanks again for your help and all the great stuff you and the other members share.
Your patterns are awesome…
Rachel,
I’m absolutely thrilled with this rose pattern. Thank you so very much for sharing with the world. You are my crochet hero.
I’m new to crocheting. Working on this project as we speak. Challenging for this newbe, but determined to get it. Thanks for sharing this.