By Rachel Choi – December 9th, 2009
12 Comments
Knowing how to smoothly decrease the number of stitches in a row is necessary when you need to change the shape of the item you are crocheting. There are different decrease for different stitches, such as single crochet, double crochet and treble crochet. This tutorial contains instructions for decreasing single crochet stitches. Here is the link to the double crochet decrease tutorial if you would like to learn that as well: How to Crochet: Double Crochet Decrease.
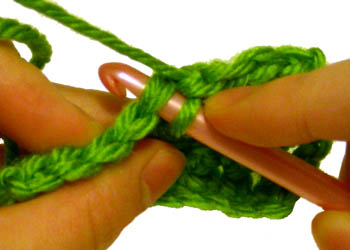
Single crochet decrease is commonly abbreviated as the following steps: pull up a loop in next 2 stitches, yarn over, pull though all 3 loops on hook, counts as one single crochet.
Below is the step by step picture tutorial to help you visualize each step. This tutorial is for both right and left handed people. For left handed pictures, roll your mouse over the image and it will change for you.
Begin with a swatch of work to practice on. Below I am using a small square of single crochet stitches.
Insert your hook into the next stitch.
Click Here To Read More »
By Rachel Choi – December 8th, 2009
6 Comments
I recently made a new page to describe the Premium Pattern Membership in detail, since I’ve gotten questions about it. If you are not familiar with the membership, it is a way for you to download ALL the patterns (including new patterns) in the Crochet Spot Store. The fee for being a member is $10 per month. The membership has become a popular alternative to purchasing patterns one by one (which you can do). It helps you save money if you want at least 2 pattern from the store.
For more detailed information about the Premium Pattern Membership CLICK HERE.
You can sign up for a membership by going to the Crochet Spot Store.
By Rachel Choi – December 6th, 2009
6 Comments
Last week I told you about my Holiday Gift Making Adventure and how I didn’t even start making anything! This week I’m proud to announce that I got some DONE! Not all the way done, but getting there.
|
Here is the break down of what’s going on:
Aunt’s shawl – I decided to give her my “The Yuet Shawl” that I just finished. It’s lacy with a nice flower on the back of it. I think she’s going to love it! Here is the pattern info if you would like to make one too: Crochet Pattern: The Yuet Shawl
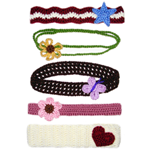
2 cousins – Last week I didn’t even know what to make them but since then my aunt gave me some great ideas. For one, I’m going to make her headbands with flowers using my Classic Headband Set Crochet Pattern. For the other, I’m going to make her animal finger puppets! (I’ll be making a pattern for these as I make them, just in case you want to make them too)
Mom – I still don’t know what to make her. I might just browse the stores to find her something if I don’t come up with anything by next week. I’ll let you know how my brainstorm goes.
That’s my update!
What have you been doing? Are you further along with your gift making?
|
|
By Rachel Choi – December 4th, 2009
5 Comments
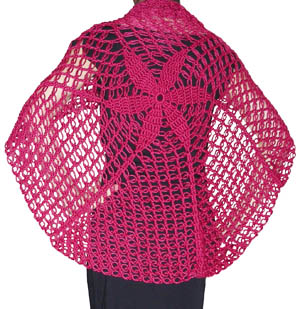
This circular shawl is designed around a simple, yet bold flower that extends out into a fun swirl. The open stitches make the Yuet Shawl lacy and perfect for draping over your shoulders.
To download this pattern, visit the Crochet Spot Store.
This pattern is free for all Premium Pattern Members.
|
Skill Level: |
 |
Finished Size: 34†(86.5 cm) diameter, instructions for increasing the size are included
Materials:
Medium Weight Yarn (approximately 300 yards)
Crochet Hook H (5.00 mm)
|
 |
By purchasing this pattern or becoming a Premium Pattern Member, you will be supporting Crochet Spot in purchasing supplies to create the tutorials and patterns you love on this site. Your support is greatly appreciated!
To download this pattern: CLICK HERE
If you need help crocheting your Yuet Shawl, let me know and I’ll be happy to help!
|

|
By Rachel Choi – December 3rd, 2009
11 Comments
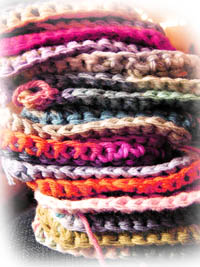
If you’re like me, WIPs (works in progress) and UFOs (unfinished objects) drive you insane. I remember when I was working on opening my crochet pattern store, I had so many WIPs that many just became UFOs. Totally not productive! There’s only so many things a person can crochet at a time, before you start putting stuff in the “I’ll finish it later, but I’m not really going to” pile. So here is the one and only rule that I’ve been using myself to prevent having WIPs and UFOs:
|
#1 Rule: One At a Time
This is going to sound like common sense, because it is! Just do one project at a time and you’ll never have WIPs and UFOs ever again. It’s just as simple as that. I’ve been doing this for a few months now and I’m super productive! No more unfinished things laying around. No more piles of stuff that I’ll never even finish. When I set my mind to accomplish crocheting a single thing, it gets done, because I’m not thinking about the hundred other things I’m crocheting.
Honestly, I’m surprised that I was able to follow this one rule, because I have such a short attention span. I’m like one of those people who get bored very fast and always want something new to do. But it seems to all work out well since I’m able to get things done faster and move on to crochet even more things!
|
 |
If I can do it, so can you!
Do you have a tip for preventing WIPs and UFOs?
By Rachel Choi – December 2nd, 2009
20 Comments
This ear warmer can be crocheted by a beginner! It’s made with ridges that are created by crocheting in the back loops only. The ridges allow the ear warmer to stretch so that it’ll fit snugly around your head.
The flower pattern can be found in my Crochet Pattern: Flower Appliques.

| Skill Level: |
 |
Finished Size: any size you desire! Follow the instructions within the pattern to make the ear warmer any size you want.
Materials:
Medium Weight Yarn (approximately 50 yards)
Crochet Hook I (5.50 mm)
Yarn needle
|
 |
Gauge: not important for this pattern. Follow the instructions within that pattern to obtain the size you desire.
Crochet Pattern: Ear Warmer
Row 1: ch 11 or a chain that is a wide as you want your ear warmer, sc in second ch from hook and in each ch across: 10 sc
Row 2: ch 1, turn, in back loops only, sc in each sc across: 10 sc
Repeat row 2 until the ear warmer wraps tightly around your head. The ridge pattern, will allow the ear warmer to stretch.
To finish, use a yarn needle and sew the last row to the first. Be careful not to twist ear warmer.
The flower pattern can be found in my Crochet Pattern: Flower Appliques.
Need help crocheting your ear warmer? Let me know!
By Rachel Choi – December 1st, 2009
52 Comments
I’ve always wanted to know what other people thought about different crochet hooks. I’ve heard some people claim how great a certain material or brand is and how terrible others are. Honestly, I think it’s a personal choice.
For me, I’m a fan of Susan Bates hooks, just because I’ve been using them the most. They come in all sorts of sizes, from the tiny ones you need for thread to the regular sized ones for popular yarns. What I don’t like about them are the plastic ones. They tend to break too easily. But the metal ones are great (haven’t broken a metal one yet)!
I’ve been wanting to try other hooks, such as bamboo, clover touch (I think that’s the name), and the ones that light up, but they seem so costly. I’d love to know how you like them if you’ve tried them!
What about you? What hooks have you tried? Which ones do you like and dislike?
By Rachel Choi – November 29th, 2009
7 Comments
| Crochet a cute teddy bear hat for a baby, toddler, child, or even an adult! This pattern includes 5 sizes so that no one is left out.
To download: CLICK HERE
You will be taken to the Crochet Spot Store. You can learn more about it here: What You Ought To Know About Shopping in the Store.
| Skill Level: |
 |
|
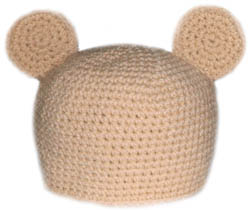 |
Finished Sizes: baby, toddler, child, women and men. (exact measurements and instructions for measuring are included within pattern)
Materials:
Medium Weight Yarn (amount will vary depending on hat size made)
Crochet Hook I (5.50 mm)
Yarn Needle
|
 |
Visit the Crochet Spot Store to download this pattern.
By purchasing this pattern, you will be support Crochet Spot in purchasing supplies to create the tutorials and patterns you love on this site. Your help is greatly appreciated!
If you need help reading the instructions or crocheting your teddy bear hat, let me know and I’ll be sure to help!
By Rachel Choi – November 28th, 2009
33 Comments
Below is a photo of Rita Kunc and she is holding a 6 feet long plastic sleeping mat, which she made for the homeless. She crocheted it in single crochet using plastic bags from milk.
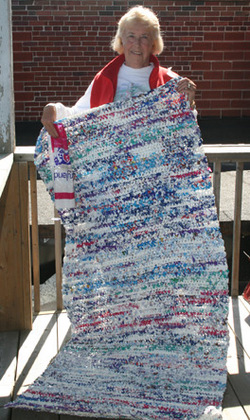
If you would like to crochet a plastic sleeping mat too, here are the instructions and pattern:
Materials:
- Plarn (plastic yarn) – Here is the tutorial: How to Make Plarn (Plastic Yarn). You will need lots of bags (too big of a number to even guess), so keep collecting them as you crochet your mat.
- Crochet Hook – since plarn can be made in different sizes, use a hook that you are comfortable with
Crochet Pattern: Sleeping Mat
Row 1: make a chain that is as wide as you desire your mat to be
Row 2: sc in second ch from hook and in each ch across
Row 3: ch 1, turn, sc in each sc across
Repeat row 3, until the mat is 6 feet long, then finish off.
Creating one if these mats may take a long time! So be patient. Rita Kunc took about a year to make one!
By Rachel Choi – November 26th, 2009
10 Comments
Since it is Thanksgiving here in the U.S. I think I should stop and take some time to say thank you to you, my Crochet Spot reader.
Thanks for inspiring me to crochet more and more.
Thanks for the support.
Thanks for visiting all the time.
Thanks for helping to make Crochet Spot a welcoming place for all crocheters.
Thanks for challenging me with your pattern requests.
Thanks for all of the friendly emails.
Thanks for keeping me on my toes with your crochet questions. |
|  |
Okay, I hope that didn’t sounds too cheesey. But seriously, thank you!


