By Rachel Choi – June 17th, 2009
36 Comments
|
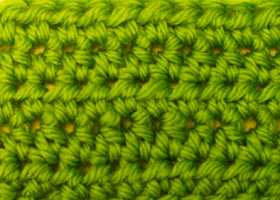
Half double crochet stitches are exactly what they imply! The are half of a double crochet stitch. Here is how to make a half double crochet stitch: Yo, insert hook into stitch, yo, draw through 1 lp, yo, draw through all 3 lps on hook
Here is a picture tutorial for a more detailed explanation. This tutorial is for both right and left handed people. For left handed pictures, roll your mouse over the image and it will change for you.
|
 |
Step 1: Yarn over (wrap the yarn around your hook)
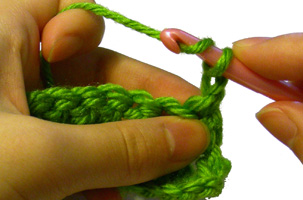
Step 2: Insert your hook into the stitch you want to make your half double crochet in.
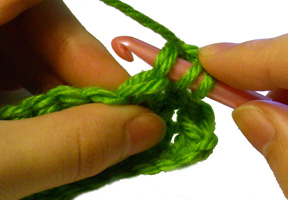
Click Here To Read More »
By Rachel Choi – June 16th, 2009
15 Comments
I want to pick a charity to donate a portion of my earnings from the Crochet Spot Store that I’ll be opening June 29th, which by the way is coming up very soon! I got this idea when a friend of mine had a birthday party and themed it to raise money to fight pediactric cancer. I thought this was a great idea!!! Although I’m not a big party person, I thought that it would be a great opportunity to use my store grand opening to help raise some money for a good cause. I’m not sure exactly how much I’ll be donating yet, but I can tell you that it will be a nice percentage.
I have some great charities in mind, but do you have any in mind?? Feel free to tell me about a charity even if it’s not crochet related!
By Rachel Choi – June 14th, 2009
38 Comments
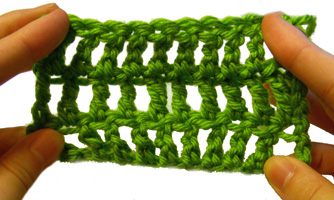
| Treble crochet stitches are very similar to double crochet stitches. The photo to the right shows a small swatch of treble stitches. They are longer than double crochet stitches and normally create a more airy piece.
Here is how to crochet treble crochet stitches: yarn over 2 times, insert hook into stitch, yarn over, pull up a loop, (yarn over, pull up 2 loops) 3 times |
 |
For further explanation, here is a picture tutorial! This tutorial is for both right and left handed people. For left handed pictures, roll your mouse over the image and it will change for you.
Step 1: Yarn over ( wrap the yarn around your hook) 2 times
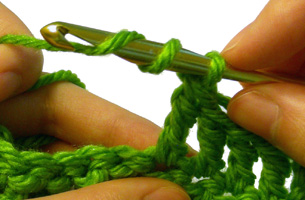
Step 2: Insert your hook into the stitch you want to make your treble crochet stitch in
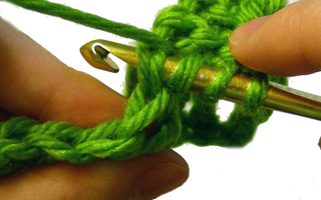
Click Here To Read More »
By Rachel Choi – June 13th, 2009
3 Comments
Thanks everyone who volunteered to be a pattern tester for the new Crochet Spot Store patterns!!! Although not everyone got to test, I must say that those individuals that did deserve a very big…

Check back often for sneak peak photos of what will be in the store opening June 29th!!!
By Rachel Choi – June 12th, 2009
16 Comments
Crochet Pattern: Cleaning Cloth
Note: all stitches are crocheted in back loop only unless otherwise indicated
Row 1: ch 19, sc in second ch from hook and in each ch across: 18 sc
Row 2 – 47: ch 1, turn, sc in each sc aross: 18 sc
Note: stitches are crocheted in both loops for the rest of the pattern
Row 48: ch 1, turn, sc in first sc, ch 25, skip next 16 sc, sc in last sc: 2 sc
Row 49: ch 1, turn, sc in first sc, 30 sc in ch-25 space, sc in last sc, finish off
If you need help crocheting this cleaning cloth, let me know and I’ll be glad to help!
By Rachel Choi – June 11th, 2009
17 Comments
Darn it! I was crocheting with plarn (plastic yarn) and my hook broke!!! I was using one of those plastic H (5.00 mm) Susan Bates hook. It is one of those cheap hooks that comes in a set. By the way, I love the cheap plastic hook sets for beginners since they are of course cheap but they have all the main sizes of hooks that any beginner will need! But the down fall is when it breaks.
Well at least I have a good reason to go buy a nice, new hook now!!! Woohoo!!!
By Rachel Choi – June 10th, 2009
15 Comments
| Call me butterfingers, I almost dropped my can of soda the other day because it was so wet from being chilled in the refrigerator! I never really knew why people used can cozies, but now I know. Here is one that I made for my soda can with plarn (plastic yarn). I’m so proud of how nice and tight the cozy fits on a can. This cozy can also be made with regular yarn if desired, just be sure to do some measuring so that it fits properly.
Also I noticed that this cozy makes a perfect pencil holder!!! The plastic makes it really stiff and less likely to fall over if loaded with pencils or whatever you may decide to put in it!
| Skill Level: |
 |
|
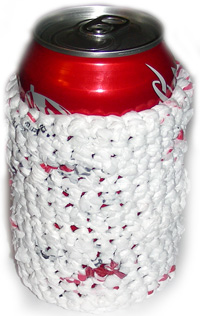 |
Finished Size: 3″ (7.5 cm) in diameter, 4″ (10 cm) tall
Note: you may adjust size if desired
Materials:
Approximately 10 plastic bags made into plarn (plastic yarn)
Crochet hook H (5.00 mm)
Gauge: Round 1 – 5 in pattern is a circle that measures 2 3/4″ (7 cm) in diameter
Crochet Pattern: Can Cozy
Round 1: ch 2, 6 sc in second ch from hook, place marker: 6 sc
Round 2: 2 sc in each sc around: 12 sc
Round 3: (2 sc in next sc, sc in next sc) around: 18 sc
Round 4: (2 sc in next sc, sc in next 2 sc) around: 24 sc
Round 5: (2 sc in next sc, sc in next 3 sc) around: 30 sc
Note: your circle should be 2 3/4″ (7 cm) in diameter fitting perfectly under your soda can. After round 8, the bottom of your can should fit tightly into the cozy.
Round 6 – 20: sc in each sc around: 30 sc
If you need help with crocheting this can cozy, feel free to let me know and I’ll be glad to help!
By Rachel Choi – June 9th, 2009
16 Comments
An interesting way to mix up your crochet life is to try crocheting with new material! Transforming plastic bags into crochet-able yarn is a fun adventure to try. If you hate it, then at least you can say that you tried, but if you love it, there is so much you can create by crocheting with plastic!
Why crochet with plastic?
- A new adventure!
- You can recycle your plastic grocery bags and turn them into something amazing!
- Some things are just better when they are made with plastic, such as a crocheted soap dish.
- Crocheting with plastic creates a very strong material, which can be great for making bags that will carry heavy objects.
How to crochet with plastic bags?
That’s simple! Here is a tutorial for “how to make plarn (plastic yarn)“. This post shows you the easy process of transforming your plastic bags into crochet-able plastic yarn, or as enthusiast say, plarn. Crocheting with plarn is just like crocheting with regular yarn. The only difference is the texture that may take a little while to get used to. There are even crochet pattern on my site and other sites that are specially designed as a plarn project. But don’t limit yourself to those patterns, regular crochet patterns can be made using plarn as well! Just make sure to check gauges when needed.
Most importantly, have fun with this new adventure in crocheting plastic bags! If you ever need any help or would like to share your knowledge in crocheting with plarn, feel free to leave a comment!
By Rachel Choi – June 7th, 2009
13 Comments
I always thought that people normally got sick in the winter, but no, it’s almost summer here and I’m sick! Nothing too serious though, just a sore throat, a small cough and a minor headache. I don’t know if getting sick is a good thing or not. I mean it does keep me at home, and what do I do at home? Crochet!! Then the down side is I might just get tired and fall asleep instead. Okie dokie, I’m done complaining…
Watch out soup can, here I come!!!
By Rachel Choi – June 6th, 2009
62 Comments
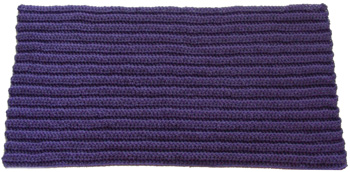
| I’ve been meaning to make a rug for my bathroom and kitchen for a while and I finally got around to doing it! I needed something simple. Nothing fancy or else I won’t want to step on it. I made it a little too big to go in front of my bathroom sink, so this one is going in the kitchen. Next time I’ll remember to measure first. This rug has a nice ridge texture that is made by crocheting in the back loop only. It’s a great project if you’re a beginner or if you just need a rug! Make sure to put something slip resistant on the bottom of it so it doesn’t slip and slide around the floor. |
|
| Skill Level: |
 |
Finished Size: 32″ (81 cm) wide, 16 1/2″ (42 cm) tall
Note: adjust rug to the size you want using directions in the pattern
Materials:
Medium Weight Yarn (approximately 364 yards)
Crochet hook K (6.50 mm)
|
 |
Gauge: not really important, crochet as tight or loose as you want your rug.
Crochet Pattern: Rug
Note: all stitches are crocheted in the back loops only
Start by chaining 90 or as wide as you want rug
Row 1: ch 3, dc in forth ch from hook and in each ch across: 90 dc
Row 2: ch 3, turn, dc in each dc across: 90 dc
Repeat row 2, 28 times or until rug is as tall as you desire.
If you need help with crocheting this rug, feel free to let me know and I’ll be glad to help!


