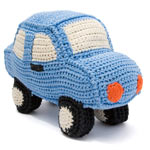
Crocheting in the Car

By Rachel Choi – June 5th, 2009 42 Comments
Today I ran some errands and decided that I would take one of my crochet projects with me to work on in the car. Of course I wasn’t the one driving or else I probably wouldn’t be here type. I’ve never crocheted much in the car until now and realized it was sort of hard to get my hook into the loops when my seat is bumping up and down! I guess it takes a little getting used to. crochet car

Also I get sort of nauseous, like motion sick or something. Call me a wimp but it’s true! I remember when I used to read my school books on the bus the same thing would happen. It’s so weird. But at least the feeling went away and I know it’s another thing that I’ll just get used to.

Okay, back to talking about crocheting in the car…I find it a good use of my time, instead of just staring out the window.

Do you do it often?

Free Crochet Pattern: Dishcloth with Ridges

By Rachel Choi – June 4th, 2009 15 Comments
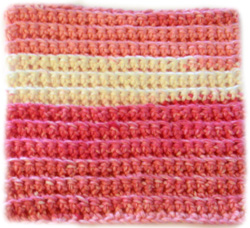
Crochet dishcloths are really fun! They are great for brightening up any kitchen or bathroom and clean those dirty counter tops and dishes at the same time. This dishcloth has ridges for extra scrubbing power. The ridges are created by crocheting in the back loops only, although it may be difficult to see the ridges in the photo to the right. For super absorbency use 100% cotton yarn. This dishcloth is made with self striping yarn, if you use other types of yarn feel free to change colors as desired. crochet ridge dishcloth
Skill Level: beginner crochet skill level

Finished Size: 6 1/2″ (16.5 cm) square

Materials:
Medium Weight Yarn (approximately 50 yards)
Crochet Hook J (6.00 mm)
crochet yarn size 4

Crochet Pattern: Dishcloth
Note: all stitches are worked in the back loops only
Row 1: ch 25, sc in second ch from hook and in each ch across: 24 sc
Row 2: ch 1, turn, sc in each sc across: 24 sc

Repeat row 2, 24 times or until dishcloth is as long as you desire.

If you need help with crocheting this dishcloth, let me know and I’ll be glad to help!

Crochet in Front, Back or Both Loops

By Rachel Choi – June 3rd, 2009 66 Comments

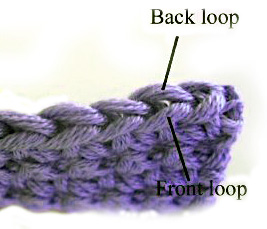
Sometimes it is confusing as to where you are suppose to insert your crochet hook, especially if you are a beginner. Here are some photos of what “loops” I’m referring to and what it looks like when you crochet in the front, back or both loops. For these examples I will be using single crochets.

This picture labels the front and back loops of a stitch. The front loop is the one that is closest to you and the back loop is the one that is furthest from you when you hold your crochet work.

crochet front and back loops

Click Here To Read More »

2009 Knit and Crochet Show

By Rachel Choi – June 2nd, 2009 Be the first to comment
The Knit and Crochet show is the Crochet Guild of America’s Annual Chain Link Conference and The Knitting Guild Association’s Regional Conference. I was reading about the neat activities that they’ll be having there and I got so excited! The show is being held in Buffalo, NY from August 6-9. They are suppose to have a cool shop full of yarn, kits, hooks, needles, books and I guess everything any crocheter or knitter can ever dream of. There’s also fashion shows, dinners, interesting classes to learn something new and so much more. knit and crochet show

I really want to go but never been before, have you? If so how was it?

What’s Coming in the Crochet Spot Store?

By Rachel Choi – June 1st, 2009 8 Comments

This month I’ve been super busy making patterns, patterns, and did I mention patterns? So far I have a few that are almost ready to be tested. But they all need some finishing touches first. Here is a snippet of what’s to come in the store. Sorry there’s no photos, they aren’t as appealing when there’s just pieces of things laying around on my desk, hehe.

Amigurumi Alien
OOOh, this one is cute! My favorite part is his feet. Then don’t have toes, but they’re perfectly rounded with a nice foot shape and ankles. I enjoy making them walk around on my desk even though they aren’t connected to the body yet. That’s how much I like them (not that I have an alien foot fetish or anything)!

Wishing Well
A nice lady asked me to make a pattern for this a while ago and I just never got around to doing it until now. She wanted to use it for her daughter’s wedding reception so that people can drop cards into it. I thought that was a great idea!

Felted Purse
This one is fun if you like felting. I first designed it to be extra big so that when it felted it would shrink to be the perfect size. But after crocheting it, it was already a great size for a bag! I contemplated felting it or leaving it as is, but I felted it anyway. It made a very cute small purse that I really love! The moral of the story is that you can choose to felt or not to felt and it will still look great.

Tunisian Purse
I love Tunisian stitches, especially when it’s done in 3 colors! The colors just weave together very nicely. This purse is larger than the felted purse so it’s better for carrying around the essentials plus some.

Lace Shawl
I always wanted a shawl that I could wear every day and also dress up for special occasions. So I designed this shawl just for that. It’s made with size 10 thread so that it drapes very nicely and is light enough so that it can be worn when the weather is warm or when it is cold.

Ruffle Shrug
You have to love ruffles to want to make this shrug because it has very full ruffles on it! There is a pretty wavy texture to the body of the shrug and then the bold ruffles surrounding it.

Thread Bunny
I thought it would be fun to crochet a very, very tiny bunny. It stands about 1 1/2 inches tall. It’s made with size 10 rainbow thread and with a bunny this tiny it makes it look like it’s colorfully striped!

Soft Sweater
This is a sweater that I started but have no clue how to finish. We’ll see where my crochet hook takes me. But I have to tell you that it’s super soft because I used boucle yarn, (one of the most petted yarns in the stash).

Kid’s Pillow
I started this round pillow and decided to put a cute animal face on it. I mean kids do like animals right? I’m thinking a teddy bear or maybe a doggy…hmm. I’ll have to think about it more.

As you can see, I’ve been busy this month, but still have yet to finish any of these for the store. Darn me and my impulse to start new things before finishing the previous. Anyway, I just wanted to share what I’ve been up to!

Let me know if you have more ideas for patterns!

I Have UFOs

By Rachel Choi – May 31st, 2009 19 Comments

Okay, I don’t have “unidentified flying objects” although somethings I wish I do. UFO if you don’t already know stands for “unfinished object” according to cool crochet language. For some reason, there’s literally 10 UFOs on my desk and I have no clue how they got there!

Alright, I lied. I put them there. But what stumps me is why there are so many. I mean I wake up one day and impulsively start something new. What am I thinking? I already have my desk full of yarn projects that are just waiting to be finished. All they need is a couple more rows or to be sewn together.

Do you have UFOs too?

ufo

Free Crochet Pattern: Lacey Headband

By Rachel Choi – May 30th, 2009 21 Comments

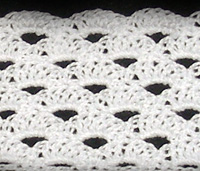
This headband is made with size 10 thread and is designed to fit any women or child’s head. The pretty lacey center is crocheted first then small straps are sewn on to secure the headband in the back of the head, while still making it adjustable for the different sizes. This headband can be worn everyday to keep your hair in place or for the special occasion when you need a touch of lace for your outfit. Follow the instructions below to get started.

crochet lacey headband

Skill Level: crochet skill level easy

Finished Size: 2” (5 cm) wide, 10” (25.5 cm) long not including straps
Note: you may alter the size of the headband if desired by following the instructions within the pattern

Materials:
Size 10 Thread
Crochet Hook US 1 (2.35 mm)
Sewing Needle

crochet lacey headband

Gauge: not really important

Need help reading the crochet pattern? Learn more about how to read crochet patterns.

Crochet Pattern: Head Band
Start by chaining 86 or a chain that is a multiple of 6, then add 2 chains
Row 1: sc in second ch from hook, sc in next ch, ch 3, skip 3 ch, (sc in next 3 ch, ch 3, skip 3 ch) across, sc in last 2 ch
Row 2: ch 1, turn, sc in first sc, (skip 1 sc, 5 dc in next ch-3 space, skip 1 sc, sc in next sc) across
Row 3: ch 3, turn, skip 2 sts, sc in next 3 dc, (ch 3, skip next 3 sts, sc in next 3 dc) across, ch 2, skip 1 st, sc last sc
Row 4: ch 2, turn, skip 1 sc, 3 dc in ch-2 space, skip 1 sc, sc in next sc, (skip 1 sc, 5 dc in next ch-3 space, skip 1 sc, sc in next sc) across, 3 dc in last ch-3 space
Row 5: ch 1, turn, sc in next 2 dc, (ch 3, skip 3 sts, sc in next 3 dc) across, ch 3, skip 3 sts, sc in last 2 sts
Repeat rows 2 – 5, two times, stopping after row 4 on last repeat.

Strap (make 2)
Start by chaining 12 or a chain that is wide as the headband
Row 1: ch 2, dc in third ch from hook and in each ch across: 12 dc
Row 2: ch 2, turn, dc2tog, dc in next 8 dc, dc2tog: 10 dc
Row 3: ch 2, turn, dc2tog, dc in next 6 dc, dc2tog: 8 dc
Row 4: ch 2, turn, dc2tog, dc in next 4 dc, dc2tog: 6 dc
Row 5: ch 2, turn, dc2tog, dc in next 2 dc, dc2tog: 4 dc
Row 6: ch 2, turn, dc in each dc across: 4 dc

Repeat row 6, 40 times or until strap is as long as desired.

Sew strap to side of headband with a sewing needle.

To wear the headband, place on head and tie the straps in the back. If desired, you may choose not the create straps, instead make headband long enough to fit around head and sew ends together.

If you need help crocheting this headband, let me know and I’ll be glad to help!
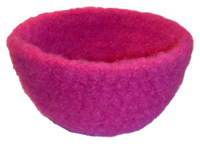
Free Crochet Pattern: Felted Bowl

By Rachel Choi – May 29th, 2009 20 Comments
Here is a cute, fuzzy bowl to crochet! This a small project that is great for practicing and learning how to felt if you’re a beginner. This bowl can be crocheted really fast using your scrap yarn. Just make sure to use yarn made of 100% animal fibers, such as wool, or else I won’t felt. Have fun and happy felting! crochet felted bowl
Skill Level: beginner crochet skill level

Finished Size:
Not felted: 4 ½” (11.5 cm) diameter, 3 ¼” (8.5 cm) tall
Felted: 4 ¼” (11 cm) diameter, 2 ½” (6.5 cm) tall
Note that felted size may vary based on type/brand of yarn and felting method.

Materials:
Medium Weight Yarn (approximately 75 yards of 100% wool or other felt-able material)
Crochet Hook I (5.50 mm)

Crochet Pattern: Bowl
Round 1: ch 4, 12 dc in forth ch form hook, sl st in top of ch-3 joining to beginning of round: 12 dc
Round 2: ch 3, 2 dc in each dc around, sl st in top of ch-3: 24 dc
Round 3: ch 3, (2 dc in next dc, dc in next dc) around, sl st in top of ch-3: 36 dc
Round 4: ch 3, (2 dc in next dc, dc in next 2 dc) around, sl st in top of ch-3: 48 dc
Round 5 – 9: ch 3, dc in each dc around, sl st in top of ch-3: 48 dc

Finish off and tuck in ends. Felt as desired or use felting instructions as a guide. Block crochet to shape your bowl.

If you need help with crocheting and felting this bowl, let me know and I’ll be happy to help!

How to Felt

By Rachel Choi – May 28th, 2009 8 Comments

Felting is the process of agitating something made with natural animal fibers under heat to create a matted fabric called felt. Lots of crafters, crocheters and knitters, enjoy felting their projects to give them a new and different look. By felting your work, you create a smooth texture, erasing stitch definition and reducing the size of the finished object. A felted project is often times stronger and sturdier than before it was felted. Felting is a really easy process!

Although there are many techniques for felting, the basic idea is to agitate your item in hot water and let it dry. Here are some common methods to consider.
Click Here To Read More »

Blocking Crochet

By Rachel Choi – May 27th, 2009 23 Comments

Blocking crochet is the process of “molding” your finished work into the shape that you desire. For example, you may want to block your crocheted bag so that it keeps a nice, sharp bag shape. Different techniques can be used for blocking your work depending on the type of yarn you used and the shape of the object being blocked. Here are some general guidelines to follow.

Step 1: Lay the item you want to block into the shape you want it to be. You may choose to use pins to hold your item in place. Try using pins that won’t rust. There are also boards specifically made for blocking, but you can use any surface that works for you. A layer of towels is great for adsorbing water and placing pins into.

Step 2: Wet it. Blocking is done be wetting your item and letting it dry. The method for wetting your item will depend on the type of yarn you are using. Check the yarn label for special instruction to make sure that you don’t violate any. You may choose to use a spray bottle to wet your item. You can also choose to steam your item using an iron. Since some materials should not be ironed, the safest way to block is via the spray bottle. You can also switch steps 1 and 2 and use the sink to wet the item.

Step 3: Let it dry. After your item is dry, it should be blocked!

Do you have a blocking tip? Fell free the share it by leaving it as a comment!