By Rachel Choi – May 26th, 2009
213 Comments
Update: Here is a link to the Crochet Pattern: Textured Slouchy Beanie – 5 Sizes. If you need more slouchy beanie sizes: baby, toddler, child, woman, and man, then that’s the pattern to try!
|
The slouchy beanie can be worn in many different styles. Slouch it to the front to form a floppy brim, slouch it to the back for a relaxed look, or to the side as a traditional beret. This beanie is able to fit my head, which is small, and my friend’s large head since it’s made to be loose and roomy. Just in case you find that it doesn’t fit the way you like, there are instructions for altering the beanie in the pattern. |
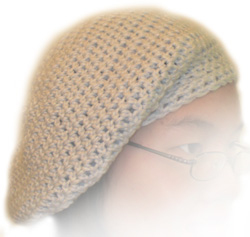 |
|
Skill Level: |

|
Click Here To Read More »
By Rachel Choi – May 25th, 2009
19 Comments
I’ve been felting and it’s pretty fun! Recently I made a purse and a bowl. Yes, a bowl… lol. At first I thought it was silly to make a crocheted bowl, but then I thought it might be cute. Lets just say that I won’t be putting it in the dishwasher so I have to make sure it doesn’t get too dirty. Other than that, I really like my little felted bowl!
So, that’s enough of me rambling about a bowl. My question to you all wonderful crocheters out there is what do you like to felt? bags? bowls? clothing? Or if you haven’t felted yet, what are you waiting for?
By Rachel Choi – May 24th, 2009
89 Comments
| Double crochets are like the long version of single crochets! If you are just beginning to learn how to crochet and have not learned single crochets yet, I would suggest learning how to crochet single crochets first. After that double crochets will be a piece of cake!
In a nut shell, here what you have to do: Yo, insert hook into stitch, yo, draw through 1 lp, yo, draw through 2 lps on hook, yo, draw through final 2 lps on hook
|
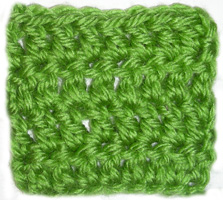 |
If that doesn’t makes sense that’s okay! Here is a picture tutorial of what to do. This tutorial is for both right and left handed people. For left handed pictures, roll your mouse over the image and it will change for you.
First I’m going to start out with a small swatch. Just use a piece of work you want to practice your double crochets on. You can even start out with a chain as long as you desire. Note that when you make a new row of double crochets you must chain 3 before starting your double crochets. This ensures that the beginning of your row will be the same height as the rest of your row.
Step 1: Yarn over (wrap the yarn around your hook)
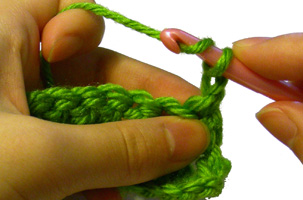
Step 2: Insert your hook into the stitch you want to make your double crochet in.
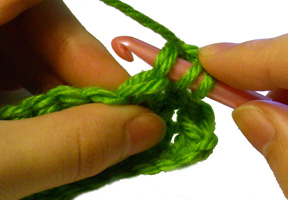
Click Here To Read More »
By Rachel Choi – May 23rd, 2009
90 Comments
A double crochet decrease is the same thing as double crocheting a number of stitches together; for example, dc2tog. You may also see a double crochet decrease abbreviated as “2-dc dec” in a crochet pattern. However, you can do decrease on more than just 2 stitches at a time.
In a nut shell, here what you have to do: (Yo, insert hook, yo, draw lp through, yo, draw through 2 lps on hook) in each of the sts indicated, yo, draw through all lps on hook.
If that doesn’t makes sense that’s okay! Here is a picture tutorial of what to do. This tutorial is for both right and left handed people. For left handed pictures, roll your mouse over the image and it will change for you.
First I’m going to start out with a small swatch of double crochets. (You don’t have to. Just use a piece of work you want to practice your decreases on)
Step 1: Yarn over (wrap the yarn around your hook)

Step 2: Insert your hook into the first stitch that you want to work the decrease on.

Click Here To Read More »
By Rachel Choi – May 22nd, 2009
7 Comments
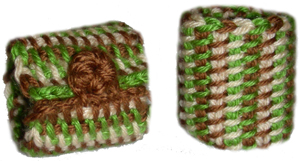
| I made these wrist warmers to practice changing colors in Tunisian crochet. Changing colors in crochet is really easy and the same principles still hold when you change colors in Tunisian. I really like the way the colors look especially when you use 3 colors. The best thing about using 3 colors is that when you go to change the color the next color is waiting right there for you, no carrying yarn required! |
 |
If you don’t know how to do Tunisian crochet yet, it’s really fun and you can learn with the Tunisian crochet tutorial.
| Skill Level: |
 |
Finished Size: 6 1/2†(16.5 cm) long, 2†(5 cm) tall, ½†(1.5 cm) button diameter
Note: to alter size of the wrist warmer follow the directions with in the crochet pattern
Click Here To Read More »
By Rachel Choi – May 21st, 2009
7 Comments
| Dr. Peter Lawrence, chief of vascular surgery at UCLA, developed a new technique to get rid of varicose veins. More interestingly, this technique uses a small crochet hook to help remove the veins. This is a minimally invasive and non-scarring procedure called light-assisted stab phlebectomy (lasp). Who ever thought that crochet hooks would be used for more than just crochet?
Have you ever seen or used crochet hooks for something other than crocheting? |
 |
By Rachel Choi – May 20th, 2009
74 Comments
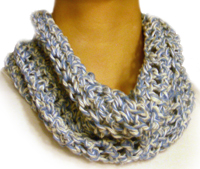
| This cowl is meant to not choke you! For some reason whenever I wear something around my neck it feels a little too tight, but finally here is something that isn’t. It’s great for when the weather gets warmer or to add some flare to an outfit. The cowl is made with a big crochet hook to work up fast and use a small amount of yarn. Feel free to adjust the size of the cowl as you see fit! |
 |
| Skill Level: |
 |
Finished Size: 8†(20 cm) tall, 19†(48 cm) around
Note: to adjust size, follow directions within pattern
Materials:
Medium Weight yarn (approximately 90 yards)
Crochet Hook N (10.00 mm)
|
 |
Gauge: not really important, use the instructions in the pattern to adjust the size as needed.
Crochet Pattern: Cowl
Start by chaining 35 or as long as you want your cowl.
Row 1: ch 1, sc in second ch from hook and in each ch across: 35 sc
Row 2: ch 2, turn, dc in each sc across: 35 dc
Row 3: ch 1, turn, sc in each dc across: 35 sc
Repeat rows 2 – 3, seven more times or until cowl is as tall as you desire.
Slip stitch or sew the shorter sides of the cowl together and finish off. You may also choose to use buttons as a closure instead of sewing ends together.
If you need help with crocheting this cowl, let me know and I would love to help!
By Rachel Choi – May 19th, 2009
21 Comments
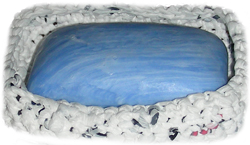
| Crocheting with plastic bags is just like crocheting with any other type of yarn. The only difference is the texture of the material. The soap dish is a very small crochet project to start you off in exploring the world of plarn (plastic yarn). You can use the “How to Make Plarn Tutorial†if you don’t know how to yet! It is fun and a great way to recycle your old plastic grocery bags. |
 |
| Skill Level: |
 |
Finished Size: 3†(7.5 cm) wide, 4 ¼†(11 cm) long, 1 ¼†(3 cm) tall
Note that size can be adjusted by following the instructions within the pattern
Materials:
Approximately 6 plastic grocery bags, cut into a ball of plarn
Crochet Hook G (4.00 mm)
Gauge: not very important
Since the thickness of plarn varies from person to person, use a crochet hook that you are comfortable with. Crochet as tight or loose as you want your soap dish to be.
Crochet Pattern: Soap Dish
Bottom
Start by chaining 12 or as wide as you want your soap dish
Row 1: ch 1, sc in second ch from hook and in each ch across: 12 sc
Row 2: ch 1, turn, sc in each sc across: 12 sc
Repeat row 2 fourteen times or until your work is as long as you want your soap dish.
Sides
Round 1: sc around bottom piece
Repeat round 1 four times or until sides are as tall as you desire, then finish off. If you find that your sides are a bit floppy, slip stitch around the last round to make it tighter or you may choose to put decreases in the last round.
If you need help with crocheting this soap dish, let me know and I’ll be glad to help!
By Rachel Choi – May 18th, 2009
2 Comments
Here is a round up for coupons this week! Some of the expiration dates vary so make sure you read them before using.
JoAnn – Here are 2 coupons! 40% off any one regular priced item. Valid through May 30, 2009. The second one is a 10% off your total purchase, which is valid from May 22 – 25, 2009. These can be used in store or online!
A.C.Moore – Here are 2 coupons! The first one is a 20% off your total purchase, valid May 17 to 23, 2009. The second is a one day special for 50% off any one regular priced item, valid May 19.
Michaels – 40% off any one regular priced item. Valid May 17 – May 23, 2009
By Rachel Choi – May 17th, 2009
21 Comments
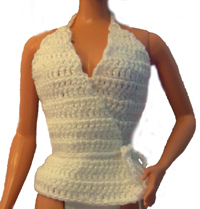
| This top is interestingly made, yet very easy. All you have to do is make two triangles and connect them together. Maybe that sounds weird, but it works! The triangles are connected at the neck by a simple chain and the rest is just wrapped around your doll and held together with a belt. This creates the V-neck in the front and an open back. You can also sew the back or front of the top together if you like, but it’s not required to crochet this awesome summer top for Barbie! |
 |
| Skill Level: |
 |
Click Here To Read More »


