Crochet Gifts for the Cousins

By Rachel Choi – March 20th, 2009 8 Comments

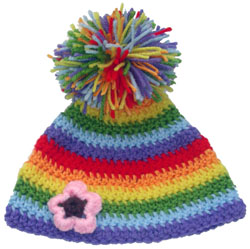
My aunt asked me to crochet a few things for my cousins a while ago and I just got around to doing it this morning! The youngest one requested a rainbow hat with a pom pom and a pink flower. Here is a picture of what I came up with!

crochet rainbow hat

I really like this one! It is the ultimate little girl’s hat! It’s so bright and colorful…I might just make one for myself!

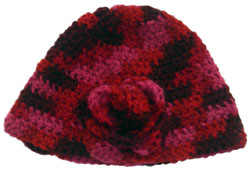
Here is the beanie that the older sister requested. It’s more sophisticated and made with red-ish, multi-colored yarn. It also has a rose on it that is sort of hard to see in the picture, since it is made with the same yarn as the beanie.

flowered beanie

The patterns for both of these beanies can be found right here on my blog! I used the easy crochet beanie pattern for both of the beanies. I did alter it a bit by take out some of the increases so that the beanies would fit young girls. I also changed the colors on each row for the rainbow hat. The pom pom was made using the “How to Make Pom Poms” tutorial. The rose on the red-ish hat was made using the crochet rose pattern.

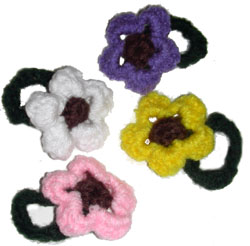
I also made them some crocheted flower hair ties!

crochet hair ties

The same hair tie crochet pattern can be found here on my blog. I also used the flower part of that pattern for the pink flower that is on the rainbow hat.

Now I just hope that the beanies fit!!!

Crochet Pattern: Easy Adjustable Slippers

By Rachel Choi – March 19th, 2009 143 Comments

Update: Please see the Easy Adjustable Slippers Version 2 for the new and improved updated version of this pattern, along with step by step photos for visual learners!

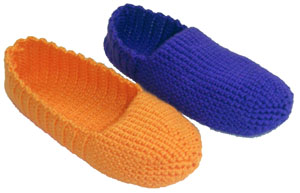
This crochet pattern is very versatile since you can create different slipper styles just from this one pattern. Using the easy adjustable slipper pattern you can crochet slippers for everyone in the family, whether they are for men, boys, women, girls or even babies. The original pattern is written for size 6 women, but this pattern is meant to be altered to fit anyone. Just follow the simple instructions to alter the size and style of your slippers. crochet easy slippers
Skill Level: crochet skill 
level easy

Finished Size: Any size you want it!
Following the exact round and row count given: 4” (10 cm) wide, 9” (23 cm) long, fitting approximately a women’s size 6

Materials:
Medium Weight Yarn
Crochet Hook G (4.00 mm)
Yarn Needle
Measuring Tape or Size Chart
Scissors
crochet yarn size 4

Gauge: not important. For best fit, measure foot size and follow instructions for altering slipper.

Need help understanding the abbreviations? Check out the crochet abbreviation chart.

Crochet Pattern: Slipper

Note: Round 1 – 8 starts the toe of the slipper by creating a circle. For best fit, make sure that the diameter of the circle is slightly smaller than the width of the wearer’s foot. To adjust the circle size, simply add or subtract rounds as needed.

Round 1: ch 2, 6 sc in second ch from hook, place marker: 6 sc
Round 2: 2 sc in each sc around: 12 sc
Round 3: (2 sc in next sc, sc in next sc) around: 18 sc
Round 4: (2 sc in next sc, sc in next 2 sc) around: 24 sc
Round 5: (2 sc in next sc, sc in next 3 sc) around: 30 sc
Round 6: (2 sc in next sc, sc in next 4 sc) around: 36 sc
Round 7: (2 sc in next sc, sc in next 5 sc) around: 42 sc
Round 8: (2 sc in next sc, sc in next 6 sc) around: 48 sc

Continue increasing the circle until the diameter is slightly smaller than the width of the wearer’s foot.

Note: Round 9 – 27 creates the front/toe of the slipper. You may choose to make this portion as long or short as you desire. To adjust length add or subtract rounds as needed. The length of the slipper upon completion of these rounds should not go pass the ankle of the wearer’s foot.

Round 9 – 27: sc in each sc around: 48 sc

Continue until the desired length of the front of the slipper is obtained.

Note: Row 28 establishes the length of the two sides plus the bottom of the slipper. The length of this row should be greater than the diameter of the slipper. 30 single crochets is the recommended length that is used in this example. You may increase or decrease the number of single crochets made to better fit your slipper size.

Row 28: sc in next 30 sc: 30 sc

Note: Row 29 – 43 creates the rest of the slipper, which includes heal and back of foot. Upon completing this set of rows your slipper should exactly reach the back of the wearer’s ankle. Increase or decrease the number of rows as you see necessary.

Row 29 – 43: ch 1, turn, sc in next 30 sc: 30 sc

Finish off. With yarn needle, sew back of slipper together.

If you need help with crocheting slippers, feel free to leave a comment!

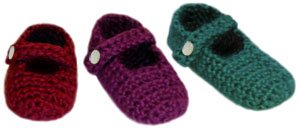
Do you need baby sizes? Check out the Crochet Pattern: Baby Mary Jane Slippers – 3 Sizes. This pattern includes the instructions for sizes 0 – 3 months, 3 – 6 months, and 6 – 12 months!

Be sure to check out the Crochet Spot Store for more easy crochet patterns!

crochet baby mary jane slippers

How to Read Crochet Patterns

By Rachel Choi – March 18th, 2009 105 Comments

I bet every crocheter remembers the dreadful first time they read a crochet pattern and had no clue what they were reading. I know for sure that happened to me! Let’s get rid of all that frustration and decrypt crochet patterns once and for all. Here is a basic guide to start reading crochet patterns.

Basic Crochet Abbreviations
For some reason pattern writers are too lazy to spell every word out. So they use abbreviations for just about every single word in the pattern. The master list of crochet abbreviations is always handy, but here are the basics to get started.

Abbreviation
Description
ch chain stitch
ch- refers to chain or space previously made: e.g., ch-1 space
ch-sp chain space, the space made by the chain
dc double crochet
dec decrease/decreases/decreasing
hdc half double crochet
inc increase/increases/increasing
lp(s) loops
MC main color
pm place marker
rep repeat(s)
rnd(s) round(s)
sc single crochet
sk skip
sl st slip sitich
sp(s) space(s)
st(s) stitch(es)
tr treble crochet
yo yarn over

Basic Crochet Symbols
Not only do pattern writers use abbreviations, they also use special symbols. Most symbols are used to indicate what parts of the pattern are to be repeated. Here are the primary ones.

Abbreviation
Description
[ ] work instructions within brackets as many times as directed
( ) work instructions within parentheses as many times as directed
* repeat the instructions following the single asterisk as directed
* * repeat instructions between asterisks as many times as directed or repeat from a given set of instructions

Crochet Syntax
Now that we know basic abbreviations and symbols, lets take some examples and examine them.

Example 1
Row 1: With red, ch 21, turn, sc in second ch from hook, sc in each ch across: 20 sc

This is the first row you are crocheting and you will be using your red colored yarn. Make a chain that is 21 chains long. Then turn you crochet work to work in the opposite direction. Make a single crochet stitch in the second chain from your hook. Then make a single crochet in each of the chains across the row. When you finish this row, you will have made 20 single crochet stitches.
Note: When you count the second chain from your hook. Do not count the loop that is on your hook. The first chain from your hook is the chain right after the loop on your hook. So the second would be the chain after that.

Example 2
Round 1: With Beige, ch 2, 8 sc in second ch from hook, place marker: 8 sc

This is the first round that you will be crocheting and you will use your beige colored yarn. Round means that you will be crochet in a circle shape.

Start by making a chain that is 2 chains long. Remember that the loop on your hook does not count as a one of the chains. Next, make 8 single crochet stitches in the second chain from your hook. Then place a marker. At the end of this round you will have crocheted 8 single crochet stitches.
Note: Markers are used to keep track of where the round ends and a new round begins. When you crochet around a circle, it is very easy to loose track of where to stop and start a new round if you do not use a marker. A marker can be a small scrap piece of yarn. To place a marker, just insert it into the loop that is on your hook. At the end of every round, you should move the marker and put it into the new loop that is on your hook.

Example 3:
Round 5: (2 dc in next dc, dc in next 3 dc) around: 30 dc

This is the fifth round of a crochet project. Make 2 double crochet stitches in the next crochet stitch, which was a double crochet in the previous round. Then make a double crochet stitch in the next 3 stitches. Repeat this all the way around, until you reach the end of this round. You will have completed 30 double crochets in this round.
Note: You will know you reached the end of this round when you reach your marker. For this round, do not crochet in the loop that has the marker in it, stop in the stitch right before it, since the loop with the marker represents the beginning of the next round.

There are unlimited amounts of examples that can be placed here. Even expert crocheters have trouble reading crochet patterns from time to time. Just remember to not get frustrated, and to ask for help when you need it! If you need help with a pattern always ask the designer of the pattern since he/she would know the most about it. If it is one of my Crochet Spot patterns, you can always ask me for help anytime!!! Just leave a comment on the crochet pattern’s post and I’ll be sure to answer.
Detailed Explaination of Crochet Rose Pattern

By Rachel Choi – March 17th, 2009 65 Comments
As a request from a Crochet Spot reader, here is a detailed explanation for the crochet rose pattern. The following instructions are intended for beginners to understand and do not use any short hand crochet abbreviations. The original crochet rose pattern can be found here. crochet rose

Rose Explained
Row 1: make a chain that is 51 chains long. Double crochet in the fifth chain from your hook, then chain 2, then double crochet again in the same chain you made the first double crochet in. Chain 2, skip 2 chains on your foundation chain, double crochet in the next chain, chain 2 again, double crochet in the same chain that you made the previous double crochet in. Repeat the previous sentence all the way across the row. You will then have 1 chain felt on the row. Double crochet in the last chain.

Row 2: chain 3, turn to work in the opposite direction. In the space created by chaining 2 in row 1, make 2 double crochet stitches, then chain 2, then make 2 more double crochet stitches in the same space. Chain 2, skip the next 2 stitches, in the next space created by chaining 2 in row 1, make 2 double crochet stitches, then chain 2 and make 2 more double crochet stitched in the same space. Repeat the previous sentence all the way across the row. You will then have 1 stitch felt on the row. Double crochet in the last stitch.

Row 3: Turn to work in the opposite direction. In the space created by chaining 2 in row 2, make 9 double crochet stitches, slip stitch in next space created by chaining 2, then chain 1, then slip stitch in the same space as the previous slip stitch, then chain 1 again. Repeat the previous sentence for all the spaces across the row.

Leaf Explained
Row 1: Chain 14, in the second chain from your hook (loop on hook does not count as a chain), make a slip stitch. In the next chain make a single crochet stitch. In the next chain make a half double crochet stitch. Make a double crochet stitch in each of the next 2 chains. Make a treble crochet stitch in each of the next 2 chains. Make a double crochet stitch in each of the next 2 chains. In the next chain make a half double crochet stitch. In the next chain make a single crochet stitch. In the next chain make a slip stitch.

Row 2: Chain 1, turn to work in the opposite direction. Repeat row 1, working the same stitches in the same order into the stitches across the row.

If you would like another pattern on this site further explained, just leave a comment on that crochet pattern and I would be happy to provide further explanation for it!

Free Crochet Pattern: Shell Lace Fingerless Gloves

By Rachel Choi – March 16th, 2009 147 Comments
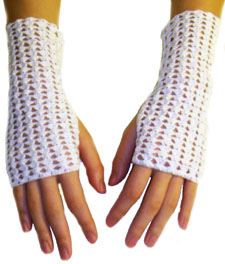
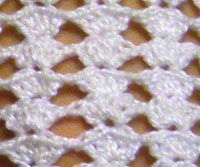
These fingerless gloves are made with size 10 crochet thread for a light and elegant look and feel. The shell stitches give it a wonderful lacy look that can be worn during winter but also in the spring and the summer. Just follow the easy and simple instructions to crochet these lovely fingerless gloves.

Skill Level: crochet skill level easy

Finished Size: 3” (8 cm) wide, 7” (18 cm) long

Materials:
Crochet Thread Size 10 (approximately 100 yards)
Crochet Hook US 7 (1.5 mm)
Sewing needle

Gauge: Not really important. For best fitted size, make the starting foundation chain the circumference of the wearer’s palm.

Need help understanding the abbreviations? Check out the crochet abbreviation chart.

shell-lace-fingerless-glove

shell-lace-fingerless-glove

Crochet Pattern: Fingerless Glove (makes 1 glove)
Start by chaining 78 or chain that is the circumference of the wearer’s palm
Note: Starting chain must be a multiple of 6, since each shell uses 6 chains
Row 1: ch 2, sc in second ch from hook, (skip 2, 5 dc in next ch, skip 2, sc in next ch) across
Row 2 – 30: ch 2, turn, skip 3, 5 dc in next dc, (ch 1, skip 5, 5 dc in next dc) across, skip 2, dc in next st

Sew sides of glove together leaving a 2” (5 cm) hole 1” (2.5 cm) from the end.

If you need help with crocheting fingerless gloves, I would love to help! Just leave a comment!

Fingerless Gloves for Men

By Rachel Choi – March 14th, 2009 52 Comments
I love fingerless gloves and so should men. They are great for keeping your palm and wrist warm and at the same time protect them from the environment. These fingerless gloves are great if you’re doing heavy lifting or riding a bike since they can protect you hands from calluses. Crocheted fingerless gloves aren’t just for women, they are for men too. crochet mens fingerless glove
Skill Level: beginner crochet skill level

Finished Size: 4 ½” (11.5 cm) wide, 6” (15 cm) long
Note: For best fitted size, make the chain in row 1 the circumference of the wearer’s palm.

Materials:
Medium Weight Yarn
Crochet Hook H (5.00 mm)
Yarn Needle
crochet yarn size 4

Gauge:
12 dc = 3’’
4 rows = 2’’
Gauge Swatch: 3’’w x 2’’h (7.5cm x 5cm) ch 14.
Row 1: dc in third ch from hook and in each ch across
Row 2 – 4: ch 2, turn, dc in each dc across
Finish off.

Need help understanding the abbreviations? Check out the crochet abbreviation chart.

Crochet Pattern: Fingerless Glove (makes 1 glove)
Row 1: ch 34, dc in third ch from hook, dc in each ch across: 32 dc
Row 2 – 11: ch 2, turn, dc in each dc across: 32 dc

Use yarn needle to sew sides of glove together leaving a 2” (5 cm) hole 1” (2.5 cm) from the end.

If you need help with crocheting fingerless gloves, just leave a comment and I would be glad to help!

Crochet Pattern: Amigurumi Light Bulb

By Rachel Choi – March 13th, 2009 8 Comments
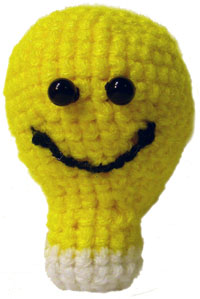
I had a bright idea today to make a light bulb and hold it over my head every time I have a bright idea! So here is the pattern that I came up with. It’s fairly easy, fast and fun to crochet!

Skill Level: crochet skill level easy

Finished Size: 3 1/2” (9 cm) tall, 2 ¼” (6 cm) wide

Materials:
Medium Weight Yarn (yellow, white, and black)
Crochet Hook F (3.75 mm)
Yarn Needle
Sewing Needle
Polyester Fiberfill
2 beads

crochet amigurumi light bulb

Gauge:
17 sc = 3’’
8 rows = 2’’
Gauge Swatch: 3’’w x 2’’h (7.5cm x 5cm) ch 18.
Row 1: sc in second ch from hook and in each ch across
Row 2 – 8: ch 1, turn, sc in each sc across
Finish off.

Need help understanding the abbreviations? Check out the crochet abbreviation chart.

Crochet Pattern: Light Bulb
Round 1: ch 2, 6 sc in second ch from hook, place marker: 6 sc
Round 2: 2 sc in each sc around: 12 sc
Round 3: (2 sc in next sc, sc in next sc) around: 18 sc
Round 4: (2 sc in next sc, sc in next 2 sc) around: 24 sc
Round 5: (2 sc in next sc, sc in next 3 sc) around: 30 sc
Round 6: sc in each sc around: 30 sc
Round 7: (2 sc in next sc, sc in next 4 sc) around: 36 sc
Round 8 – 10: sc in each sc around: 36 sc
Round 11: (decrease, sc in next 4 sc) around: 30 sc
Round 12: sc in each sc around: 30 sc
Round 13: (decrease, sc in next 3 sc) around: 24 sc
Round 14: sc in each sc around: 24 sc
Round 15: (decrease, sc in next 2 sc) around: 18 sc
Round 16: sc in each sc around: 18 sc
Round17: sc in each sc around, changing to white in last sc made: 18 sc
Round 18 – 19: sc in each sc around: 18 sc
Fill with fiberfill.
Round 20: (decrease, sc in next sc) around: 12 sc
Round 21: decrease in each around, finish off: 6 sc

Sew on eyes and face as desired.

Need help? No worries just leave a comment!

How to Crochet: Slip Knot

By Rachel Choi – March 12th, 2009 28 Comments

This tutorial is for both right and left handed people. For left handed pictures, roll your mouse over the image and it will change for you.

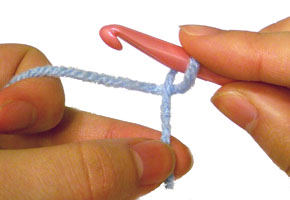
Every crochet project you start starts with a slip knot. So here is a fast and easy way to make a slip knot using your crochet hook. This method is a lot faster than making the slip knot with just your hands.

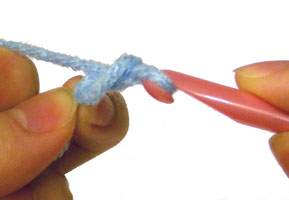
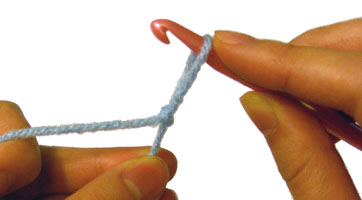
Wrap the yarn around your hook as show in the picture.


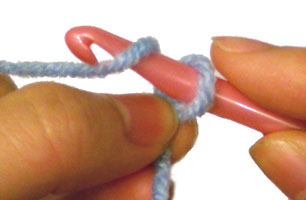
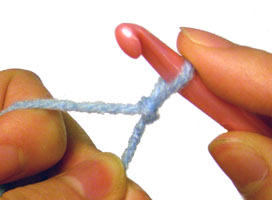
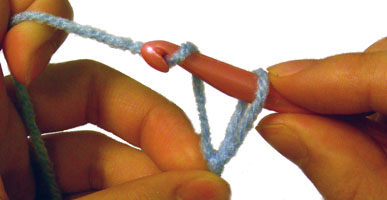
Yarn over (wrap the yarn over your hook) while holding the bottom loop steady.


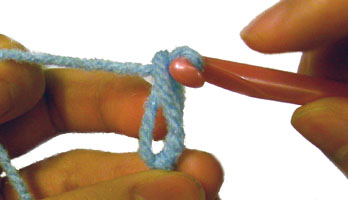
Pull the strand of yarn through the loop.


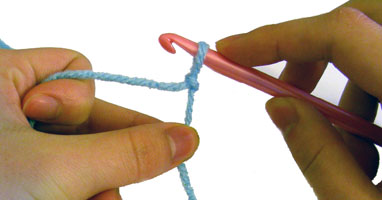
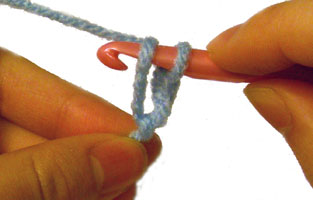
Tighten your slip knot.


Woohoo! You just saved yourself time. No more making knots with your hands. Just wrap it around your hook and get crocheting!

Was this helpful? Do you still need more help? Leave a comment to let me know!

Crochet Pattern: Knot Stitch Capelet

By Rachel Choi – March 11th, 2009 75 Comments
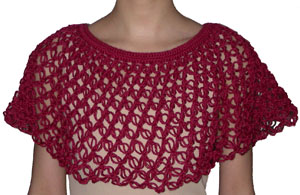
The knot stitch capelet is great to wear when it’s breezy outside. This capelet is also great for practicing your knot stitches. It is made with a simple round of single crochet and double crochet at the top, followed by rounds and rounds of knot stitches. This gives the capelet a very light, elegant lacey look. One size fits most and it can easily be adjusted if needed. crochet knot stitch capelet
Skill Level: crochet skill level easy

Finished Size: 13” (33 cm) wide at neck, 9” (13 cm) long

Materials:
Medium Weight Yarn (approximately 350 yards)
Crochet Hook F (3.75 mm)
crochet yarn size 4

The loop on the knot stitch is approximately 3/4″ long. How to crochet knot stitch?

Crochet Pattern: Capelet
Round 1: Ch 150 (or multiple of 3), ch 1, sl st in first ch forming loop, place marker
Round 2: sc in each ch around
Round 3: sl st in next sc, ch 2, dc in each sc around, sl st on top of ch-2
Round 4: (make 2 knots, skip 2 dc, sl st in next dc) around
Round 5 – 13: (make 2 knots, skip 1 knot, sl st in next knot) around
Finish off.

Crochet Tips:

  • To change the size of the neck hole, simply alter the number of chains made in round 1.
  • To change the length of the capelet, repeat the last round of pattern until the capelet is the desired length.
  • To crochet a less dense capelet, use a larger hook and vice versa for a denser capelet.
  • For a thicker capelet, make 2 layers of knot stitches by repeating round 5 – 13 then sewing the bottom of the capelet to the top of round 4.

Have a question about this pattern? Leave it as a comment!

How to Crochet: Knot Stitch

By Rachel Choi – March 10th, 2009 59 Comments

This tutorial is for both right and left handed people. For left handed pictures, roll your mouse over the image and it will change for you.

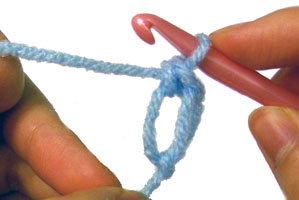
The knot stitch has many different names: Love Knot, Lovers’ Knot, True Lovers’ Knot, Solomon’s Knot or Hail Stone. The knot stitch is composed of a long loop with at knot at the end. When you make several knot stitches in a pattern, it give a very light, elegant and lacey look.

Step 1: Start with a slip knot on your hook.


Step 2: Pull loop that is on your hook to the desired length. Try ½ to 1 inch.


Step 3: Yarn over and pull through. This creates an elongated chain stitch.


Step 4: Single crochet in the back ridge of the chain. In the image for right handed crocheters the ridge is located on the far left and vice versa in the left handed picture.


This image shows the hook inserted into the back ridge.

This image shows the complete knot stitch after the single crochet.

Repeat step 2 to 4 to make a chain of knot stitches.

To make rows of knot stitches, you can slip stitch or single crochet in the knots of previous knot stitches.

If you need help with how to crochet the knot stitch, leave your question as a comment and I would be glad to help!