By Rachel Choi – February 9th, 2009
93 Comments
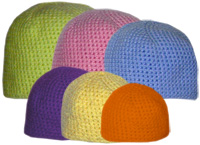
| To crochet a beanie there are many crochet patterns you can use. The basic idea in crocheting a beanie is to start by making the top of the beanie, to do so crochet multiple stitches into a circular shape. Then crochet around the circle, slowly increasing the number of crochet stitches in each round. Once the crocheted beanie is as wide as you want it, keep crocheting without increasing the width. Continue to crochet in circles around the rim of your beanie until it’s the length that you want. |
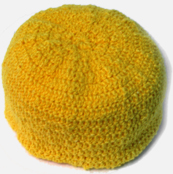 |
It’s very easy to learn how to crochet a beanie. Here is a free, very easy crochet pattern of a beanie that uses the double crochet stitch.
| Skill Level: |
 |
Finished Size: 4 1/2’’(12 cm) tall, 7’’ (18 cm) diameter
Materials:
Medium Weight Yarn (approximately 100 yards)
Crochet Hook F (3.75 mm) |
 |
Gauge:
17 sc = 3’’
8 rows = 2’’
Gauge Swatch: 3’’w x 2’’h (7.5cm x 5cm) ch 18.
Row 1: sc in second ch from hook and in each ch across
Row 2 – 8: ch 1, turn, sc in each sc across
Finish off.
Crochet Pattern: Beanie
Round 1: ch 5, sl st in 5th ch from hook, 10 dc in loop, place marker
Round 2: 3 dc in each dc around
Round 3: (2 dc in next dc, dc in next dc) around
Round 4: (2 dc in next dc, dc in next 2 dc) around
Round 5: (2 dc in next dc, dc in next 3 dc) around
Round 6: (2 dc in next dc, dc in next 4 dc) around
Round 7 – 15: dc in each dc around
Finish off.
Need help understanding the abbreviations? Check out the crochet abbreviation chart.
If you find that your crocheted beanie is not the right size, make alterations by increasing or decreasing the number of double crochet stitches in each round or changing the number of rounds. You may also like to change colors in each round to make stripes or use a different crochet stitch, such as a single crochet stitched beanie, to give your beanie a different look.
If you need help with crocheting the beanie, leave a comment and I would be glad to help you!
By Rachel Choi – February 7th, 2009
21 Comments
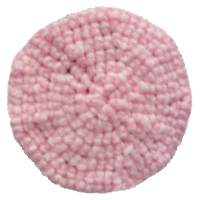
Crocheting a circle is very simple. The basic idea is to start with a small loop and continue to increase the number of crochet stitches each time you crochet around the loop. By increasing the number of crochet stitches in a easy to follow, symmetric pattern, you will create a flat circle.
Crocheting in a circular fashion is great for creating household items such as pot holders, dish clothes, facial scrubs, and coasters. Crocheting a circle is also a primary way to start patterns for hats, beanies and dolls.
To learn how to crochet a circle, follow the simple pattern below. Any size yarn and crochet hook can be used, since circles come in all shapes and sizes.
Crochet Pattern: Circle
Round 1: ch 2, 6 sc in second ch from hook, place marker
Round 2: 2 sc in each sc around
Round 3: (2 sc in next sc, sc in next sc) around
Round 4: (2 sc in next sc, sc in next 2 sc) around
Round 5: (2 sc in next sc, sc in next 3 sc) around
Round 6: (2 sc in next sc, sc in next 4 sc) around
Round 7: (2 sc in next sc, sc in next 5 sc) around, sl st in next sc, finish off
|
 |
Need help understanding the abbreviations? Check out the crochet abbreviation chart.
To Crochet a larger circle, do not slip stitch and finish off in round 7, instead continue with this pattern until your circle is of desired length. You may also want to try using different crochet stitches, such as double crochet, to get a different look. Changing yarn colors can also give a very pretty pattern, such as stripes or checkers.
If you need further explanation for how to crochet a circle, leave a comment and I would be glad to help!
By Rachel Choi – February 6th, 2009
61 Comments
Crocheting a granny square is a very simple pattern that is repeated around in a square shaped fashion. Granny squares are commonly used to make baby blankets and afghans. They can also be used to make scarves, clothing, washcloths and coasters. The usage for granny squares is unlimited.
Learning how to crochet a granny square is very easy, just use the below pattern to get started! Gauge is not important since granny squares can be many different sizes.
|
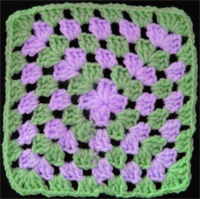 |
Crochet Pattern: Granny Square (updated 2/19/2010)
Round 1: ch 4, sl st in forth ch from hook forming a loop
Round 2: ch 3 (counts as 1 dc now and throughout), 2 dc in loop, ch 2, (3 dc in loop, ch 2) 3 times, sl st in top of beginning ch-3: 12 dc
Note: at the end of this round and all following rounds, you may change yarn color if desired
Round 3: ch 3, turn, 2 dc in next ch-2 space, ch 2, 3 dc in same ch-2 space, ch 2, (3 dc in next ch-2 space, ch 2, 3 dc in same ch-2 space, ch 2) 3 times, sl st in top of beginning ch-3: 24 dc
Round 4: ch 3, turn, 2 dc in next ch-2 space, (ch 2, 3 dc in next ch-2 space, ch 2, 3 dc in same ch-2 space, ch 2, 3 dc in next ch-2 space) 3 times, ch 2, 3 dc in next ch-2 space, ch 2, 3 dc in same ch-2 space, ch 2, sl st in top of beginning ch-3: 36 dc
Need help understanding the abbreviations? Check out the crochet abbreviation chart.
Continue this pattern to increase the size of the granny square. Here is the basic idea for the granny square pattern:
- For corner spaces (each round has 4 corners): 3 dc in ch-2 space, ch 2, 3 dc in same ch-2 space
- For side spaces (each round adds one more ch-2 space to each side): 3 dc in ch-2 space
- Each round will have 12 more double crochets than the previous round.
When moving from one loop to the next, always chain 2, thus each set of 3 double crochets is separated by 2 chains.
If you are having problems crocheting a granny square, no worries! Just leave a comment and I will be sure to help.
By Rachel Choi – February 5th, 2009
93 Comments
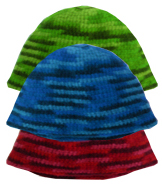
| To crochet a beanie there are many different crochet patterns that you can learn. The basic idea is to start from the top of the beanie by crocheting multiple stitches into a circular shape. Then the number of stitches is slowly increased each time you crochet around the circle to form the shape of the beanie. Once the crocheted beanie is as wide as you want it, keep crocheting without increasing the width. Continue to crochet in circles around the rim of your beanie until it is the length that you desire. |
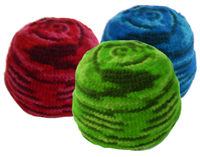 |
It is very easy to learn how to crochet a beanie using basic crochet stitches and patterns. Here is a free easy crochet pattern of a beanie to help you get started.
Gauge:
17 sc = 3’’
8 rows = 2’’
Gauge Swatch: 3’’w x 2’’h (7.5cm x 5cm) ch 18.
Row 1: sc in second ch from hook and in each ch across
Row 2 – 8: ch 1, turn, sc in each sc across
Finish off.
Crochet Pattern: Beanie
Round 1: ch 2, sc 10 in second ch from hook, place marker
Round 2: 2 sc in each sc around
Round 3: (2 sc in next sc, 1 sc in next sc) around
Round 4: (2 sc in next sc, 1 sc in next 2 sc) around
Round 5: (2 sc in next sc, 1 sc in next 3 sc) around
Round 6: (2 sc in next sc, 1 sc in next 4 sc) around
Round 7: (2 sc in next sc, 1 sc in next 5 sc) around
Round 8 – 9: (2 sc in next sc, 1 sc in next 10 sc) around
Round 10 – 11: sc in each sc around
Round 12: (2 sc in next sc, 1 sc in next 10 sc) around
Round 13 – 17: sc in each sc around
Round 18 – 19: (2 sc in next sc, 1 sc in next 15 sc) around
Round 20 – 31: sc in each sc around
Finish off
Need help understanding the abbreviations? Check out the crochet abbreviation chart.
If you find that the crochet beanie pattern is too big or too small, feel free to make alterations as needed by increasing or decreasing the number of crochet stitches in each round or changing the number of rounds. You may also like to change colors in each round to make stripes or use a different crochet stitch to give your beanie a different look, such as a double crochet stitched beanie.
If you need help with crocheting the beanie, leave a comment and I would be glad to help you!
By Rachel Choi – February 4th, 2009
2 Comments
Most published crochet patterns have symbols that represent the skill needed to complete the pattern. The symbol represents how easy or difficult the pattern will be. These symbols are created by the Craft Yarn Council of America’s Standards & Guidelines for Crochet. The chart below describes each symbol.
 |
Projects for first-time crocheters using basic stitches. Minimal shaping. |
 |
Projects using yarn with basic stitches, repetitive stitch patterns, simple color changes, and simple shaping and finishing. |
 |
Projects using a variety of techniques, such as basic lace patterns or color patterns, mid-level shaping and finishing. |
 |
Projects with intricate stitch patterns, techniques and dimension, such as non-repeating patterns, multi-color techniques, fine threads, small hooks, detailed shaping and refined finishing. |
By Rachel Choi – January 29th, 2009
252 Comments
| Abbreviation |
Description |
| [ ] |
work instructions within brackets as many times as directed |
| ( ) |
work instructions within parentheses as many times as directed |
| * |
repeat the instructions following the single asterisk as directed |
| * * |
repeat instructions between asterisks as many times as directed or repeat from a given set of instructions |
| : |
instructions after (to the right of) the colon indicates the total stitch count for the row |
| alt |
alternate |
| approx |
approximately |
| beg |
begin/beginning |
| bet |
between |
| BL |
back loop(s) |
| bo |
bobble |
| BP |
back post |
| BPdc |
back post double crochet |
| BPsc |
back post single crochet |
| BPtr |
back post treble crochet |
| CA |
color A |
| CB |
color B |
| CC |
contrasting color |
| ch |
chain stitch |
| ch- |
refers to chain or space previously made: e.g., ch-1 space |
| ch-sp |
chain space, the space made by the chain |
| CL |
cluster |
| cm |
centimeter(s) |
| cont |
continue |
| dc |
double crochet |
| dc2tog |
double crochet 2 stitches together |
| dec |
decrease/decreases/decreasing |
| dtr |
double treble |
| FL |
front loop(s) |
| foll |
follow/follows/following |
| FP |
front post |
| FPdc |
front post double crochet |
| FPsc |
front post single crochet |
| FPtr |
front post treble crochet |
| g |
gram |
| hdc |
half double crochet |
| inc |
increase/increases/increasing |
| lp(s) |
loops |
| m |
meter(s) |
| MC |
main color |
| mm |
millimeter(s) |
| oz |
ounce(s) |
| p |
picot |
| pat(s) or patt |
pattern(s) |
| pc |
popcorn |
| pm |
place marker |
| prev |
previous |
| rem |
remain/remaining |
| rep |
repeat(s) |
| rnd(s) |
round(s) |
| RS |
right side |
| sc |
single crochet |
| sc2tog |
single crochet 2 stitches together |
| sk |
skip |
| sl st |
slip sitich |
| sp(s) |
space(s) |
| st(s) |
stitch(es) |
| tch or t-ch |
turning chain |
| tbl |
through back loop |
| tog |
together |
| tr |
treble crochet |
| trtr |
triple treble crochet |
| WS |
wrong side |
| yd(s) |
yard(s) |
| yo |
yarn over |
| yoh |
yarn over hook |
Feel free to leave a comment if there are crochet abbreviations that are missing or if you need further explanation of an abbreviation. Your input is greatly appreciated!
By Rachel Choi – January 29th, 2009
2 Comments
Greetings fellow crocheters, I am Rachel the crochet enthusiast. Here at Crochet Spot I will share all of my very own crochet patterns, tips, ideas and things that I learn on the way.Â
Crochet Spot will soon be filled with plenty of crochet patterns including everything from stuffed animals, household accessories, clothing and afghans. If there’s a crochet pattern you are looking for, Crochet Spot will definitely be the spot to look. If you would like to share your crochet patterns or ideas with others, Crochet Spot is just the place to do so.Â
One of the most important aspects of Crochet Spot is to make crocheting easy to learn for beginners by providing tutorials, guides and detailed patterns. I remember my frustration when I didn’t understand crochet lingo, therefore, I would love to make it easier for others to learn.Â
I welcome you to Crochet Spot, the place to be hooked on crocheting!

